Battle of Ismailia
| ||||||||||||||||||||||||||||||
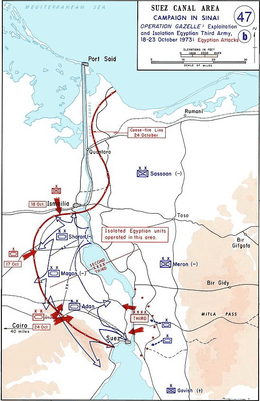
The Battle of Ismailia took place between the Egyptian Army and the Israeli Defense Forces (IDF) during the last stages of the Yom Kippur War during October 18–22, 1973, south of the city of Ismailia, on the west bank of the Suez Canal in Egypt. The battle itself took place as part of the larger IDF-launched Operation Abiray-Lev, in an attempt to seize Ismailia and thereby sever the logistical and supply lines of most of Egypt's Second Field Army across the Suez Canal.
Breaking out of their newly established bridgehead west of the Canal at the northern end of the Great Bitter Lake, the IDF launched an offensive from Deversoir toward Ismailia. A combined force of Egyptian paratroopers and commandos fought a delaying battle, falling back upon defensive positions further north under increasing pressure from IDF infantry and armor. By October 22, they were occupying a last line of defense, including positions along the Ismailia canal. Though outnumbered, they repulsed a final Israeli effort to capture the city; a United Nations ceasefire was then imposed, bringing the battle to an end. The Egyptians registered a tactical and strategic victory in the defense of Ismailia, stopping an encirclement of their large forces on the east bank of the Suez Canal and ensuring their supply lines remained open.
Background
On October 6, 1973, Egypt launched Operation Badr, which started the Yom-Kippur War. It succeeded in crossing the Suez Canal and establishing bridgeheads on the east bank in Israeli-occupied Sinai, and counter-attacks by launched by Israeli reserves were unsuccessful. By October 10, fighting along the front had come to a lull.[1][2] Egyptian President Anwar Sadat soon ordered an offensive to seize the strategic Sinai mountain passes, despite protests and objections by his senior commanders against such an offensive. Sadat hoped to divert Israeli pressure from the Syrians. The October 14 offensive was ill-planned and ill-executed, and culminated in heavy Egyptian losses without achieving any objectives.[3][4][5]
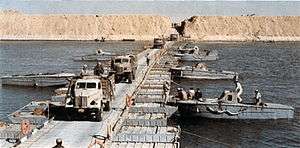
The failed Egyptian offensive gave the initiative to the Israelis, who immediately launched Operation Abiray-Lev, aiming to cross the canal between two Egyptian armies in order to encircle Egyptian forces on the east banks and cut their supply lines. Optimistically planned, the operation began smoothly, but quickly ran into problems. The Israelis faced difficulties in establishing a corridor to the canal due to unexpectedly determined resistance by Egyptian defenses, in what became known as the Battle of the Chinese Farm. After several days of heavy fighting, they were able to secure the roads to the canal, and by October 18 had two bridges laid down at Deversoir, at the northern end of the Great Bitter Lake. By the next day there were three Israeli armored divisions across the canal. Two advanced south toward Suez City, while the 143rd Armored Division under Major General Ariel Sharon advanced north to seize Ismailia, hoping to sever the supply lines to three Egyptian divisions of the Second Field Army across the canal.[6][7]
Prelude

The west bank of the canal was lined with a series of ramparts up to 30 meters (98 ft) high, which the Egyptians referred to as "strong points". These were used during the opening days of the war to allow Egyptian forces to directly fire on the Israelis on the east bank. There were five strong points between the Great Bitter Lake and the Ismailia Canal, from north to south: a pumping station at Deversoir, the village of Serabaeum, Touscan, Heneidac and Jebel Mariam.[8] The area was largely agricultural, intersected with dikes and irrigation ditches, although these did not present significant obstacles. There were several villages and numerous farms, especially orchards of mango and orange trees. The density of foliage made the terrain unsuitable for vehicles. The Israelis called it the "jungle" or "Vietnam".[9] West of the Suez Canal, and running parallel to it, was the Sweetwater Canal, which distributed freshwater to the inhabitants of the canal zone and its cities. It branched from the Ismailia Canal, running east from the Nile River near Cairo to Lake Timsah at Ismailia. There were four bridges across the Ismailia Canal. The first was the Abu Gamus Bridge at Ismailia. Two bridges, one railroad and one vehicular, were located at the village of Nafisha, on the western outskirts of Ismailia. Further west was the Upper Bridge, as it was called.[10] Engineers had wired the bridges with demolition charges for destruction should they fall to the Israelis. Second Army's reserve included the 10th and 118th Mechanized Infantry Brigades, with the latter occupying a series of fortified defenses on the northern bank of the Ismailia Canal.[11]
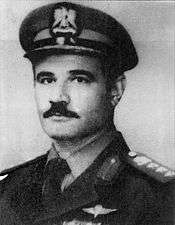
The 182nd Paratrooper Brigade, comprising the 81st, 85th and 89th Battalions (each composed of three companies) under the command of Colonel Ismail Azmy, was assigned responsibility for defending the area south of Ismailia against an Israeli offensive. Azmy arrived at Nafisha with the bulk of his brigade at midnight on October 17, where he was briefed by Brigadier General Abd el-Munim Khalil, commander of Second Army. Khalil identified the west bank strong points as objectives for the paratroopers to secure, as the ramparts could be used to provide fire support to Egyptian forces on the east bank. The paratroopers would also hold Serabaeum and the bridges there over the Sweetwater Canal.[8][12]
The 85th Paratrooper Battalion, commanded by Lieutenant Colonel 'Atef Monsif, had been involved in a recent counter-attack against Deversoir. Despite breaking through in certain areas and even seizing part of the airstrip at Deversoir, the paratroopers and their supporting armor were greatly outnumbered and the counter-attack failed. The battalion suffered around a hundred dead, missing or wounded, and by dawn on October 18 it had been pulled back to Inshas Military Base for reorganizing. The only other Egyptian forces in the area were commandos, the 73rd Battalion of the 129th Sa'iqa (lightning) Group. The Sa'iqa had also been engaged in heavy fighting at Serabaeum, Deversoir and the nearby military base of Abu Sultan. By late October 17, the battalion's two companies had been ordered to withdraw from the vicinity of Deversoir northward to defend Serabaeum.[13][14][15]
On October 18, Sharon's division across the canal included the 243rd Paratrooper Brigade under Colonel Danny Matt and an armored brigade under Colonel Haim Erez. Sharon, wanting to expand the Israeli bridgehead northward, received permission to cross a third unit, an armored brigade under Colonel Amnon Reshef, to the west bank, and did so on October 19. The paratroopers and part of the armor had been holding the Israeli bridgehead since October 16, facing little resistance, while Reshef's brigade had been involved in heavy fighting at the Chinese Farm until it was relieved by Israeli reinforcements.[16][17]
Battle
First day

On the morning of October 18, Israeli paratroopers began their first push northward. Sharon ordered the attack, even though he had not yet received permission to launch an offensive in that direction. An Israeli battalion moved toward Serabaeum, spearheaded by a company mounted in half-tracks. The village was then occupied by a company of the 73rd Sa'iqa battalion, and the defenders received a platoon of reinforcements to compensate losses. The Israelis began receiving fire as they approached the town, but the battalion commander decided to push ahead. As they entered the village, they encountered heavy resistance, and the lead half-track was cut off. Fourteen men including the company commander, Captain Asa Kadmoni, managed to take cover in one of the houses. Kadmoni took up a position covering several approaches and, with ammunition passed on to him by others, held his position for over three hours, engaging the Egyptians at ranges of 10 meters (33 ft) to 15 meters (49 ft), hitting their positions with his LAW anti-tank weapon. Other paratroopers with armor managed to reach the unit and retrieve them, before the Israelis withdrew under Egyptian pressure. The paratroopers suffered 11 killed and 27 wounded in the attack. Kadmoni would be awarded the Medal of Valor for his performance that day.[18][19][20]
The Sa'iqa battalion's other company was occupying positions just north of Abu Sultan. Despite receiving the order to retreat during the night of October 17–18, the Egyptians were heavily outnumbered and the intensity of the fighting prevented them from withdrawing from their positions. Consequently, Heikal ordered artillery barrages on the area, including the Sa'iqa company's position, inadvertently leading to friendly-fire casualties. Soon after the firing subsided, Israeli paratroopers attacked at morning, and severe fighting, including hand-to-hand combat, ensued. Both sides suffered heavy losses, but the Sa'iqa held its position. At night, both companies retreated. The 73rd Battalion sustained 85 casualties, including 11 officers, throughout the fighting on October 18, and subsequently was withdrawn to be reconstituted.[21]

That morning, Azmy's paratroopers moved south to their objectives, reaching them with relative ease. The 89th Battalion occupied all five strong points between Jebel Mariam and the pumping station. The commander made the mistake of separating his forces equally among all five strong points, rather than concentrating his forces at the southernmost strong points. However, from the rampart at the pumping station, the paratroopers could clearly see the Israeli pontoon bridge at Deversoir, and corrected artillery fire being directed against the bridge. Second Army's artillery forces continued to fire almost unceasingly until the following day, sometimes scoring hits on the bridge. Egyptian artillery fire against the bridges would inflict heavy casualties on the Israelis until the end of the war.[17][22][23][note 1]
The accuracy of the Egyptian artillery strikes alerted the Israelis, who attacked the strong point at the pumping station with armor and seized it. Instead of concentrating forces for a counter-attack, the battalion commander used only the forces originally assigned to the strong point in a counter-attack to regain it, which inevitably failed due to the paucity of forces. Meanwhile, the 81st Battalion reached Serabaeum where they established defenses, mainly at a position south of the railway station, at a hill called Orcha by the Israelis. At this point, only these two paratrooper battalions were positioned between Sharon's division and the Ismailia Canal.[12][25]
During the afternoon that day, Egyptian Chief-of-Staff Saad el-Shazly arrived at Second Army Headquarters in Ismailia, at President Sadat's request. Shazly sought to assess the situation and to work with Khalil on a plan to counter the Israeli advance. They agreed to withdraw the 15th Armored Brigade from the east bank and keep it north of Ismailia as a reserve force, and to have Egyptian forces on the east bank attack southward to sever or at least narrow the Israeli corridor to the canal. Azmy's brigade meanwhile would continue defending the area south of the Ismailia Canal, and additional Sa'iqa units would be committed. Shazly also solved a major problem concerning anti-tank weaponry. Azmy's brigade was almost completely lacking anti-tank weapons; it had been stripped of its anti-tank guided missile (ATGM) battalion, equipped with AT-3 Saggers and RPG-7s, which was sent to the east bank to support the initial offensive. This battalion, and a second belonging to the 118th Infantry Brigade, were now withdrawn from the east bank throughout October 18 and brought back to their units. Shazly and Khalil carried out these orders in relative secrecy, as they were disobeying direct orders from Sadat and the Minister of War, Ahmed Ismail, not to withdraw any units from the east bank.[26][27] Several measures decided upon were not implemented however.[note 2]
Second day
Amnon Reshef's armored brigade completed its crossing that morning, and joined Sharon's division, just as the latter received actual approval to begin an offensive toward Ismailia. In the meantime, the 85th Battalion had completed reorganizing at Inshas Base and returned to Ismailia, where it was placed under Azmy's command once again.[29][30] The 129th Sa'iqa Group retreated to Abu Suweir, north of Ismailia, to reorganize, and Heikal was also informed of his group's new area of operations, with the objective of defending the Upper Bridge, and the crucial Cairo-Ismailia Desert Road that incorporated the bridge.[31]
Sharon ordered Matt to push northward to Serabaeum again, where paratroopers of the 81st Battalion were occupying defenses. The attack failed once more, and Sharon now sent Reshef on Matt's left flank. Using a battalion of some thirty tanks with mechanized infantry, Reshef used his superior maneuverability to flank the Egyptian position.[note 3] There was heavy, close-quarter fighting in the trenches, and extra units were brought up against the Orcha position. The paratroopers reported their defenses to have been penetrated during the afternoon, and they later withdrew after detonating the bridges over the Sweetwater Canal at Serabaeum. The Israelis captured Egyptian positions in the area, and discovered that Orcha Hill contained a major Egyptian radio intercept station. The capture of Orcha caused the collapse of Egyptian defenses in the area; the paratroopers pulled back to the village of Ain Ghasin five kilometres north, and Azmy ordered the 89th Battalion to withdraw to the adjacent Touscan strong point, abandoning the ramparts at Serabaeum. These were occupied by the Israelis, which they used to fire on Egyptian positions across the canal. The Egyptians hastily organised defenses at Touscan.[30][33][34] This new line of defenses was just over 12 kilometres south of Ismailia.[35]
Meanwhile, Egyptian General Headquarters (GHQ) in Cairo, sent the 139th Sa'iqa Group with its two battalions to Ismailia. They were given the objective of eliminating Israeli forces up to the Deversoir area and destroying Israeli bridges across the Suez Canal. A team of frogmen was attached for that end, and the group had no armor or heavy weaponry, and their only transports were large military trucks. GHQ did not include Second Army command in any of the planning, and in fact only notified Second Army of the operation on the morning of October 19, when the Sa'iqa Group had already begun moving to Ismailia from Cairo. This alarmed Second Army command, and Khalil ordered military police to stop the 139th Sa'iqa Group's vehicles at Abu Suweir, and have its commander, Colonel Osama Ibrahim, arrive at his headquarters in Ismailia. Ibrahim arrived that evening and met Khalil and Shazly. Both men were shocked when they learned of Ibrahim's objectives, imaginary as they were and impossible to achieve, an indication of the state of confusion in GHQ at the time. Khalil canceled the entire operation and placed the Sa'iqa unit under Second Army's command instead, and Ibrahim in turn notified GHQ of his new orders. By midnight he was at Khalil's headquarters once more, where he was informed GHQ's reply: Ibrahim would proceed with his original mission.[36]
Third and fourth days
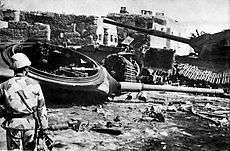
Starting at sunrise on October 20, the Israeli Air Force launched aerial attacks for the duration of the day, targeting Ismailia, the nearby al-Galaa' army base, and Jebel Mariam. Close air support was also provided to advancing ground forces. Israeli aircraft employed ordnance fitted with time fuses, as well as napalm to demoralize Egyptian troops.[37] Shazly left Ismailia that evening, returning to Cairo where he presented a grim evaluation of the military situation to GHQ. His recommendation to withdraw armored forces to counter the Israeli threat on the west bank created a serious command crisis, and ultimately no withdrawal took place.[38]
Sharon renewed his division's attack that day, moving north from Serabaeum on a three brigade front, with Matt on the right, Erez in the center, and Reshef on the left. The advance spanned the entire area between the Suez Canal on the east and the Sweetwater Canal on the west. By dawn, both Touscan and Ain Ghasin were under attack. The 89th Battalion had concentrated all its forces at the Touscan strong point, where it was hard-pressed by superior Israeli armored and mechanized forces. Azmy reported the situation to Second Army headquarters, and requested permission to detonate a nearby bridge on the Sweetwater Canal and flood the area before the advancing Israelis. Khalil however issued strict orders not to do so, since the canal was a crucial source of drinking water to civilians all the way up to Suez city. The situation was deteriorating for the paratroopers however, and Azmy soon had the bridge destroyed and broke down sections of nearby irrigation canals, flooding the entire area and submerging Israeli tanks up to their hulls in muddy water. This led to the paratroopers of Matt's brigade spearheading the advance in the center instead, while the armored brigades were forced to have their mechanized infantry push ahead on foot. The Touscan position remained under heavy air and artillery attack, and by midday it was surrounded. Losses due to death and injury left the battalion with some 120 paratroopers still able to fight.[39][40]
Meanwhile, the 81st Battalion was able to hold Ain Ghasin until the afternoon, when it retreated to Nefisha. As for the reconstituted 85th Battalion, it was ordered to occupy Jebel Mariam, Heneidac and Touscan. The battalion's commander, Lt. Col. Monsif, found during a reconnaissance that Touscan was surrounded by large Israeli forces and under heavy fire, and so limited his battalion's defenses to Jebel Mariam and Heneidac only, occupying the former with the battalion's main forces, including two companies of paratroopers, and placing a single company at Heneidac.[41]
The 139th Sa'iqa Group, having had its mission confirmed by GHQ, began moving southward from Ismailia at sunset. Both battalions advanced in columns, each pushing a company ahead as a vanguard. Col. Ibrahim sent four patrols ahead to reconnoitre, and only one returned; the rest were considered missing. As the Sa'iqa group moved south, they encountered groups of Egyptian paratroopers from the 81st and 89th Battalions, retreating northward under Israeli pressure. When the unit neared Ain Ghasin they were ambushed by an Israeli force. An intense firefight took place as the vanguard engaged the Israelis, after some of their transports had been hit. Soldiers disembarked their vehicles and took cover in nearby farms and orchards. The vehicles and transports were turned back with great difficulty, and the entire Sa'iqa group soon began to retreat to a position south of the village of Abu 'Atwa, itself roughly 3 kilometres south of Ismailia. Ibrahim called for artillery support, but the Israelis were jamming and interfering his radio net, and communicated with him in Arabic. This led to Israeli artillery fire falling on his forces instead. The Egyptians suffered few casualties though, due to the density of the mango trees, which minimized the hit radius of artillery rounds and provided cover from shrapnel.[42]
Retreat to Ismailia Canal

Meanwhile, Heikal was able to contact Ibrahim and asked him to arrive at headquarters in Ismailia due to a change in orders, and he arrived sometime after midnight. Khalil had managed, after a lengthy and drawn-out conversation, to convince GHQ to cancel the operation and place the 139th Sa'iqa Group under his command to assist in fortifying Ismailia instead of sacrificing the elite force in a suicidal mission, and GHQ finally acquiesced. Ibrahim was now tasked with occupying and defending Abu 'Atwa and Nefisha. He reorganized his force, and occupied both villages with a battalion each by dawn on October 21.[37]
Despite the near-debacle, the commitment of the Sa'iqa, along with the paratroopers of the 85th Battalion, had actually reinforced Egyptian defenses and helped defeat the Israeli attack. The battle continued south of Lake Timsah in see-saw fashion, raging back and forth, but by nightfall on October 20 the Israelis had made no progress, and the Egyptian paratroopers were firmly in control of Touscan. According to Trevor N. Dupuy, by this time Israeli artillery fire had made the main Cairo-Ismailia road unusable.[30][43]
Azmy lost contact with the 89th Battalion during the night, due to the intensity of Israeli bombardment on Touscan. At morning on October 21 the Israelis attacked again, and the paratroopers managed to repulse the attack again, before falling back. By dusk the battalion had abandoned the Touscan strong point and managed to retreat northward. Azmy had the 81st and 89th Battalions pulled back to the Ismailia Stadium, where they were to be reconstituted. The Israelis also attacked Heneidac at dawn that day using armor and infantry with air and artillery support, and captured the position before noon. The paratrooper company there pulled back north and joined the rest of the 85th Battalion at Jebel Mariam, now the only defensive position occupied by the 182nd Paratrooper Brigade, and the last position on the Suez Canal before Ismailia.[30][41]
Israeli command conflict
During this time, Major Generals Shmuel Gonen and Chaim Bar-Lev, the heads of Israeli Southern Command and Sharon's superiors, continued to press Sharon to send forces to the east bank to widen the corridor to the Israeli bridgehead, while Sharon ignored these commands repeatedly, claiming that the attacks were unnecessary. Gonen finally issued a peremptory order to Sharon to transfer troops to the east bank and conduct a full-scale attack to widen the corridor. Sharon only sent five tanks as reinforcement to the armored brigade on the east bank tasked with launching the attack. Consequently, the Israelis suffered heavy losses and the assault was repulsed. Gonen and Bar-Lev were now joined by Lieutenant General David Elazar, and ordered Sharon to renew the attack, this time transferring Reshef's brigade. Sharon opposed this however, and argued that if he succeeded in his mission, the Egyptian Second Army would collapse, thereby eliminating any Egyptian threat to the Israeli corridor and bridgehead. He retorted with the claim that had it not been for Southern Command's hesitation, he could have encircled Ismailia by now. When his superiors remained adamant, Sharon bypassed the chain of command and contacted the Minister of Defense, Moshe Dayan, who called off any further attacks on the east bank. As a result, Sharon would be able to concentrate his attention and the efforts of his three brigades in the final push to capture Ismailia.[44][45][46][47]
Fifth day
Egyptian preparations
With Egyptian forces occupying a final line of defense, Khalil focused on preventing any Israeli crossing of the Ismailia Canal. To this end, he concentrated a large amount of firepower from various artillery units. Following the Israeli crossing, Brigadier General Abd al-Halim Abu Ghazala, commander of Second Army artillery, had managed to reorganize around ten artillery battalions in fire bases north of the Ismailia Canal, and incorporated the divisional artillery of Egyptian units on the east bank of the Suez Canal – an additional eight battalions. Abu Gazala thus had at his disposal between 12 and 16 battalions available for a single barrage incorporating a total of some 280 artillery guns. He also organized anti-tank defenses, emplacing eight Sagger launchers at the easternmost Upper Bridge, and allocating six BRDMs with Sagger launchers.[48]
The 118th Mechanized Infantry Brigade was assigned positions occupying the bridges of the Ismailia Canal, and was to defend the city and nearby al-Galaa' army base. The 85th Paratrooper Battalion was directly ordered by Khalil to "hold Jebel Mariam to the last bullet and the last man", due to its critical importance and dominance, overlooking Ismailia itself and the main approaches to the city. In addition to Second Army's supporting artillery, the 182nd Paratrooper Brigade's 120 mm mortar battalion, with eighteen mortars, was attached to the paratroopers at Jebel Mariam, significantly increasing their firepower. As for the 139th Sa'iqa Group, its two battalions occupied Abu 'Atwa and Nefisha, and a company from the battalion at Nefisha was kept in reserve. While preparing defenses, the Sa'iqa were confronted with huge numbers of civilians, mainly farmers, fleeing northward with as many belongings and livestock as possible, cluttering and blocking roads.[49]
Final Israeli attack
Throughout the night of October 21/22, the large artillery forces the Egyptians had concentrated began harassing the Israelis. The Egyptians had identified command posts and tank concentration areas for attack, especially at Serabaeum and Ain Ghasin, as well likely routes of attack, and continued to provide a withering fire support during the Israeli attack.[50] At morning, Israeli aircraft attacked Egyptian positions, concentrating on Jebel Mariam, Abu 'Atwa, Nefisha, and al-Galaa' base, and at noon they destroyed the Abu Gamoos Bridge at Ismailia. At this time, company-sized units of armor and infantry advanced against the Upper Bridge and the bridges at Nefisha but were repelled by Sagger missiles.[51]
At around 10:00 am, the Israelis renewed the attack, moving toward Jebel Mariam, Abu 'Atwa and Nefisha. The paratroopers at Jebel Mariam became engaged in intense fighting but, with their advantageous position, were able to repel the attack by late afternoon. Meanwhile, the Israelis concentrated artillery and mortar fire against the Sa'iqa positions at Abu 'Atwa and Nefisha. At noon, advance Israeli elements engaged with a Sa'iqa reconnaissance unit, and the Israelis lost two tanks and a half-track. At 1:00 pm, an Israeli paratrooper company attacked Abu 'Atwa without first scouting ahead, and was ambushed and annihilated. The attack ended after paratroopers suffered over fifty casualties and lost four tanks.[51]
At the same time, two tank companies and mechanized infantry attacked Nefisha, supported with close air support. The Egyptian commando battalion in charge of Nefisha managed to repel the attack after prolonged, heavy fighting that closed to very short distances. The Israelis lost three tanks, two half-tracks, and a large number of men. For their part the Sa'iqa at Nefisha lost 24 commandos, including four officers, and 42 wounded, including three officers.[47][51] Edgar O'Ballance mentions a counterattack by the Sa'iqa which took place during the afternoon and pushed some of Sharon's troops back along the Sweetwater Canal.[52] The Israeli attack had been thoroughly routed.[14][53]
Aftermath
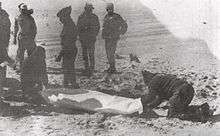
With nightfall, the ceasefire imposed by United Nations Security Council Resolution 338 came into effect at 6:52 pm, ending the battle. A large number of Israeli wounded were still on the battlefield. Sharon requested helicopters to evacuate the wounded, but Bar-Lev replied in the negative, as it was dark and too risky to land helicopters near the battlefield. The Israelis worked to extract the wounded from the battlefield anyway, and the rescue operations took some four hours before most of the wounded were finally evacuated. When sunrise arrived, Israeli paratroopers and Egyptian Sa'iqa sometimes found that there were no more than 20 meters separating their positions, but the ceasefire held.[54][55]
The combined Egyptian paratrooper-commando force managed to achieve a tactical and strategic victory at a time when Egypt's general situation on the battlefield was deteriorating, and GHQ was in a state of confusion. Sharon's advance toward Ismailia had been halted, and Second Army's logistical lines remained secure.[56][57] According to Dupuy, the Israelis remained about ten kilometers south of Ismailia, now mostly a wrecked city.[53]
While the Egyptians attribute their successful defense of the city to their staunch resistance, Sharon would remain adamant after the war that he had failed to capture Ismailia due to Southern Command's interference.[53] Sharon – who was a member of the political opposition in Israel – insisted that political issues played into hampering his advance against Ismailia.[note 4] Sharon would frequently encourage his men by telling them "The secretary of the Likud Party is here with you."[47]
Ismail Azmy's decision to detonate a bridge over the Sweetwater Canal on October 20 in order to stall an Israeli attack, in violation of direct orders not to do so, led to him being relieved of his command on October 25, three days after the ceasefire.[58] Captain Asa Kadmoni, who was awarded Israel's highest military decoration for his actions on October 18, later returned his medal as a protest against his government's defense policy.[note 5]
Post cease-fire reconciliation
Israeli journalist Abraham Rabinovich, in his account of the Yom Kippur War, writes that despite being involved in intense fighting for several days, the Egyptian and Israeli soldiers in the Ismailia sector who survived the battle were among the first to reconcile, even when the first ceasefire was broken in the south and fighting resumed. On the morning of October 23, an Israeli paratroop company under Captain Gideon Shamir was deploying near the Ismailia Canal, when Shamir saw Egyptian commandos, probably from the unit he had engaged the night before, encamped in an orchard less than 100 meters away. Wishing to ensure there would be no more killing in his sector, Shamir instructed his men to cover him and, taking a soldier who spoke Arabic, went to the commandos, shouting "Cease-fire, peace" so as not to surprise the Egyptians. The commandos held their fire as the two Israelis presented themselves, and soon summoned their company commander, who identified himself as Major Ali.[59]
Both men agreed to avoid shooting, and to avoid getting anyone on either side hurt. Ali even surprised Shamir by predicting that Sadat wanted peace with Israel, not just a cease-fire. In coming days, soldiers from both sides would come out to the clearing between their positions and fraternized. When shooting erupted in nearby sectors, they would return to their respective positions. Initially, the Egyptians would fire if it was nighttime, but the Israelis held their fire, and soon the Egyptians stopped firing as well. Soon, the commandos and paratroopers would meet daily, drinking coffee, playing backgammon and soccer, getting to personally know each other, and occasionally holding a kumzits, with the Egyptians slaughtering a sheep and the Israelis presenting food parcels sent from home. The example set by the Egyptians and Israelis here was soon emulated in other sectors, and even Sharon came to see for himself the "local armistice" that had taken place. At one point, two officers came with Ali to meet with Shamir and said they hoped relations between Egypt and Israel would come to match the relations between Shamir's and Ali's men.[59]
Rabinovich writes of this:
The Egyptian commandos and the Israeli paratroopers were at the spearheads of their respective armies. That these motivated fighters, left to themselves, chose at the first opportunity to lay aside their weapons and break bread together on the battlefield said something about what the war had wrought.[59]
Notes
- Footnotes
- ↑ According to Edgar O'Ballance, the Israelis regarded highly the capabilities of Egyptian gunners. During one night of shelling on the Deversoir crossing, "over 100 Israelis were killed and many hundreds were wounded."[24]
- ↑ The 15th Armored Brigade never crossed back to the west bank, while the planned Egyptian counter-attack on the east bank was called off.[28]
- ↑ Shazly had sent a message to GHQ at 9:25 AM notifying them of this particular Israeli attack, saying "The enemy is spreading in groups in the area with between 40 to 50 tanks in Fayed and Serabaem. His forces are wreaking havoc." (original Arabic text reads: ".العدو ينتشر في مجموعات داخل المنطقة من ٤٠ الى ٥٠ دبابة في فايد و سرابيوم. قواته تعيث في الأرض فسادا") sic [32]
- ↑ In fact, Sharon claimed that Major General Abraham Adan was given permission in preference to himself to exploit the Israeli crossing of the Suez Canal and advance southward, attributing this preference to political reasons. Adan reached and encircled Suez city on October 23.[47]
- ↑ For more information regarding the post-war anti-government protests in Israeli, see Motti Ashkenazi.[20]
- Citations
- ↑ Hammad (2002), pp.85–200
- ↑ Gawrych (1996), pp.27–55
- ↑ Hammad (2002), pp.237–276
- ↑ Gawrych (1996), pp.55–57
- ↑ Dupuy (2002), pp.485–490
- ↑ Hammad (2002), pp.293–412, 435–436
- ↑ Gawrych (1996), pp.59–65
- 1 2 Hammad (2002), pp.426–428
- ↑ O'Ballance (1997), p.229
- ↑ Hammad (2002), p.559
- ↑ Hammad (2002), p.438
- 1 2 O'Ballance (1997), p.235
- ↑ Hammad (2002), pp.429–430, 432–433
- 1 2 Gawrych (2000), p.220
- ↑ O'Ballance (1997), p.236
- ↑ Hammad (2002), p.436
- 1 2 Dupuy (2002), p.527
- ↑ Dupuy (2002), pp.527–528
- ↑ Hammad (2002), pp.429–430
- 1 2 O'Ballance (1997), p.238
- ↑ Hammad (2002), pp.430–431
- ↑ O'Ballance (1997), pp.235–236
- ↑ Hammad (2002), pp.428–429
- ↑ O'Ballance (1997), pp.241, 248
- ↑ Hammad (2002), p.429
- ↑ Hammad (2002), pp.433–435
- ↑ Gawrych (2000), pp.220, 223
- ↑ Hammad (2002), pp.447–451, pp.785–786
- ↑ Hammad (2002), pp.544, 436
- 1 2 3 4 Dupuy (2002), p.528
- ↑ Hammad (2002), pp.552–553
- ↑ Hammad (2002), p.544
- ↑ O'Ballance (1997), p.243
- ↑ Hammad (2002), pp.545-546
- ↑ Hammad (2002), p.558
- ↑ Hammad (2002), pp.554–556
- 1 2 Hammad (2002), p.557
- ↑ Gawrych (2000), pp.223–224
- ↑ Hammad (2002), pp.550–551
- ↑ O'Ballance (1997), p.242
- 1 2 Hammad (2002), pp.551–552
- ↑ Hammad (2002), pp.556–557
- ↑ O'Ballance (1997), p.247
- ↑ Gawrych (2000), p.226
- ↑ Dupuy, pp.528–529
- ↑ Hammad (2002), pp.558–559
- 1 2 3 4 O'Ballance (1997), pp.248–249
- ↑ Hammad (2002), pp.561–563
- ↑ Hammad (2002), pp.563–564
- ↑ Hammad (2002), pp.562, 564
- 1 2 3 Hammad (2002), p.566
- ↑ O'Ballance (1997), p.249
- 1 2 3 Dupuy (2002), p.529
- ↑ Hammad (2002), p.567
- ↑ O'Ballance (1997), p.262
- ↑ Gawrych (1996), p.73
- ↑ Gawrych (2000), pp.220, 231
- ↑ Hammad (2002), p.551
- 1 2 3 Rabinovich (2004), pp.513–515.
References
| Wikimedia Commons has media related to Battle of Ismailia. |
- Bibliography
- Dupuy, Trevor N. (2002). Elusive Victory: The Arab-Israeli Wars, 1947-1974. Military Book Club. ISBN 0-9654428-0-2.
- Gawrych, George (2000). The Albatross of Decisive Victory: War and Policy Between Egypt and Israel in the 1967 and 1973 Arab-Israeli Wars. Greenwood Publishing Group. ISBN 0-313-31302-4.
- Hammad, Gamal (2002). Military Battles on the Egyptian Front (in Arabic) (First ed.). Dār al-Shurūq. ISBN 977-09-0866-5.
- O'Ballance, Edgar (1997). No Victor, No Vanquished: The Arab-Israeli War, 1973. Presidio. ISBN 0-89141-615-3.
- Rabinovich, Abraham (2004). The Yom Kippur War: The Epic Encounter That Transformed the Middle East. Schocken. ISBN 0-8052-1124-1.
- Online Publication
- Gawrych, George (1996). The 1973 Arab-Israeli War: The Albatross of Decisive Victory. Combat Studies Institute, U.S. Army Command and General Staff College. p. 97. In parts: