Battle of Kapyong
| ||||||||||||||||||||||||||||||||||
.jpg)
The Battle of Kapyong (Korean: 가평전투, 22–25 April 1951), also known as the Battle of Jiaping (Chinese: 加平战斗; pinyin: Jiā Píng Zhàn Dòu), was fought during the Korean War between United Nations (UN) forces—primarily Australian and Canadian—and the Chinese communist People's Volunteer Army. The fighting occurred during the Chinese Spring Offensive and saw the 27th British Commonwealth Brigade establish blocking positions in the Kapyong Valley, on a key route south to the capital, Seoul. The two forward battalions—3rd Battalion, Royal Australian Regiment (3 RAR) and 2nd Battalion, Princess Patricia's Canadian Light Infantry (2 PPCLI)—occupied positions astride the valley and hastily developed defences. As thousands of South Korean soldiers began to withdraw through the valley, the Chinese infiltrated the brigade position under the cover of darkness, and assaulted the Australians on Hill 504 during the evening and into the following day.
Although heavily outnumbered, the 27th Brigade held their positions into the afternoon before the Australians were finally withdrawn to positions in the rear of the brigade, with both sides having suffered heavy casualties. The Chinese then turned their attention to the Canadians on Hill 677, but during a fierce night battle they were unable to dislodge them. The fighting helped blunt the Chinese offensive and the actions of the Australians and Canadians at Kapyong were important in assisting to prevent a breakthrough on the United Nations Command central front, and ultimately the capture of Seoul. The two battalions bore the brunt of the assault and stopped an entire Chinese division during the hard fought defensive battle. The next day the Chinese withdrew back up the valley, in order to regroup. Today, the battle is regarded as one of the most famous actions fought by the Australian and Canadian armies in Korea.
Background
Military situation
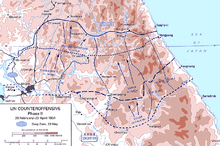
The United Nations counter offensive between February and April 1951 had been largely successful, with the US Eighth Army pushing the Chinese north of the Han River during Operation Killer, while Seoul was recaptured in mid-March during Operation Ripper and UN forces once again approached the 38th parallel.[3] Regardless, the strained relationship between General Douglas MacArthur and US President Harry S. Truman led to MacArthur's dismissal as Commander-in-Chief, and his replacement by General Matthew B. Ridgway.[4] Consequently, on 14 April 1951, General James Van Fleet replaced Ridgway as commander of the US Eighth Army and the United Nations forces in Korea. Ridgway flew to Tokyo the same day to replace MacArthur.[5] Meanwhile, the offensive continued with a series of short thrusts. Operation Courageous, in late March, pushed forward to the Benton Line, 8 kilometres (5.0 mi) south of the 38th parallel, while Operation Rugged in early-April pushed just north of the 38th parallel to the Kansas Line. Finally, in mid-April a further advance moved the US Eighth Army to the Utah Line.[6]
Following the Battle of Maehwa-San the 27th British Commonwealth Brigade had enjoyed a period in corps reserve as the UN forces had continued to push steadily northwards.[7] By April 1951, the brigade consisted of four infantry battalions, one Australian, one Canadian and two British, including: the 3rd Battalion, Royal Australian Regiment; the 2nd Battalion, Princess Patricia's Canadian Light Infantry; the 1st Battalion, Middlesex Regiment and the 1st Battalion, Argyll and Sutherland Highlanders. Brigadier Basil Coad had departed for Hong Kong on compassionate leave on 23 March and the brigade was now under the command of Brigadier Brian Arthur Burke.[4] In direct support was the 16th Field Regiment, Royal New Zealand Artillery (16 RNZA) with its 3.45-inch (88 mm) 25 pounder field guns.[8][9] 3 RAR was now under the command of Lieutenant Colonel Bruce Ferguson, who had replaced Lieutenant Colonel Floyd Walsh following his dismissal in the wake of the Battle of Pakchon on 5 November 1950.[10] 2 PPCLI was commanded at this time by Lieutenant Colonel James Riley Stone.[11] Deployed in the central sector, the brigade was part of the US IX Corps which also included the US 24th Division, South Korean 2nd Division, US 7th Division and the South Korean 6th Division, under the overall command of Major General William M. Hoge.[12][13]
.jpg)
During this time 27th Brigade was attached to the US 24th Division, advancing north through the Chojong valley in late-March, reaching the Benton Line on 31 March. The brigade was then released, advancing with IX Corps up the deep and narrow valley of the Kapyong River, 10 kilometres (6.2 mi) to the east.[14] From 3 April, the 27th Brigade moved further up the river, advancing 30 kilometres (19 mi) over the next twelve days as part of Operation Rugged. Although the valley was not held in strength by the Chinese, it was skilfully defended by small groups of infantry dug-in on the hilltops that overlooked it. Advancing along the flanking hills and ridges the brigade captured successive positions, while encountering heavy resistance before reaching the Kansas Line on 8 April.[6] Following a brief operational pause, the advance 5 kilometres (3.1 mi) to the Utah Line began on 11 April, the day after MacArthur's dismissal. Chinese resistance strengthened noticeably and the brigade's initial objectives were not captured by the Middlesex until 13 April.[15]
The approach to the Utah Line was dominated by two 900 metres (3,000 ft) hills—the 'Sardine' feature 1 kilometre (0.62 mi) north, and 'Salmon' a further 800 metres (870 yd) north. The Middlesex were repulsed during repeated attempts to capture Sardine on 14 April, before the task was allocated to 3 RAR.[15] A Company, 3 RAR subsequently captured the crest, killing 10 Chinese and wounding another 20 for the loss of eight Australians wounded.[16] The following morning, Salmon was captured by C Company without firing a shot, amidst light resistance. Chinese shelling after its capture resulted in two men wounded, while airstrikes then broke up an attempted Chinese counter-attack.[17] Meanwhile, 2 PPCLI continued their advance on the right flank, capturing the 'Turbot' feature (Hill 795) on 15 April. Facing a spirited Chinese delaying action on successive positions, the Canadians did not capture their final objective—the 'Trout' feature (Hill 826)—until the following morning.[18]
Prelude
Opposing forces
After reaching the Utah Line, 27th Brigade was withdrawn from the front on 17 April, handing over its positions to the South Korean 6th Division. Burke subsequently ordered his battalions into reserve positions north of the previously destroyed village of Kapyong, on the main road from Seoul to the east coast.[19] Intelligence indicated that a new Chinese offensive was imminent, and while the brigade settled in to rest it remained on three hours notice to move to support IX Corps.[20] Having been on operations continuously for the past seven months, the British intended to relieve the bulk of the brigade during its period in reserve. The two British battalions—the Argylls and the Middlesex—would be replaced by two fresh battalions from Hong Kong, while Burke and the headquarters of 27th Brigade would be replaced by Brigadier George Taylor and the headquarters of 28th Brigade in late-April. The Canadians were scheduled to transfer to the newly raised 25th Canadian Brigade in May as part of Canada's increased commitment to the war. Advance parties from Brigade Headquarters and the Argylls departed for Seoul en route for Hong Kong on 19 April, while the remaining British battalions were scheduled to depart two weeks later.[20][21] 3 RAR would not be rotated and remained a part of the brigade for the entire war, operating on an individual reinforcement system instead.[20][22]
Meanwhile, planning began for Operation Dauntless, a drive 30 kilometres (19 mi) into the Iron Triangle—a key communist concentration area and communications junction in the central sector between Chorwon and Kumwha in the south and Pyonggang in the north. Contingency planning also included precautions against a further Chinese offensive, in which the US Eighth Army would conduct a delaying defence on successive positions.[20] Further indications of an imminent communist offensive—including the visible strengthening of Chinese and North Korean artillery and logistic systems—led Ridgway to order Van Fleet not to exploit any opportunities beyond the Wyoming Line. Confident nonetheless, Ridgway widened the scope of the offensive, designating a secondary objective line in the eastern sector known as the Alabama Line. Fate would intervene however, and Van Fleet launched his offensive on 21 April only to be met by a much stronger Chinese and North Korean offensive the following night.[5]
.jpg)
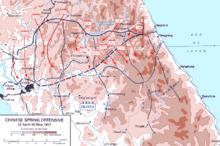
The First Chinese Spring Offensive—also known as the Chinese Fifth Phase Campaign, First Impulse—envisioned the total destruction of the US I and IX Corps above the Han River, involving three Chinese Army Groups—the 3rd, 9th, and 19th Army Groups—and three North Korean corps—the I, III and V Corps—under the overall command of Peng Dehuai, the commander of the Chinese People's Volunteer Army in Korea.[23][24][25][note 1] With the immediate objective of capturing Seoul, the offensive commenced on 22 April on two broad fronts: the main thrust across the Imjin River in the western sector held by the US I Corps involving 337,000 troops driving towards Seoul, and the secondary effort involving 149,000 troops attacking further east across the Soyang River in the central and eastern sectors, falling primarily on the US IX Corps, and to a lesser extent on the US X Corps sector.[26] A further 214,000 Chinese troops supported the offensive; in total more than 700,000 men.[5] As part of the preparation, the battle hardened 39th and 40th Armies of the 13th Army Group were transferred to the 9th Army Group under the overall command of Song Shi-Lun, and Commander Wen Yuchen of the 40th Army was given the mission of destroying the South Korean 6th Division while blocking any UN reinforcements towards the Imjin River at Kapyong.[27][note 2]
Facing the Chinese offensive were 418,000 UN troops, including 152,000 South Koreans, 245,000 Americans, 11,500 British Commonwealth and 10,000 troops from other UN countries.[5] However, with the US Eighth Army not strong enough to prevent large penetrations along its line, masses of Chinese infantry soon swept around its flanks, surrounding entire formations in an attempt to cut off their withdrawal.[28] Standing directly in the path of the main Chinese attack towards Seoul in the I Corps sector was the 29th British Brigade. The brigade's stand on the Imjin River held off two Chinese divisions for two days and ultimately helped prevent the capture of Seoul, but resulted in heavy casualties in one of the bloodiest British engagements of the war. During the fighting, most of the 1st Battalion, Gloucestershire Regiment were killed or captured during a stubborn resistance at the Battle of the Imjin River that saw the commanding officer—Lieutenant Colonel James Carne—awarded the Victoria Cross after his battalion was surrounded.[29] Ultimately the 29th Brigade suffered 1,091 casualties in their defence of the Kansas Line, and although they destroyed a large portion of the Chinese 63rd Army and inflicted nearly 10,000 casualties, the loss of the Glosters caused a controversy in Britain and within the United Nations Command.[30] Meanwhile, further east, in the IX Corps sector, the Chinese 118th Division, 40th Army and the 60th Division, 20th Army prepared to attack the South Korean 6th Division on the night of 22 April.[31]
Battle
South Korean collapse, 22–23 April 1951
The South Koreans were holding positions at the northern end of the Kapyong Valley, having advanced 10 kilometres (6.2 mi) since relieving the 27th Brigade.[12] However, anticipating a Chinese attack, the divisional commander—General Chang Do Yong—had halted his advance at 16:00 and ordered his two forward regiments—the 19th and the 2nd Infantry Regiments—to tie-in and develop defensive positions. Meanwhile, the 7th Infantry Regiment occupied reserve positions immediately behind the forward regiments.[32][33] Suffering a reputation for unreliability in defence the South Koreans had been bolstered by the attachment of the New Zealand guns and a battery of 105-millimetre (4.1 in) M101 howitzers from the US 213th Field Artillery Battalion.[34][35] Regardless, left with only one hour to halt its advance and step up defences, the forward South Korean units were only able to occupy a series of hill-top positions while leaving the valleys and flanks exposed.[33] Two Chinese divisions—the 118th and the 60th Division—struck at 17:00, easily infiltrating through numerous gaps between the badly organised defensive positions.[33] Under pressure all along the front, the defenders gave ground almost immediately and soon broke. Abandoning their weapons, equipment and vehicles, they disintegrated and began to stream south out of the mountains and through the valley, and by 23:00 Chang was forced to admit that he had lost all communication with his units.[36] At 04:00 the decision was made to withdraw the New Zealanders to prevent their loss, however following reports that the South Koreans were making a stand they were ordered back up the valley the next morning with the Middlesex accompanying them as protection. By dusk it was clear that the South Koreans had in fact collapsed, and the guns were withdrawn again.[34][36]
Meanwhile, the US 1st Marine Division was holding firm against the Chinese 39th Army to the east, and the withdrawal of the South Koreans had left their flank exposed.[36] However, with the Chinese 39th and 40th Armies only tasked with protecting the eastern flank of the 9th Army Group against possible counterattacks from the 1st Marine Division, the Chinese did not exploit this opportunity and the Americans remained relatively unmolested.[36][37] Yet with the forward UN positions in both the US I Corps and US IX Corps sectors increasingly untenable as the Chinese exploited gaps between formations, Van Fleet ordered a withdrawal to the Kansas Line in the mid-morning. Hoge subsequently ordered the US Marines to form a new defensive position beyond the Pukhan River, between the Hwachon Reservoir and the new position to be occupied by the South Korean 6th Division. Hoge's plan relied on the South Koreans reforming and offering some resistance, and although a rearguard of 2,500 men was belatedly established it was in no condition to fight.[38] Fearing a breakthrough, Hoge warned out the 27th Brigade, as the corps reserve, to establish defensive positions north of Kapyong on the afternoon of 23 April as a precaution in the event the South Koreans were unable to hold, tasking them with blocking the two approaches to the village and to prevent the Chinese from cutting Route 17, a key route south to Seoul and an important main supply route.[34][39]
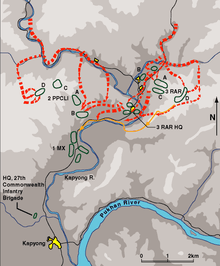
The brigade was by now reduced to three battalions, as the Argylls had been withdrawn to Pusan just prior to the battle, in preparation for their embarkation. The Middlesex were also on stand-by for embarkation, and were kept in reserve.[40] As such, with the width of the valley precluding the establishment of continuous linear defensive, Burke was forced to place his two available battalions on the high points on either side of it, with 3 RAR occupying Hill 504 to the east of the river and 2 PPCLI occupying Hill 677 to the west. Meanwhile, Sudok San (Hill 794) to the north-west—a massive hill nearly 800 metres (2,600 ft) high—was left undefended by necessity. Together these three hills formed a naturally strong defensive position, well suited to blocking a major advance.[41] Regardless, the brigade position suffered from a number of deficiencies, being exposed without flank protection, while the central sector was not occupied because the Middlesex were away to the north with the guns. Likewise, until the return of the New Zealanders the brigade would have little artillery support; as such if large Chinese forces arrived before these two units returned the forward companies would be without support and would have to accept the probability that they would be cut-off. 3 RAR—whose line of communications ran 4 kilometres (2.5 mi) through the exposed central sector of the valley—would be particularly exposed.[41]
Each of the battalions were deployed across the summits and slopes in separate company-sized defensive positions, creating a series of strong-points across a 7-kilometre (4.3 mi) front. Due to the large amount of ground to be defended each of the companies were spread widely, and were unable to offer mutual support. Instead each platoon would support each other, with each company adopting all-round defence. Brigade Headquarters remained in the valley, 4 kilometres (2.5 mi) to the south.[42] With the New Zealand gunners still forward supporting the South Koreans, US IX Corps placed a battery of 105-millimetre (4.1 in) howitzers from the US 213th Field Artillery Battalion and the twelve 4.2-inch (110 mm) M2 mortars of B Company, 2nd Chemical Mortar Battalion, under the command of 27th Brigade. Fifteen Sherman tanks from A Company, US 72nd Heavy Tank Battalion, were also in support.[8][9]
The Canadians subsequently occupied Hill 677 and began digging-in, deploying their six Vickers medium machine-guns in sections to add depth, and using defensive fire tasks to cover the gaps in their positions.[43] Meanwhile, the Australians occupied Hill 504, with D Company holding the summit itself, A Company the spur-line which ran down to the north-west, and B Company the small hill by the river, while C Company was in reserve on the rear spur.[41] In response to US IX Corps requirements Burke directed Ferguson to site his headquarters in the low ground of the valley in the vicinity of the hamlet of Chuktun-ni, so as to control the withdrawing South Koreans. However, this would limit Ferguson's situational awareness and his ability to control the battle, while also leaving them exposed to infiltration.[44] The afternoon was spent on the lightly scrub-covered slopes digging-in and building sangers where the rocky ground proved too hard.[26] In only a few hours the Australians managed to prepare hasty defensive positions, although defensive fire tasks were unable to be registered as the artillery Forward Observers were unable to reach the company positions until after dark.[45]
.jpg)
The American tank company commander—Lieutenant Kenneth W. Koch—deployed his platoons in support of the Australians. The road skirted the eastern flank of Hill 504, and it offered the best area for the employment of armour. One platoon of five tanks occupied a northern outpost position forward of B Company to prevent the Chinese using the road; another platoon occupied the high ground to the west, with B Company; while the final platoon and Koch's command tank was deployed near Battalion Headquarters, covering a ford by which the road crossed the Kapyong River, approximately 800 metres (870 yd) south of B Company. Perhaps unwisely the tanks were deployed without infantry support.[41] The command relationship between the Australians and their armoured support was also complicated, as the Americans were not under command as they might normally have been, rather Koch was free to conduct his own battle. Regardless, armed with a 76-millimetre (3.0 in) cannon and one .50 calibre and two .30 calibre machine-guns, the Sherman tanks were formidable assets and bolstered the defence considerably. In contrast, the Chinese had no tanks at Kapyong, while their infantry had only a few 3.5-inch (89 mm) anti-tank rockets with which to counter them.[46]
By 20:00 that evening a large number of South Koreans were retreating in disarray through a gap in the line held by the brigade, the majority of them moving through the Australians.[34] The South Korean 6th Division later regrouped in positions behind 27th Brigade, but was now reduced to less than half its original strength.[35] Meanwhile, as the 20th Army veered to the west as part of the Chinese main effort against Seoul, the Chinese 118th Division continued its secondary advance down the Kapyong Valley, closely pursuing the retreating South Koreans. Racing down the northeast running valley, the 354th Regiment reached the Australian positions by about 22:00.[35][note 3] Intent on capturing the important crossroads of Route 17 south of Kapyong, and most likely unaware of the location of the Australian blocking position, the Chinese vanguard remained in the low ground, splitting as they approached a long, low north-south running ridge that rose like an island in the mouth of the valley.[35]
Night battle, 23/24 April 1951
Having successfully prevented the US 1st Marine Division from reinforcing the Imjin River front, the Chinese 40th Army turned its attention towards the 27th Brigade on 23 April.[37][47] The battle started during the night of 23/24 April, and continued until late the following day as an entire Chinese division—the 118th Division, totalling perhaps 10,000 men under the command of Deng Yue—engaged the two forward battalions of 27th Brigade.[2][45][48] The initial Chinese attack at Kapyong engaged 3 RAR on Hill 504, while in the early part of the battle the Middlesex and New Zealand gunners were all but cut off. However, the resistance of the Australians ultimately allowed them to safely withdraw and the Middlesex then moved into a reserve position astride the western bank of the river in order to provide depth to the brigade defence.[26] The two battalions of the Chinese 354th Regiment launched repeated attacks on the two forward Australian companies on the northwest spur of Hill 504. Assault after assault of massed Chinese troops kept up the attack throughout the night, but the strong defence of the Australians on the brigade's right flank held them back, before they turned their attention to the Canadians the following day.[41]
Using the retreating South Korean troops to cover their movements, the Chinese had infiltrated the brigade position in the initial stages of the battle, penetrating between A and B Companies, 3 RAR astride the road, and largely surrounding the latter before moving into the rear positions.[26] The Australians struggled to distinguish the Chinese from the South Koreans in the dark, although the Korean Service Corps porters attached to the battalion were able to provide valuable assistance to the defenders distinguishing the Chinese by the sounds of their voices.[49] At 21:30 the Chinese launched their first attack on the forward platoon of American tanks, which had been posted on the road without infantry support. The initial moves were easily repelled, however a stronger attack an hour later forced the tanks to withdraw after two of the tank commanders were killed, including the platoon commander.[26] The Chinese then proceeded to assault the Australians on two different axes: one against the two forward companies in front of Hill 504, and the other through the valley astride the road around Battalion Headquarters.[45] Finally, by 23:00 the New Zealand artillery had returned to the brigade, although they provided only limited support throughout the rest of the night.[7][50]
Probes began on the A and B Company positions, and a number of assaults occurred during the night. Utilising indirect fires, the Chinese charged forward in waves, only to be beaten back by the Australians' Bren light machine-guns, Owen submachine-guns, rifle fire and grenades, before again regrouping and attacking again.[26] B Company—under the command of Captain Darcy Laughlin—supported by tanks, drove off each assault, inflicting heavy casualties while emerging almost unscathed. Laughlin's command post was fired upon by a number of Chinese that had infiltrated the company position, but they were swiftly driven out. An outpost on the northern knoll reported Chinese massing on their flanks at 23:00, and although heavy artillery was directed against the attackers, the section was forced to break contact and withdraw to the main defensive position. The main Chinese assault began at 00:50, falling on 4 Platoon but was broken up after an hour of heavy fighting. A second assault was mounted on 6 Platoon at 03:30, following a feint against 5 Platoon. With determination the Chinese swept forward, penetrating the Australian perimeter before being ejected by an equally determined counter-attack by 6 Platoon with Sherman tanks in support. At 04:00 a small outpost to the rear of the company position was attacked by more than 50 Chinese. Held by just four men under the command of Lance Corporal Ray Parry, the Australians fought off four separate attacks, killing more than 25 and wounding many more over the space of twenty minutes. Parry was later awarded the Military Medal for his actions.[51][52] A final assault on B Company was made just on dawn at 04:45 by about 70 Chinese, and was again repulsed.[53]
Further up the ridge, A Company—under Major Ben O'Dowd—faced a tougher task, and came under heavy attack.[54] The first probes began at 21:30, targeting 1 Platoon which was the lowest of the three platoons on the west flank. The initial moves were then followed up by major Chinese assaults from three sides over the next three hours. Despite suffering many casualties the Chinese continued their attack, closing in and attacking the Australians with hand grenades. The Australians also suffered numerous casualties, with more than half the platoon killed or wounded, including all three Bren gunners. Fighting back with small arms fire, they held against repeated assaults, which increased in frequency and strength as the Chinese assaulted over heaps of their own dead and wounded. By 01:00 O'Dowd ordered the survivors of 1 Platoon to withdraw through Company Headquarters into a new position in between 2 and 3 Platoons. For his leadership Lieutenant Frederick Gardner was later Mentioned in Despatches.[53][55] The Chinese attacks then continued against 3 Platoon, lasting until 04:30, although they were not made with the same weight as the previous assaults.[56]
By dawn it was clear that they had succeeded in penetrating the perimeter through a gap between the Australian platoons, and they began to engage them with machine-guns from a defilade position covered from fire by a steep dip in the ridgeline, and concealed by thick scrub. In the growing light, 1 and 3 Platoon were soon pinned down and suffered a number of casualties as they attempted to gain better fire positions with which to engage their attackers. At 06:00 a fighting patrol was dispatched to make contact with Company Headquarters, and as the section passed over a false crest on their way down the spur line they encountered the Chinese positions by chance. Attacking immediately, six Chinese were killed for the loss of one Australian, and the threat to A Company was eliminated. O'Dowd then launched a counter-attack with 3 Platoon assaulting the Chinese occupying the original 1 Platoon position. By 07:00 they had regained the feature and the Chinese were forced to withdraw under heavy fire from the Australians on the high ground, who again exacted a heavy toll. The night's fighting had cost A Company dearly however, and among the dead were the two New Zealand forward observers. In total they suffered more than 50 casualties—half their original strength.[56][57] Meanwhile, on the right flank, D Company—under Captain Norm Gravener—held the summit of Hill 504 and was not heavily engaged during the night, while C Company—commanded by Captain Reg Saunders—was attacked only once.[58]
Located 1,500 metres (1,600 yd) to the rear, Battalion Headquarters found itself heavily pressed however. Protected only by a section of Vickers medium machine-guns, two 17 pounder anti-tank guns, the Assault Pioneer Platoon and the Regimental Police under the Headquarters Company commander—Captain Jack Gerke—the fighting flared around 22:00 as the Chinese infiltrated the position among the retreating South Koreans. They bypassed the headquarters and the American tanks nearby, surrounding the defenders and establishing blocking positions on the road to the south. During the night the Chinese attempted to mount the tanks and destroy them with grenades and satchel charges, but were driven off by fire. Later, one of the tanks received a direct hit from a 3.5 inch rocket, while the forward perimeter was struck heavily by attacking waves of Chinese, and was forced back with heavy casualties. Receiving fire from Chinese soldiers occupying several houses in the village of Chuktun-ni, the Shermans engaged the road block and several houses, killing more than 40 Chinese in one house alone.[58] However, at 04:00 a company from the Middlesex battalion had to be dispatched to help restore the situation.[45]
At dawn the Chinese intensified their attack on the headquarters' perimeter, killing and wounding the bulk of the Medium Machine Gun section and the Assault Pioneer Platoon and driving them off the high ground they had been occupying.[59] By 05:00 the Chinese on the heights were able to fire directly into Battalion Headquarters below, and Ferguson made the decision to withdraw 3 kilometres (1.9 mi) to a new position inside the Middlesex perimeter. Gerke ordered his men to withdraw gradually, moving one vehicle at a time back along the road, as those that remained provided covering fire. The withdrawal was successfully completed, and with Headquarters Company finally assembled inside the Middlesex perimeter, Gerke was then ordered to secure a key ford across the Kapyong River, 2 kilometres (1.2 mi) east, as a possible withdrawal route for the battalion should it later have to retire from Hill 504.[60] However, during the withdrawal two Australians were left behind and were subsequently captured by the Chinese: Private Robert Parker, the battalion despatch rider, and Private Horace Madden, one of the signallers.[61] For his conduct while in captivity Madden was posthumously awarded the George Cross, following his death from malnutrition and ill-treatment.[62][63][note 4] Ferguson's caravan, a converted two-and-a-half tonne trunk, became bogged during the withdrawal and had to be destroyed.[64] Meanwhile, the New Zealand gunline had also been probed during the early morning and was forced to redeploy at 03:00, while the American mortar company had simply fled, abandoning most of their weapons and vehicles.[65]
Communications between 3 RAR and Brigade Headquarters had failed early, while those with the forward companies were also poor. This was mostly due to the large number of South Koreans retreating through their position tearing out the line from the Command Post, as well the effect of heavy vehicle traffic and gunfire on the exposed line. Likewise, direct radio communication with the forward companies on the battalion command net with the new Type 31 VHF radios was obstructed by the rugged terrain due to the sitting of Battalion Headquarters in low ground relative to the forward companies and the requirement for line-of-sight. The forward companies were able to maintain communications with each other, but not with Battalion Headquarters, while the company level nets also functioned well. Ultimately contact was maintained between Ferguson and Burke through a radio set in the Middlesex Battalion Headquarters, while messages to the forward companies relied on line and a slow relay through C Company.[45][66][67] These issues had only further complicated the conduct of the defence on the first night, with the co-ordination of the forward battle falling to O'Dowd.[56][67] The next morning, O'Dowd finally managed to get through on a radio phone to a general in the US 1st Marine Division. The officer was incredulous, thinking it was a Chinese agent speaking. He told O'Dowd that the unit no longer existed and that it had been wiped out the night before. O'Dowd replied "I've got news for you. We're still here and we're staying here."[68]
The Chinese attacks had been launched quickly and aggressively, placing their light machine-guns on the flank in support and attempting to close to attack the Australian perimeter with grenades. Contrary to some contemporary western accounts, the Chinese did not use human wave tactics, rather, using a tactic known as 'one-point-two sides', they used massed forces and infiltration to achieve local numerical superiority and to penetrate the gaps between the forward companies, before attempting to envelop the Australians while drawing their fire to the front, away from their threatened flanks.[49] They would normally attempt to close with UN defensive positions using darkness or poor visibility to cover their movement and to counter American air superiority, before attacking using massed force, co-ordinated with close fire support. However, although normally well-planned and closely supported by machine-gun, mortar and artillery fire, Chinese attacks in Korea were often inflexible in execution once launched. This was mostly due to the lack of radio communications below battalion-level, with the Chinese instead relying on whistle blasts, bugle calls and runners for command and control, and although their 60-millimetre (2.4 in) and 81-millimetre (3.2 in) mortars had provided particularly effective indirect fire support, these problems were again evident during the fighting at Kapyong.[49][69] Later, it was estimated that more than 500 Chinese were killed by the Australians and the American tanks that supported them.[70]
Meanwhile, on Hill 677 the Canadians had spent the night of 23/24 April in their pits listening to the sounds of the fighting on the Australian front. However, by early morning Chinese activity increased and, with the situation deteriorating on the Patricia's right flank, Stone withdrew B Company from their position forward of the feature's summit to strengthen this flank if the Australians were forced to withdraw. Under the command of Major Vince Lilley the company subsequently moved to occupy positions east of Battalion Headquarters on the high ground overlooking the valley road.[71]
Day battle, 24 April 1951
.jpg)
As daylight broke, the Chinese now found themselves highly exposed in the open ground in front of the Australians. A and B Company supported by artillery, mortars and tanks poured heavy fire onto the hapless Chinese, forcing them to withdraw leaving hundreds of casualties behind on the slopes. With the Australians remaining in possession of their original defensive locations the immediate situation had stabilised, although they were now effectively cut-off 4 kilometres (2.5 mi) behind the front.[65] Ammunition, food and medical supplies were now extremely low throughout the forward area, and with casualty evacuation increasingly difficult, the battalion was at risk of being overrun unless it could be concentrated, resupplied and supported.[60] As such in order to avoid each company being isolated and overwhelmed in a series of Chinese attacks, at 07:15 B Company was ordered to leave its position and join the other companies on the high ground to form a defendable battalion position. The Australians subsequently withdrew as instructed, taking several dozen Chinese prisoners with them that had been captured earlier by a standing patrol.[65] The New Zealand gunners covered their movement across the open valley, laying a smoke screen to conceal the withdrawal, while the American tanks also provided support. As they moved across the valley the Australians exchanged a number of shots with a small groups of Chinese who were still hiding in dead ground and in the riverbed, as well as numerous dead from the fighting the previous night.[72] 173 Chinese dead were counted on the B Company perimeter by the Australians before they departed.[73]
With B Company successfully occupying its new positions, Ferguson moved forward to the hillside below his forward companies aboard a Sherman tank.[74] Just after 09:00, a group of Chinese launched an attack at the top of the spur held by C Company. The attack was repulsed, and no further assaults were made against C Company during the day, although they endured sniper fire and mortar bombardment for several hours. Realising the importance of B Company's previous position to a planned counter-offensive, two hours after their withdrawal, Ferguson order Laughlin to re-occupy the position which they had just vacated. 27th Brigade would now be reinforced by American troops and their move forward would be facilitated if the Chinese were cleared from the small hill that commanded the road through the valley. Likewise, the defence of this position the previous evening had prevented a Chinese assault on the western flank of Hill 504. As such, at 09:30 the order to withdraw was rescinded and B Company was tasked to re-occupy the position. In preparation for the company assault on the summit, Laughlin tasked 5 Platoon to assault a small knoll halfway between C Company and the old B Company position. A frontal assault was launched at 10:30, with two sections attacking and one in fire support. Strongly held by a Chinese platoon well dug-in in bunkers, the defenders allowed the Australians to approach to within 15 metres (16 yd) before opening fire with machine-guns, rifles and grenades. 5 Platoon suffered seven casualties, including the platoon commander, and they were forced to withdraw under the cover of machine-gun and mortar fire.[72]
4 Platoon under Lieutenant Leonard Montgomerie took over the attack, while a number of American tanks moved in to provide further support. Conducting a right flanking attack, the Australians suffered a number of casualties as they moved across the open ground. Advancing to within 30 metres (33 yd) of the forward trenches, the Chinese fire increased. Montgomerie launched a desperate bayonet charge, while a section under Corporal Donald Davie broke in on the right. Amid fierce hand-to-hand fighting the Australians cleared the Chinese from the trenches, losing three men. Davie's section was then heavily engaged by machine-guns from the rear trenches, and he moved quickly to assault these with his remaining men. Montgomerie reorganised the platoon, and they fought from trench to trench using bayonets and grenades. The Australians then began taking fire from another knoll to their front and, leaving his rear sections to clear the first position, Montgomerie led Davie's section onto the second knoll. Against such aggression the Chinese were unable to hold and, although the majority bravely fought to the death, others fled across the open ground. By 12:30 the knoll had been captured by the Australians, with 57 Chinese dead counted on the first position and another 24 on the second.[75] A large Chinese force was now detected occupying the old B Company position and the Australians were effectively halted halfway to their objective. Before Laughlin could prepare his next move he was ordered to withdraw by Ferguson, and the attempt to dislodge the Chinese was subsequently abandoned.[65] During the fighting the tanks had provided invaluable support, moving ammunition forward to B Company, and helping to evacuate the wounded. The entire operation had cost the Australians three killed and nine wounded. For his actions Montgomerie was awarded the Military Cross, while Davie received the Military Medal.[74][76]
.jpg)
Meanwhile, the Chinese shifted their attention to D Company, launching a series of relentless assaults against the summit.[65] D Company's position was vital to the defence of Hill 504, commanding the high ground and protecting the Australians' right flank. Commencing at 07:00 the Chinese assaulted the forward platoon—12 Platoon, launching attacks at thirty-minute intervals until 10:30. Using mortars to cover their movement, they attacked on a narrow front up the steep slope using grenades, however the Australians beat the Chinese back, killing more than 30 for the loss of seven wounded during six attacks. The New Zealand artillery again played a key role in defeating the Chinese attempts, bringing down accurate fire within 50 metres (55 yd) of the Australian positions. However, throughout the fighting the supply of ammunition for the guns had caused severe problems, as the Chinese offensive had depleted the stock of 25 pounder rounds available forward of the airhead in Seoul. Despite improvements, problems with the logistic system remained and each round had to be used effectively in response to the directions of the artillery Forward Observers which controlled their fire.[77] Although badly wounded Corporal William Rowlinson was later awarded the Distinguished Conduct Medal for his leadership,[52] while Private Ronald Smith was awarded the Military Medal.[76] Lance Corporal Henry Richey was posthumously Mentioned in Despatches after being fatally wounded attempting to evacuate the last of the Australian casualties.[76][78]
Despite their previous failures, the Chinese launched another series of attacks from 11:30 and these attacks continued for the next two hours, again targeting 12 Platoon under the command of Lieutenant John Ward. Failing to break through again, the Chinese suffered heavy casualties before the assault ended. From 13:30 there was another lull in the fighting for an hour and a half, although D Company continued to endure Chinese mortar, machine-gun and rifle fire. Believing that the battle may continue into the night, Gravener made the decision to pull 12 Platoon back in order to adopt a tighter company perimeter, lest his forward platoon be overrun and destroyed. The movement was completed without incident and, shortly after, the newly vacated position was assaulted by a large Chinese force which had failed to detect the withdrawal. The Chinese moved quickly as they attempted to establish their position on the northern end of the ridge, only to be heavily engaged by Australian machine-gun and rifle fire, and artillery.[79]
On the Canadian front, B Company, 2 PPCLI completed its redeployment by 11:00 hours. The battalion now occupied a northward facing arc curving from the summit of Hill 677 in the west to the high ground closest to the river. D Company held the summit on the battalion's left, C Company the central forward slope, while A and B Company held the right flank. The high grass and severe terrain of Hill 677 limited the ability of each company to provide mutual support however, while at the same time it afforded any attacking force limited avenues of approach, and even less cover or concealment for an assault.[80] 24 April passed with little activity, with the Chinese continuing to focus on the Australians across the river. Meanwhile, the Canadians continued to strengthen their defences as reports of growing Chinese concentrations came in from the forward companies. Each company was allocated a section of Vickers medium machine-guns, as well as three 60-millimetre (2.4 in) mortars. Defensive fire tasks were registered, while additional ammunition was pushed out to the forward companies in the afternoon.[81]
3 RAR withdraws, evening 24 April 1951
Although originally intending on holding until the Australians could be relieved by the US 5th Cavalry Regiment, Burke had decided during the morning to withdraw 3 RAR, and this had prompted the cancellation of B Company's assault.[74][82] With the Australians facing encirclement, and mindful of the fate that had befallen the Glosters, Burke had ordered a fighting withdrawal back to the Middlesex area to new defensive positions in rear of the brigade.[83] Indeed, despite holding the Chinese at bay throughout the morning and afternoon, the increasing difficulty of resupply and casualty evacuation made it clear that the Australians would be unable to hold Hill 504 for another night in its exposed and isolated positions.[83] Planning for the withdrawal had begun as the Chinese renewed their assault on D Company around 11:30, while Ferguson and O'Dowd discussed the withdrawal by radio at 12:30.[84] With the Chinese dominating the road south, Ferguson ordered his companies to withdraw along a ridge running 3 kilometres (1.9 mi) south-west from Hill 504, just east of the Kapyong River. The Middlesex position lay a further 1 kilometre (0.62 mi) south-west of the foot of the ridge and could be reached by the ford secured earlier by Gerke, which would act as the battalion check point for the withdrawal. O'Dowd, as the senior company commander, was subsequently appointed to plan and command the withdrawal.[74] Ferguson saw his role as ensuring that O'Dowd received the support he needed to achieve a clean break, and had as such decided not to move forward to lead the withdrawal himself.[85]
Command of A Company was temporarily handed over to the second-in-command, Captain Bob Murdoch. Present at Pakchon in November 1950, O'Dowd understood first-hand the dangers of withdrawing while in contact. The challenge was to protect the forward platoons as they withdrew from being followed up by the Chinese occupying the old B Company positions and from D Company's position after they broke contact. The Australians would also have to clear the withdrawal route of any blocking forces, while at the same time the evacuation of a large number of wounded and Chinese prisoners would hamper their movement.[86] As such the timing of the withdrawal would be critical to its success. Consequently, the lead company would not move until mid-afternoon so that the rearguard would be able to use the protection of darkness to break contact, while at the same time offering good observation and fields of fire during the daylight to support the initial moves.[74][86] Orders were delivered at 14:30. B Company would lead the withdrawal down the ridge line, carrying any wounded that still required evacuation, as well as clearing the route and securing the ford near the Middlesex position. C Company would wait for the artillery to neutralise the Chinese on the old B Company position, before moving to establish a blocking position behind D Company. A Company would then withdraw to a blocking position behind C Company, in order to allow Gravener and Saunders to establish a clean break. Finally, D Company would withdraw through both C and A Company and set up a blocking position to delay any follow up and allow those companies to withdraw.[87]

After 15:00 an airstrike was called in to dislodge the surviving Chinese in front of D Company. However, the attack by two US Marine Corps F4U Corsairs was mistakenly directed at the Australians themselves after their positions were wrongly marked by the spotter plane. Two men were killed and several badly burnt by napalm before the attack was broken off after the company second-in-command—Captain Michael Ryan—ran out under Chinese fire waving a marker panel.[65] The company medical orderly—Private Ronald Dunque—was subsequently awarded the Military Medal for his efforts assisting the wounded despite his own injuries.[52][88] The Chinese quickly attempted to exploit the chaos, moving against D Company's long exposed eastern flank. 11 Platoon on the main ridge forward of the summit was subjected to a frontal assault; however, unaffected by the napalm, they broke up the Chinese attack and inflicted heavy casualties on them. Regardless, further Chinese attempts to infiltrate the Australian positions continued into the afternoon.[89][note 5]
The withdrawal was scheduled to begin shortly following the misdirected airstrike, and was to be preceded by an artillery bombardment with high explosive and smoke at 16:00.[note 6] The American tanks were subsequently moved forward to provide cover, and when the New Zealand artillery failed to fire at the appointed hour, they provided the direct fire support. Still in contact, the Australians began to pull back, fighting a number of well-disciplined rearguard actions as the companies leapfrogged each other. Meanwhile, the New Zealand artillery kept the Chinese at bay, after it finally commenced firing.[86] B Company had taken 39 Chinese prisoners during the earlier fighting, and unable to leave these behind, they were used to carry many of the Australian wounded and much of their equipment as well. O'Dowd's fear that the Chinese might have blocked the withdrawal route was not realised, and B Company moved back along the ridge and down to the ford without incident, reaching the Middlesex area after dark. C Company was the next to withdraw, departing at 16:30, just after suffering another casualty from sniper fire. Saunders led his company up the spur and then south down the main ridge without incident, followed by A Company during the next hour with the Chinese in close pursuit.[90]
Murdoch had been concerned lest he and his men should be engaged when they reached the Kapyong River in an exhausted condition and with little ammunition. Luck was with the Australians, and due to difficulties of communication and navigation along the ridge line in the dark, elements of A Company had become separated and the last two platoons descended to the river too early to strike the ford. However, reaching a deserted part of the bank they realised their mistake and immediately turned west again, following the river-bank to the ford. The Chinese did not follow this sudden final turn and plunged on into the river, giving A Company an unexpected opportunity to break free. The Chinese were subsequently detected by the Canadians on Hill 677 and were fired on. Fortunately for the Australians, the Canadian fire did not hit them. This possibility had been foreseen earlier; however, problems with the radio relay between the Canadians and Australians meant that there had been no guarantee that the withdrawing force would not be mistaken for Chinese as they crossed the river.[91]
Only D Company—which had been holding the summit and had withdrawn last—was heavily engaged and was unable to move at the scheduled time. The Chinese launched a determined assault, preceding it with heavy machine-gun and mortar fire, before attempting to overrun the forward pits. Once again the Australians repelled the Chinese assault and Gravener decided to begin to thin out his position before the situation deteriorated further. With one platoon covering their movement, D Company subsequently withdrew, closely pursued by the Chinese. During the rapid withdrawal after the final Chinese attack, Private Keith Gwyther was accidentally left behind after being knocked unconscious and buried in a forward pit by a mortar round. He regained consciousness some hours later and was subsequently captured by the Chinese who had by then occupied Hill 504 and were digging-in.[92] Finally, the Australians succeeded in achieving a clean break after dark, and D Company was able to safely withdraw.[83][93] By 23:30 the battalion was clear, completing its withdrawal in good order and intact, and suffering only minimal casualties.[93] Regardless, the previous 24 hours of fighting had been costly for the Australians, resulting in 32 killed, 59 wounded and three captured; the bulk of them in A Company and Battalion Headquarters. Yet their stout defence had halted the assault on the brigade's right flank, and had inflicted far heavier casualties on the Chinese before being withdrawn. Significantly for the Australians 25 April was Anzac Day; however, following their successful withdrawal the Chinese turned their attention to the Canadians on the left flank.[83]
Defence of Hill 677, 24–25 April 1951
Despite the withdrawal from Hill 504 that evening, 27th Brigade had been reinforced on the afternoon of 24 April by the arrival of the 5th US Cavalry Regiment. The Americans had been dispatched earlier in the day to ensure that Kapyong remained in UN hands, and one of the battalions was subsequently deployed to the southwest of the D Company, 2 PPCLI on the summit of Hill 677 in order to cover the left flank. A second American battalion occupied a position across the river, southeast of the Middlesex. Likewise, despite heavy casualties in one of the Australian companies and battalion headquarters, 3 RAR had emerged from the intense battle largely intact and had successfully withdrawn in an orderly fashion. Meanwhile, one of the replacement British battalions, the 1st Battalion, King's Own Scottish Borderers, had also arrived during the 24th and it took up positions with the Australians around Brigade Headquarters. With six UN battalions now holding the valley the Chinese faced a difficult task continuing the advance.[81]
Having dislodged the defenders from Hill 504, the 354th Regiment of the Chinese 118th Division would attempt to capture the dominating heights of Hill 677 held by the Canadians.[94] Although unaware of the arrival of American reinforcements, the Chinese had however detected the redeployment of B Company, 2 PPCLI and at 22:00 that evening they commenced an assault on the Canadian right flank.[95] Although the initial moves were easily beaten back by automatic fire and mortars, a second Chinese assault an hour later succeeded in overrunning the right forward platoon. The Canadians successfully withdrew in small groups back to the company main defensive position, where they eventually halted the Chinese advance.[96] During the fighting the Canadians' 60-millimetre (2.4 in) mortars had proven vital, their stability allowing for rapid fire out to 1,800 metres (2,000 yd) with an ability to accurately hit narrow ridgelines at maximum range.[81] The next morning 51 Chinese dead were counted around the B Company perimeter.[96] Shortly after the second assault on B Company was repelled, another large Chinese assault force was detected fording the river in the bright moonlight. Laying down heavy and accurate artillery fire, the New Zealand gunners forced the Chinese to withdraw, killing more than 70.[97]

Meanwhile, a large Chinese force of perhaps company strength was detected in the re-entrant south of B Company, moving toward Battalion Headquarters, and Lilley warned Stone of the impending assault. Six M3 Half-tracks from Mortar Platoon had been positioned there before the battle, each armed with a .50 calibre and a .30 calibre machine-gun. Stone held fire until the Chinese broke through the tree-line just 180 metres (200 yd) from their front. The Canadians opened fire with machine-guns and with mortars at their minimum engagement distance. The Chinese suffered severe casualties and the assault was easily beaten off.[96] The Chinese had telegraphed their intentions prior to the assault by using tracer fire for direction, and had used bugles to co-ordinate troops in their forming up positions. Such inflexibility had allowed the Canadians to co-ordinate indirect fires and took heavy toll on the attackers in the forming up positions.[98]
The Chinese had been unable to successfully pin-point the Canadian defensive positions, having failed to carry out a thorough reconnaissance prior to the attack. The severe terrain had also prevented the assaulting troops from adopting a low profile during their final assault, however in the darkness the Canadian rifle fire was ineffective, forcing them to resort to using grenades and rocket launchers.[98] The Chinese mortars and artillery was particularly ineffective however, and very few rounds fell on the Canadian positions during the evening. Indeed, in their haste to follow up the collapse of the South Korean 6th Division, the Chinese 118th Division had left the bulk of its artillery and supplies well north of scene of the fighting. Meanwhile, what mortar ammunition they did have had been largely used up on the Australians during the previous evening. In contrast, the New Zealand gunners provided effective fire support and had been able to break up a number of Chinese assaults before they had even reached the Patricias. The Chinese now turned their attention to D Company holding the summit of Hill 677, on the battalion's left flank.[97]
At 01:10 a large Chinese force was detected forming up on a spur to the west towards Hill 865 and they were engaged by Bren light machines guns and defensive fires. Assaulting 10 Platoon under the cover of machine-gun and mortar fire, the Chinese were soon effectively engaged by Vickers machine-guns from 12 Platoon firing in mutual support. Switching their axis of assault to 12 Platoon, the Chinese succeeded in overrunning one of the Canadian sections and a medium machine-gun, killing two of its crew who had remained at their post firing until the last moment. The Canadians fought back, engaging the Chinese as they attempted to turn the Vickers on them, rendering it inoperable before calling in pre-arranged defensive fires on to the newly lost position.[99] With the supporting artillery firing at the 'very slow' rate to conserve ammunition, the weight of the Chinese assaults soon prompted the Canadians to request it be increased to the 'slow' rate of two rounds per gun per minute, so that 24 rounds fell every 30 seconds within a target area of 180 metres (200 yd).[100]
With the Chinese infiltrating the Canadian perimeter through the gaps between platoons, D Company was close to being surrounded. The company commander—Captain J.G.W. Mills—was subsequently forced to call down artillery fire onto his own position on several occasions during the early morning of 25 April to avoid being overrun. The tactic succeeded and the exposed Chinese were soon swept off the position, while the dug-in Canadians escaped unharmed. The Chinese persisted however, launching a number of smaller attacks during the rest of the night, but these were again repulsed by artillery and small arms fire. By dawn the attacks on the Canadian positions had abated, and with D Company remaining in control of the summit they were able to recover the previously abandoned machine-gun at first light. Meanwhile, on the right flank B Company was also able to re-occupy the platoon position it had been forced to relinquish earlier the previous evening.[100] The Chinese had suffered heavily during the night, with perhaps as many as 300 killed by the Patricias.[101]
Fighting concludes, 25 April 1951
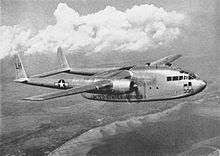
Although the Chinese had continued to mount small attacks, UN forces were now in control of the battle. Regardless, the Chinese had succeeded in establishing blocking positions on the roads south of the Canadians, temporarily cutting them off from resupply. Anticipating that the battle would continue into the evening, Stone requested that food, ammunition and water be airdropped directly onto Hill 677 and by 10:30 the required supplies—including 81-millimetre (3.2 in) mortar ammunition—were dropped by four American C-119 Flying Boxcars flying from an airbase in Japan. Anticipating a renewed Chinese effort, the Canadians continued to improve their defensive position. Meanwhile, the Middlesex sent out patrols during the morning in order to clear the Chinese that had infiltrated behind Hill 677 during the evening, and although the Chinese blocking positions were relatively weak it was not until 14:00 that patrols from B Company, 2 PPCLI reported the road clear. Stone subsequently requested that further supplies and reinforcements be sent forward by vehicle as rapidly as feasible.[100]
The remainder of the day was relatively quiet for the Canadians, although they were subjected to periodic harassing fire from the Chinese. D Company received heavy machine-gun fire from Hill 865 to the west, in particular. Regardless, the Chinese made no further attempt to attack, and confined themselves to limited patrolling activities across the front. Later the Patricias, with American tanks in support, cleared the remaining Chinese from the northern slopes of Hill 677, while several concentrations of Chinese were again broken up by heavy artillery fire and airstrikes. The American battalion on the south-west flank of the Canadians was subsequently relieved by the Middlesex, following which the 5th US Cavalry Regiment launched an assault to recover Hill 504. The Chinese resisted until 16:00, before the 118th Division suddenly withdrew. American patrols north of the feature met no resistance, while the Americans were also able to patrol east along Route 17 to Chunchon without contact. By last light the situation had stabilised on the Kapyong Valley front.[101] Having left their supplies of food and ammunition far behind during the advance two days earlier, the Chinese had been forced to withdraw back up the Kapyong Valley in the late afternoon of 25 April in order to regroup and replenish following the heavy casualties incurred during the fighting.[101][102]
Aftermath
Casualties
With vastly superior numbers the Chinese had attacked on a broad front, and had initially overrun a number of the forward UN positions. Regardless, the 27th Brigade had ultimately prevailed despite being outnumbered by a factor of five to one.[103] Indeed, despite their numerical advantage the Chinese had been badly outgunned and they could not overcome the well-trained and well-armed Australians and Canadians.[68] The battlefield was littered with the corpses of Chinese soldiers, a testament to the discipline and firepower of the defenders. And yet, despite their ultimate defeat, the battle once again demonstrated that the Chinese were tough and skillful soldiers capable of inflicting heavy casualties on the Australians and forcing their eventual withdrawal, albeit both intact and orderly.[49] As a result of the fighting Australian losses were 32 killed, 59 wounded and three captured, while Canadian casualties included 10 killed and 23 wounded.[93] American casualties included three men killed, 12 wounded and two tanks destroyed, all from A Company, 72nd Heavy Tank Battalion. The New Zealanders lost two killed and five wounded.[41] In contrast, Chinese losses were far heavier, and may have included 1,000 killed and many more wounded.[93][101] The Canadians were finally relieved on Hill 677 by a battalion of the 5th US Cavalry Regiment on the evening 26 April.[104]
.jpg)
2 PPCLI, 3 RAR and A Company, 72nd Heavy Tank Battalion were all subsequently awarded the US Presidential Unit Citation for their actions during the Battle of Kapyong. The New Zealand gunners—without whom the Australians and Canadians may have suffered a similar fate to that of Glosters at the Imjin—were awarded the South Korean Presidential Unit Citation.[49] Although the Canadians and Australians had borne the brunt of the fighting, the Middlesex—despite the imminence of their replacement—had shown no evidence of hesitancy or lack of aggression when recalled into the fighting early in the battle.[40] For their leadership, Ferguson and Stone were both awarded the Distinguished Service Order, while Koch was awarded both the American Distinguished Service Cross and the British Military Cross for the vital part his tanks had played in the fighting.[77][note 7] The Royal Australian Regiment, Princess Patricia's Canadian Light Infantry and the Middlesex Regiment were subsequently granted the battle honour "Kapyong".[7][105] Today, the battle is regarded one as the most famous actions fought by the Australian and Canadian armies in Korea.[26]
Subsequent operations
By 29 April, the First Chinese Spring Offensive was halted by UN forces at a defensive line north of Seoul, known as the "No-Name Line"; in total a withdrawal of 56 kilometres (35 mi) in the US I and IX Corps sectors, and 32 kilometres (20 mi) in the US X Corps and South Korean III Corps sectors.[106] Although the main Chinese blow had fallen on US I Corps, the resistance by British Commonwealth forces in the battles at the Imjin River and at Kapyong had helped to blunt its impetus, with the defence mounted by the 27th Brigade stopping the Chinese from isolating the US I Corps from the US IX Corps, thereby helping to halt the Chinese advance on Seoul and preventing its capture.[68][107] The Chinese had now nearly exhausted their resources of men and material, and were approaching the limit of their supply lines. Many Chinese soldiers were now tired, hungry and short of equipment and during the fighting at Kapyong they had demonstrated a greater willingness to surrender than in previous encounters, with 3 RAR alone taking 39 prisoners, only eight of them wounded. Contingent on the rapid attainment of its objectives, the attempted Chinese coup de main ultimately failed amid heavy casualties and they had little recourse but to abandon their attacks against the US I and IX Corps.[49][108] The Chinese had suffered at least 30,000 casualties during the period 22–29 April.[109] In contrast, US casualties during the same period numbered just 314 killed and 1,600 wounded, while Commonwealth, South Korean and other UN contingents brought the total to 547 killed, 2,024 wounded and 2,170 captured; the disparity highlighting the devastating effect of enormous UN firepower against massed infantry.[110][111] Undeterred by these setbacks, the Second Chinese Spring Offensive began on 16 May to the east of Kapyong, only to suffer their worst defeat at the Battle of the Soyang River.[112]
27th Brigade was replaced by the 28th British Commonwealth Brigade and Brigadier George Taylor took over command of the new formation on 26 April. With the Chinese offensive losing momentum, the new Commonwealth formation was subsequently pulled back into IX Corps reserve to the southwest of Kapyong, near the junction of the Pukhan and Chojon rivers. 3 RAR was transferred to 28th Brigade, while the 1st Battalion, The King's Own Scottish Borderers and the 1st Battalion, The King's Shropshire Light Infantry replaced the Argylls and Middlesex regiments. Later, the Patricias were transferred to the newly arrived 25th Canadian Brigade on 27 May.[113][114] After protracted negotiations between the governments of Australia, Britain, Canada, India, New Zealand and South Africa, agreement had been reached to establish an integrated formation with the aim of increasing the political significance of their contribution, as well as facilitating the solution of the logistic and operational problems faced by the various Commonwealth contingents.[113] The 1st Commonwealth Division was formed on 28 July 1951, with the division including the 25th Canadian, 28th British Commonwealth and 29th British Infantry Brigades under the command of Major General James Cassels, and was part of US I Corps.[115] For many of the Australians Kapyong was to be their last major battle before completing their period of duty and being replaced, having endured much hard fighting, appalling weather and the chaos and confusion of a campaign that had ranged up and down the length of the Korean Peninsula. Most had served in the Second Australian Imperial Force (2nd AIF) during the Second World War and this combat experience had proven vital.[116] Regardless, casualties had been heavy, and since the battalion's arrival from Japan in September 1950 the Australians had lost 87 killed, 291 wounded and five captured.[117]
See also
- Gapyeong Canada Monument
- Kapyong (2011) – documentary about the battle
- United Nations Memorial Cemetery, Busan, South Korea – where many of the Australian and Canadian casualties are buried
Notes
- Footnotes
- ↑ The Chinese military did not have ranks during the 1950s, except for the title of "Commander" or "Commissar".
- ↑ In Chinese military nomenclature, the term "Army" (军) means Corps, while the term "Army Group" (集团军) means Field Army.
- ↑ O'Neill identifies the Chinese 60th Division, however the 60th Division maintained its south-westerly course as part of the 20th Army and had not pursued the South Korean 19th Infantry Regiment after routing it in the Kapyong valley. The division next contacted the US 24th Division in the I Corps sector. See Mossman 1990, p. 402 and O'Neill 1985, p. 134.
- ↑ During his captivity Madden resisted repeated Chinese and North Korean attempts to make him collaborate, despite repeated beatings and being deprived of food. He remained cheerful and optimistic for six months, sharing his meagre food with other prisoners who were sick. He grew progressively weaker though and died of malnutrition on 6 November 1951. For his conduct he was posthumously awarded the George Cross. See O'Neill 1985, p. 147.
- ↑ Controversy surrounds the circumstances of this accident. While the Australian official historian states that Gravener requested the airstrike, it seems neither Gravener nor O'Dowd called for air support that afternoon, and it is more likely the request came from either Ferguson or Brigade Headquarters. See O'Neill 1985, p. 153 and Breen 1992, p. 97.
- ↑ There is some disagreement between sources on the timing of the withdrawal, with some sources nominating 15:30, while others claim it began at 17:30. The time of 16:00 is based on an account by O'Dowd himself. See Breen 1992, p. 93.
- ↑ For Stone it was his second such award, winning his first DSO at the Battle of Ortona in Italy in 1943. See Johnston 2003, p. 30.
- Citations
- ↑ Chinese Military Science Academy 2000, p. 377.
- 1 2 Hu & Ma 1987, p. 51.
- ↑ O'Neill 1985, p. 121.
- 1 2 O'Neill 1985, p. 123.
- 1 2 3 4 O'Neill 1985, p. 132.
- 1 2 O'Neill 1985, pp. 125–127.
- 1 2 3 Horner 1990, p. 444.
- 1 2 Breen 1992, p. 12.
- 1 2 Butler, Argent and Shelton 2002, p. 103.
- ↑ Butler, Argent and Shelton 2002, p. 77.
- ↑ O'Neill 1985, p. 107.
- 1 2 O'Neill 198, p. 134.
- ↑ Varhola 2000, pp. 88, 278.
- ↑ O'Neill 1985, p. 125.
- 1 2 O'Neill 1985, p. 127.
- ↑ O'Neill 1985, p. 128.
- ↑ Breen 1992, p. 20.
- ↑ O'Neill 1985, pp. 128–129.
- ↑ O'Neill 1985, p. 129.
- 1 2 3 4 O'Neill 1985, p. 131.
- ↑ Breen 1992, p. 18.
- ↑ Breen 1992, p. 21.
- ↑ Farrar-Hockley 1995, p. 109.
- ↑ Zhang 1995, p. 145.
- ↑ Chinese Military Science Academy 2000, pp. 309, 326.
- 1 2 3 4 5 6 7 Coulthard Clark 2001, p. 263.
- ↑ Chinese Military Science Academy 2000, p. 312.
- ↑ Johnston 2003, p. 89.
- ↑ O'Neill 1985, pp. 133–134.
- ↑ Johnston 2003, pp. 90–91.
- ↑ Mossman 1990, p. 401.
- ↑ Mossman 1990, p. 382.
- 1 2 3 Chae, Chung and Yang 2001, p. 630.
- 1 2 3 4 Horner 2008, p. 69.
- 1 2 3 4 Mossman 1990, p. 402.
- 1 2 3 4 Johnston 2003, p. 91.
- 1 2 Zhang 1995, p. 149.
- ↑ Johnston 2003, pp. 91–92.
- ↑ Mossman 1990, p. 391.
- 1 2 Horner 2008, p. 68.
- 1 2 3 4 5 6 "The Battle of Kapyong, April 1951". The Australian War Memorial. Retrieved 23 January 2010.
- ↑ Horner 2008, pp. 69–70.
- ↑ Johnston 2003, pp. 94–95.
- ↑ Johnston 2003, p. 95.
- 1 2 3 4 5 Horner 2008, p. 70.
- ↑ Breen 1992, p. 40.
- ↑ Chinese Military Science Academy 2000, p. 314.
- ↑ Breen 1992, p. 25.
- 1 2 3 4 5 6 Horner 2008, p. 71.
- ↑ O'Dowd 2000, p. 165.
- ↑ Breen 1992, pp. 113–114.
- 1 2 3 The London Gazette: no. 39448. p. 514. 25 January 1952. Retrieved 1 February 2010.
- 1 2 O'Neill 1985, p. 142.
- ↑ Johnston 2003, p. 96.
- ↑ The London Gazette: no. 39703. p. 6214. 25 November 1952. Retrieved 1 February 2010.
- 1 2 3 O'Neill 1985, p. 143.
- ↑ Breen 1992, p. 100.
- 1 2 O'Neill 1985, p. 144.
- ↑ O'Neill 1985, pp. 145–146.
- 1 2 O'Neill 1985, p. 148.
- ↑ O'Neill 1985, pp. 146–147.
- ↑ O'Neill 1985, p. 642.
- ↑ The London Gazette: (Supplement) no. 40665. p. 7299. 27 December 1955. Retrieved 1 February 2010.
- ↑ O'Neill 1985, p. 147.
- 1 2 3 4 5 6 Coulthard-Clark 2001, p. 264.
- ↑ Mossman 1990, p. 403.
- 1 2 Breen 1992, pp. 46–47.
- 1 2 3 "Out in the Cold: Australia's involvement in the Korean War – Kapyong 23–24 April 1951". The Australian War Memorial. Retrieved 24 January 2010.
- ↑ Kuring 2004, p. 235.
- ↑ Breen 1992, p. 119.
- ↑ Johnston 2003, pp. 97–98, 106.
- 1 2 O'Neill 1985, p. 149.
- ↑ O'Neill 1985, pp. 148–149.
- 1 2 3 4 5 O'Neill 1985, p. 150.
- ↑ O'Neill 1985, pp. 149–150.
- 1 2 3 The London Gazette: no. 39312. p. 4382. 17 August 1951. Retrieved 1 February 2010.
- 1 2 O'Neill 1985, p. 151.
- ↑ O'Neill 1985, p. 152.
- ↑ O'Neill 1985, pp. 152–153.
- ↑ Johnston 2003, p. 98.
- 1 2 3 Johnston 2003, p. 99.
- ↑ Breen 1992, p. 86.
- 1 2 3 4 Johnston 2003, p. 97.
- ↑ Breen 1992, p. 91.
- ↑ Breen 1992, p. 92.
- 1 2 3 Breen 1992, p. 93.
- ↑ Breen 1992, pp. 95–96.
- ↑ O'Neill 1985, p. 153.
- ↑ O'Neill 1985, pp. 153–154.
- ↑ O'Neill 1985, p. 154.
- ↑ O'Neill 1985, pp. 156–157.
- ↑ O'Neill 1985, p. 155.
- 1 2 3 4 Coulthard-Clark 2001, p. 265.
- ↑ Chae, Chung & Yang 2001, p. 635.
- ↑ Johnston 2003, pp. 99–100.
- 1 2 3 Johnston 2003, p. 100.
- 1 2 Johnston 2003, p. 102.
- 1 2 Johnston 2003, p. 101.
- ↑ Johnston 2003, pp. 102–103.
- 1 2 3 Johnston 2003, p. 103.
- 1 2 3 4 Johnston 2003, p 104.
- ↑ Kuring 2004, p. 237.
- ↑ Brooke, Michael (20 April 2006). "3 RAR's Priority On Duty". Army News (1142 ed.). Australian Department of Defence. Archived from the original on 4 June 2013. Retrieved 24 January 2010.
- ↑ Johnston 2003, p. 106.
- ↑ Rodger 2003, p. 373.
- ↑ Mossman 1990, p. 436.
- ↑ Chae, Chung & Yang 2001, p. 636.
- ↑ O'Neill 1985, p. 160.
- ↑ Millett 2010, p. 434.
- ↑ Mossman 1990, p. 437.
- ↑ Johnston 2003, p. 108.
- ↑ Appleman 1990, pp. 509, 550.
- 1 2 O'Neill 1985, p. 166.
- ↑ Johnston 2003, p. 107.
- ↑ Grey 1988, pp. 192–195.
- ↑ Breen 1992, p. 104.
- ↑ O'Neill 1985, p. 158.
References
- Appleman, Roy (1990). Ridgway Duels for Korea. Military History Series. Volume 18. College Station, Texas: Texas A&M University Press. ISBN 978-0-89096-432-3.
- Breen, Bob (1992). The Battle of Kapyong: 3rd Battalion, the Royal Australian Regiment, Korea 23–24 April 1951. Georges Heights, New South Wales: Headquarters Training Command, Australian Army. ISBN 978-0-642-18222-7.
- Butler, David; Argent, Alf; Shelton, Jim (2002). The Fight Leaders: Australian Battlefield Leadership: Green, Hassett and Ferguson 3RAR – Korea. Loftus, New South Wales: Australian Military Historical Publications. ISBN 978-1-876439-56-9.
- Chae, Han Kook; Chung, Suk Kyun; Yang, Yong Cho (2001). Yang, Hee Wan; Lim, Won Hyok; Sims, Thomas Lee; Sims, Laura Marie; Kim, Chong Gu; Millett, Allan R., eds. The Korean War. Volume II. Lincoln, Nebraska: University of Nebraska Press. ISBN 978-0-8032-7795-3.
- Chinese Military Science Academy (2000). History of War to Resist America and Aid Korea (抗美援朝战争史) (in Chinese). Volume II. Beijing: Chinese Military Science Academy Publishing House. ISBN 978-7-80137-390-8.
- Coulthard-Clark, Chris (2001). The Encyclopaedia of Australia's Battles (Second ed.). Crows Nest, New South Wales: Allen & Unwin. ISBN 978-1-86508-634-7.
- Farrar-Hockley, Anthony (1995). The British Part in the Korean War: An Honourable Discharge. Volume II. London: HMSO. ISBN 978-0-11-630958-7.
- Grey, Jeffrey (1988). The Commonwealth Armies and the Korean War: An Alliance Study. Manchester, United Kingdom: Manchester University Press. ISBN 978-0-7190-2770-3.
- Horner, David, ed. (1990). Duty First: The Royal Australian Regiment in War and Peace (First ed.). North Sydney, New South Wales: Allen & Unwin. ISBN 978-0-04-442227-3.
- Horner, David, ed. (2008). Duty First: A History of the Royal Australian Regiment (Second ed.). Crows Nest, New South Wales: Allen & Unwin. ISBN 978-1-74175-374-5.
- Hu, Guang Zheng (胡光正); Ma, Shan Ying (马善营) (1987). Chinese People's Volunteer Army Order of Battle (中国人民志愿军序列) (in Chinese). Beijing: Chinese People's Liberation Army Publishing House. OCLC 298945765.
- Johnston, William (2003). A War of Patrols: Canadian Army Operations in Korea. Vancouver, British Columbia: UBC Press. ISBN 978-0-7748-1008-1.
- Kuring, Ian (2004). Redcoats to Cams: A History of Australian Infantry 1788–2001. Loftus, New South Wales: Australian Military Historical Publications. ISBN 978-1-876439-99-6.
- Millett, Allan R. (2010). The War for Korea, 1950–1951: They Came From the North. Lawrence, Kansas: University Press of Kansas. ISBN 978-0-7006-1709-8.
- Mossman, Billy C. (1990). United States Army in the Korean War: Ebb and Flow: November 1950 – July 1951. Washington D.C.: Center of Military History, US Army. ISBN 978-1-131-51134-4.
- O'Dowd, Ben (2000). In Valiant Company: Diggers in Battle – Korea, 1950–51. St Lucia, Queensland: University of Queensland Press. ISBN 978-0-7022-3146-9.
- O'Neill, Robert (1985). Australia in the Korean War 1950–53: Combat Operations. Volume II. Canberra, Australian Capital Territory: Australian War Memorial. ISBN 978-0-642-04330-6.
- Rodger, Alexander (2003). Battle Honours of the British Empire and Commonwealth Land Forces 1662–1991. Marlborough, United Kingdom: The Crowood Press. ISBN 1-86126-637-5.
- Varhola, Michael J. (2000). Fire and Ice: The Korean War, 1950–1953. Mason City, Iowa: Da Capo Press. ISBN 978-1-882810-44-4.
- Zhang, Shu Guang (1995). Mao's Military Romanticism: China and the Korean War, 1950–1953. Lawrence, Kansas: University Press of Kansas. ISBN 978-0-7006-0723-5.
Further reading
External links
| Wikimedia Commons has media related to Battle of Kapyong. |
Coordinates: 37°53′N 127°32′E / 37.883°N 127.533°E