Battle of the Nek
| ||||||||||||||||||||||||||||||||||
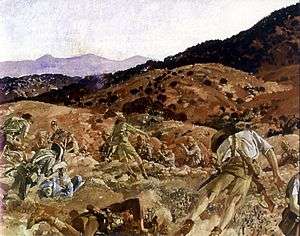
The Battle of the Nek (Turkish: Kılıçbayır Muharebesi) was a small World War I battle fought as part of the Gallipoli campaign. "The Nek" was a narrow stretch of ridge in the Anzac battlefield on the Gallipoli Peninsula. The name derives from the Afrikaans word for a "mountain pass" but the terrain itself was a perfect bottleneck and easy to defend, as had been proven during an Ottoman attack in May. It connected the Anzac trenches on the ridge known as "Russell's Top" to the knoll called "Baby 700" on which the Ottoman defenders were entrenched.
On 7 August 1915, two regiments of the Australian 3rd Light Horse Brigade mounted a futile bayonet attack on the Ottoman trenches on Baby 700, suffering 40% killed for no gain and negligible enemy casualties. The battle became known as "Godley's abattoir".[3]
Prelude
For the three months since the 25 April landings, the Anzac beachhead had been a stalemate. In August an offensive (which later became known as the Battle of Sari Bair) was intended to break the deadlock by capturing the high ground of the Sari Bair range, and linking the Anzac front with a new landing to the north at Suvla. In addition to the main advance north out of the Anzac perimeter, a number of supporting attacks were planned from the existing trench positions.
The attack at the Nek was meant to coincide with an attack by New Zealand troops from Chunuk Bair, which was to be captured during the night. The light horsemen were to attack across the Nek to Baby 700 while the New Zealanders descended from the rear onto Battleship Hill, the next knoll above Baby 700.
The 3rd Light Horse Brigade, which was fast commanded by Colonel F.G. Hughes, comprised the 8th, 9th and 10th Light Horse Regiments. Like the other Australian Light Horse and the New Zealand Mounted Rifles regiments, they had been dispatched to Gallipoli in May as infantry reinforcements, leaving their horses in Egypt.
Battle
The attack was scheduled to commence at 4:30 a.m[4][5] on 7 August. It was to be preceded by a naval bombardment. The 8th and 10th Light Horse regiments were to advance on a front 80 metres (87.5 yards) wide in a total of four waves of 150 men each, two waves per regiment. Each wave was to advance two minutes apart. The distance to the Ottoman line was a mere 27 metres (29.5 yards). Coloured marker flags were carried, to be shown from the captured trenches to indicate success.
On the morning of 7 August, it was clear that the prerequisites for the attack had not been met. The plan drafted by Colonel Andrew Skeen required a simultaneous attack from the rear of Baby 700, thereby creating a hammer and anvil effect on the Ottoman trenches caught in between this pincer movement. Because the New Zealand advance was held up, and failed to reach Chunuk Bair until the morning of 8 August, a day late, the reason for charging at the Nek evaporated. A further part of the Skeen plan required an attack from Steele's Post against German Officers' Trench by the 6th Battalion, 2nd Infantry Brigade of the Australian 1st Division, which failed. The Ottoman machine guns sited there enfiladed the ground in front of Quinn's Post and the Nek. The Ottoman machine gunners did not suffer any casualties as a result. Nonetheless, Major General Sir Alexander Godley, commander of the New Zealand and Australian Division of which the 3rd Light Horse Brigade was then a part, declared that the attack was to proceed.
Owing to a failure of timing instructions, the artillery preparation ceased at 4:23 am while the attack was not launched until 4:30 am.[6] After the artillery firing ceased, no one knew if the bombardment was to continue. It was later discovered that the synchronisation of watches between the artillery officer and the assault officer was overlooked. As a result, the attack was not launched at the scheduled time,[4] giving the Ottoman defenders ample time to return to their trenches and prepare for the assault that they now knew was coming. The first wave of 150 men from the 8th Light Horse Regiment, led by their commander, Lieutenant Colonel Alexander Henry White, "hopped the bags" and went over the top.[7] They were met with a hail of machine gun and rifle fire and within 30 seconds, Colonel White and all of his men were gunned down. A few men reached the Ottoman trenches, and marker flags were reportedly seen flying, but the men were quickly overwhelmed and shot or bayoneted by the Ottoman defenders.
The second wave of 150 followed the first without question two minutes later and met the same fate, with almost all the men cut down by heavy rifle and machine gun fire before they got half way to the Ottoman trench. This was the ultimate tragedy of the Nek, that the attack was not halted after the first wave when it was clear that it was futile. A simultaneous attack by the 2nd Light Horse Regiment (1st Light Horse Brigade) at Quinn's Post against the Ottoman trench system known as "The Chessboard" was abandoned after 49 out of the 50 men in the first wave became casualties. In this case, the regiment's commander had not gone in the first wave and so was able to make the decision to cancel.
Lieutenant Colonel Noel Brazier, commander of the 10th Light Horse Regiment, attempted to have the third wave cancelled, claiming that "the whole thing was nothing but bloody murder". He was unable to find Colonel Hughes, and unable to persuade the Brigade Major, Colonel John Antill, who had received the reports that marker flags, implying success, had been sighted. This report of marker flags was subsequently confirmed in a Turkish article published after the war, where it was stated by a man who had been at the Nek that a couple of men with a marker flag reached the Ottoman trench and raised the flag, but were killed. Colonel Antill had not checked the scene to establish if it was of any purpose to send the next wave, and issued the order for the third wave to proceed. The third wave "hopped the bags" and the assault came to a quick end as before. On this assault, many men launched themselves out of the trenches and tried to dive for cover, having performed their duty to attack, but having no ambition to commit mindless suicide by attacking clearly impenetrable defences. This explains the lower casualty rate for the 10th Light Horse Regiment. Finally, Colonel Hughes was informed by a messenger about the futility of the situation and ordered Colonel Antill to call off the attack, but confusion in the right area of the fire trench, due to an officer not being told of the cancellation, led to around 75 to 80 men of the fourth wave going over, and being cut down in less than a minute. By 4:45 a.m. the ridge was covered with dead and wounded Australian soldiers, most of whom remained where they fell for the duration of the campaign.
Aftermath

A further consequence of the failure to call off the attack at the Nek was that a supporting attack by two companies of the Royal Welch Fusiliers was launched from the head of Monash Valley, between Russell's Top and Pope's Hill, against the "Chessboard" trenches. Sixty-five casualties were incurred before the attack was aborted.
Of the 600 Australians from the 3rd Light Horse Brigade who took part in the attack, the casualties numbered 372; 234 out of 300 men from the 8th Light Horse Regiment, of whom 154 were killed, and 138 out of the 300 men from the 10th, of whom 80 were killed. The Ottoman losses were negligible but are known to include eight dead: the Australians charged with unloaded rifles with fixed bayonets and were unable to fire.[2]

When Commonwealth burial parties returned to the peninsula in 1919 after the war's end, the bones of the dead Light Horsemen were still lying thickly on the small piece of ground. The Nek Cemetery now covers most of no-man's land of the tiny battlefield, and contains the remains of 316 Australian soldiers, most of whom fell during the 7 August attack, of whom only five could be identified.[8]
Trooper Harold Rush of the 10th Light Horse Regiment died in the third wave. His body was one of the few identified and he is buried in Walker's Ridge Cemetery. His epitaph famously reads "His last words, Goodbye Cobber, God bless you".
Legacy
The battle is depicted in the climax of Peter Weir's 1981 movie, Gallipoli, though it inaccurately portrays the offensive as a diversion to reduce Ottoman opposition to the landing at Suvla Bay.[9]
Notes
- ↑ "The Battle of Sari Bair, 1915". First World War.com. Retrieved 12 October 2016.
- 1 2 "Comprehensive list of Australian, British and Turkish Nek Killed in Action". Australian Light Horse Studies Centre. Retrieved 2008-08-24.
- ↑ "Curriculum topic: Anzac Day books". Education Queensland. Archived from the original on 5 March 2012. Retrieved 28 November 2013.
- 1 2 "12.The Nek – Nek Cemetery". Visiting Gallipoli Today (Australian Government website). Archived from the original on 24 October 2007. Retrieved 2007-11-04.
- ↑ "World War I Timeline - Gallipoli". University of San Diego History Department. Retrieved 2007-11-04.
- ↑ "Australian Light Horse Studies Centre - The Nek and Hill 60". Retrieved 2010-06-12.
- ↑ Burness, Peter (1990). "White, Alexander Henry (1882–1915)". Australian Dictionary of Biography. Volume 12. Carlton, Victoria: Melbourne University Press. ISBN 9780522842364.
- ↑ "The Gallipoli Campaign, 1915" (PDF). Commonwealth War Graves Commission. Retrieved 2008-08-24.
- ↑ Bean, Charles. "Gallipoli Mission p109". Retrieved 22 March 2012.
References
| Wikimedia Commons has media related to Battle of the Nek. |
- Peter Burness (1996). The Nek: The Tragic Charge of the Light Horse at Gallipoli. ISBN 0-86417-782-8.
- "The Nek - 7 August 1915 - Lest We Forget". Australian Light Horse Studies Centre. Retrieved 2008-08-24.
Coordinates: 40°14′29″N 26°17′18″E / 40.2414°N 26.288385°E