Microphone practice
There exist a number of well-developed microphone techniques used for miking musical, film, or voice sources. Choice of technique depends on a number of factors, including:
- The collection of extraneous noise. This can be a concern, especially in amplified performances, where audio feedback can be a significant problem. Alternatively, it can be a desired outcome, in situations where ambient noise is useful (hall reverberation, audience reaction).
- Choice of a signal type: Mono, stereo or multi-channel.
- Type of sound-source: Acoustic instruments produce a sound very different from electric instruments, which are again different from the human voice.
- Situational circumstances: Sometimes a microphone should not be visible, or having a microphone nearby is not appropriate. In scenes for a movie the microphone may be held above the pictureframe, just out of sight. In this way there is always a certain distance between the actor and the microphone.
- Processing: If the signal is destined to be heavily processed, or "mixed down", a different type of input may be required.
- The use of a windshield as well as a pop shield, designed to reduce vocal plosives.
Basic techniques
There are several classes of microphone placement for recording and amplification.
- In close miking, a microphone is placed relatively close to an instrument or sound source, within three to twelve inches, producing a dry or non-reverberant sound.[1] This serves to reduce extraneous noise, including room reverberation, and is commonly used when attempting to record a number of separate instruments while keeping the signals separate, or when trying to avoid feedback in an amplified performance. Close miking often affects the frequency response of the microphone, especially for directional mics which exhibit bass boost from the proximity effect. Ubiquitous in the tracking of instruments used in pop and popular music, examples of close-mic vocal tracks include many songs on Elliott Smith's Elliott Smith and Either/Or, Lily Allen's "The Fear", the chorus of Fergie's "Glamorous", Imogen Heap's lead on "Hide and Seek", and Madonna's spoken verses on "Erotica".[2]
- In ambient or distant miking, a microphone — typically a sensitive one — is placed at some distance from the sound source. The goal of this technique is to get a broader, natural mix of the sound source or sources, along with ambient sound, including reverberation from the room or hall. Example include The Jesus and Mary Chain's Psychocandy (excepting the vocals), Robert Plant's vocals on songs from Physical Graffiti, Tom Waits's lead vocals on his "junkyard" records, and Mick Jagger's lead-vocals on songs from Exile On Main Street.[3]
- In room miking a distant mic, referred to as the room mic, is used in conjunction with a close mic, "typically placed far enough past the critical distance in a room that the room's ambience and reverberations transduce at an equivalent, if not greater, volume than the sound source itself."[4] Ubiquitous in pop, it is the industry standard for tracking rhythm guitars in rock. A "celebrated" example is the rhythm guitar on Led Zeppelin's "Communication Breakdown"[4] while other examples include John Frusciante's electric guitar parts on BloodSugarSexMagik, Noel Gallagher's lead-guitar on "Champagne Supernova", and Billy Corgan's guitar on "Cherub Rock", "Today", "Bullet With Butterfly Wings", "Zero", and "Fuck You (An Ode To No One)".[5]
- Accent (or Spot) Microphone Placement. Often, the tonal and ambient qualities will sound very different between a distant- and close-miked pickup. Under certain circumstances, it’s difficult to obtain a naturally recorded balance when mixing the two together. For example, if a solo instrument within an orchestra needs an extra mic for added volume and presence, placing the mic too close would result in a pickup that sounds overly present, unnatural and out of context with the distant, overall orchestral pickup. To avoid this pitfall, a compromise in distance should be struck. A microphone that has been placed within a reasonably close range to an instrument or section within a larger ensemble (but not so close as to have an unnatural sound) is known as an accent (or spot) pickup . Whenever accent miking is used, care should be exercised in placement and pickup choices. The amount of accent signal that’s introduced into the mix should sound natural relative to the overall pickup, and a good accent mic should only add presence to a solo passage and not stick out as separate, identifiable pickup. [6] [7][8]
Multi-track recording
Often each instrument or vocalist is miked separately, with one or more microphones recording to separate channels (tracks). At a later stage, the channels are combined ('mixed-down') to two channels for stereo or more for surround sound. The artists need not perform in the same place at the same time, and individual tracks (or sections of tracks) can be re-recorded to correct errors. Generally effects such as reverberation are added to each recorded channel, and different levels sent to left and right final channels to position the artist in the stereo sound-stage. Microphones may also be used to record the overall effect, or just the effect of the performance room.
This permits greater control over the final sound, but recording two channels (stereo recording) is simpler and cheaper, and can give a sound that is more natural.
Stereo recording techniques
(Main article Stereophonic#Recording_methods)
There are two features of sound that the human brain uses to place objects in the stereo sound-field between the loudspeakers. These are the relative level (or loudness) difference between the two channels Δ L, and the time delay difference in arrival times for the same sound in each channel Δ t. The "interaural" signals (binaural ILD and ITD) at the ears are not the stereo microphone signals which are coming from the loudspeakers, and are called "interchannel" signals (Δ L and Δ t). These signals are normally not mixed. Loudspeaker signals are different from the sound arriving at the ear. See the article "Binaural recording for earphones".
Various methods of stereo recording
X-Y technique: intensity stereophony

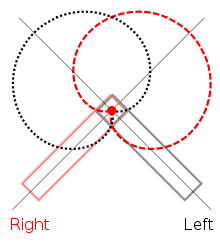
Here there are two directional microphones at the same place, and typically placed at 90° or more to each other.[9] A stereo effect is achieved through differences in sound pressure level between two microphones. Due to the lack of differences in time-of-arrival and phase ambiguities, the sonic characteristic of X-Y recordings is generally less "spacey" and has less depth compared to recordings employing an AB setup.

When the microphones are bidirectional and placed facing +-45° with respect to the sound source, the X-Y-setup is called a Blumlein Pair. The sonic image produced by this configuration is considered by many authorities to create a realistic, almost holographic soundstage.
A further refinement of the Blumlein Pair was developed by EMI in 1958, who called it "Stereosonic". They added a little in-phase crosstalk above 700 Hz to better align the mid and treble phantom sources with the bass ones. [10]
A-B technique: time-of-arrival stereophony
This technique uses two parallel microphones, typically omnidirectional, some distance apart, capturing time-of-arrival stereo information as well as some level (amplitude) difference information, especially if employed close to the sound source(s). At a distance of about 50 cm (0.5 m) the time delay for a signal reaching first one and then the other microphone from the side is approximately 1.5 ms (1 to 2 ms). If the distance is increased between the microphones it effectively decreases the pickup angle. At 70 cm distance it is about equivalent to the pickup angle of the near-coincident ORTF setup.
M/S technique: Mid/Side stereophony

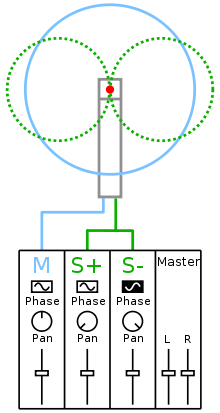
This coincident technique employs a bidirectional microphone (with a Figure of 8 polar pattern) facing sideways and a cardioid (generally a variety of cardioid, although Alan Blumlein described the usage of an omnidirectional transducer in his original patent) facing the sound source. The capsules are stacked vertically and brought together as closely as possible, to minimize comb filtering caused by differences in arrival time.
The left and right channels are produced through a simple matrix: Left = Mid + Side, Right = Mid − Side ("minus" means you add the side signal with the polarity reversed). This configuration produces a completely mono-compatible signal and, if the Mid and Side signals are recorded (rather than the matrixed Left and Right), the stereo width (and with that, the perceived distance of the sound source) can be manipulated after the recording has taken place.
Jecklin Disk technique
The Jecklin Disk technique is similar to A/B recording, with 2 omni-directional microphones at 36 cm apart from each other. A sound absorbing Jecklin disk of 35cm is placed in the middle between the two microphones. The disk makes the apparent separation between the mics much larger than an equivalent A/B recording.
Choosing a technique
If a stereo signal is to be reproduced in mono, out-of-phase parts of the signal will cancel, which may cause the unwanted reduction or loss of some parts of the signal. This can be an important factor in choosing which technique to use.
- Since the A-B techniques use phase differences to give the stereo image, they are the least compatible with mono.
- Jecklin disk has a relatively small distance between the mics. Frequencies coming in sideways can reach only one microphone and will not interfere. Therefore Jecklin disk works reasonably well when converted to mono. Jecklin disk also gives phase shifts and amplitude differences matching well with what a real pair of ears would hear at this position and therefore is well suited for headphone playback.
- In the X-Y techniques, the microphones would ideally be in exactly the same place, which is not possible – if they are slightly separated left to right, there may be some loss of high frequencies when played back in mono, so they are often separated vertically. This only causes problems with sound from above or below the height of the microphones.
- The M/S technique is ideal for mono compatibility, since summing Left+Right just gives the Mid signal back.
The equipment for the techniques also varies from the bulky to the small and convenient. A-B techniques generally use two separate microphone units, often mounted on a bar to define the separation. X-Y microphone capsules can be mounted in one unit, or even on the top of a handheld digital recorder.
M/S arrays can be very compact and fit easily into a standard blimp windscreen, which makes boom-operated stereo recordings possible. They provide a variable soundstage width to match a zoom lens, which can be manipulated in post-production. This makes M/S is a very popular stereo technique for film location recording. They are often used in small 'pencil microphones' to mount on video cameras, sometimes even coupled to the zoom.
References
- ↑ Hodgson, Jay (2010). Understanding Records, p.32. ISBN 978-1-4411-5607-5.
- ↑ Hodgson (2010), p.34.
- ↑ Hodgson (2010), p.35-36.
- 1 2 Hodgson (2010), p.39.
- ↑ Hodgson (2010), p.40.
- ↑ Huber, David Miles (2009). Modern Recording Techniques 7th Edition p.141.
- ↑ Huber, David Miles (2013). Modern Recording Techniques 8th Edition p.141.
- ↑ "DPA Microphones :: How to: Multimiking a classical orchestra". www.dpamicrophones.com. Retrieved 2015-09-22.
- ↑ Michael Williams. "The Stereophonic Zoom" (PDF). Rycote Microphone Windshields Ltd.
- ↑ Eargle, John (2004). The Microphone Book (2 ed.). Focal Press. p. 170. ISBN 0-240-51961-2.
External links
- Michael Williams, The Stereophonic Zoom
- Visualization XY Stereo System - Blumlein Eight/Eight 90° - Intensity Stereophony
- Visualization AB Stereo System - Omni/Omni (Spaced) 60 cm - Time-Of-Arrival Stereophony