Dye penetrant inspection

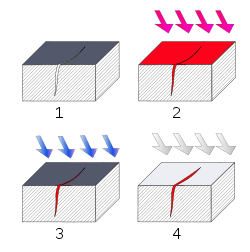
2. Penetrant is applied to the surface.
3. Excess penetrant is removed.
4. Developer is applied, rendering the crack visible.
Dye penetrant inspection (DPI), also called liquid penetrant inspection (LPI) or penetrant testing (PT), is a widely applied and low-cost inspection method used to locate surface-breaking defects in all non-porous materials (metals, plastics, or ceramics). The penetrant may be applied to all non-ferrous materials and ferrous materials, although for ferrous components magnetic-particle inspection is often used instead for its subsurface detection capability. LPI is used to detect casting, forging and welding surface defects such as hairline cracks, surface porosity, leaks in new products, and fatigue cracks on in-service components.
History
The oil and whiting method used in the railroad industry in the early 1900s was the first recognized use of the principles of penetrants to detect cracks. The oil and whiting method used an oil solvent for cleaning followed by the application of a whiting or chalk coating, which absorbed oil from the cracks revealing their locations. Soon a dye was added to the liquid. By the 1940s, fluorescent or visible dye was added to the oil used to penetrate test objects.
Experience showed that temperature and soak time were important. This started the practice of written instructions to provide standard, uniform results. The use of written procedures has evolved, giving the ability for design engineers and manufacturers to get the high standard results from any properly trained and certified liquid penetrant testing technician.
Principles
DPI is based upon capillary action, where low surface tension fluid penetrates into clean and dry surface-breaking discontinuities. Penetrant may be applied to the test component by dipping, spraying, or brushing. After adequate penetration time has been allowed, the excess penetrant is removed and a developer is applied. The developer helps to draw penetrant out of the flaw so that an invisible indication becomes visible to the inspector. Inspection is performed under ultraviolet or white light, depending on the type of dye used - fluorescent or nonfluorescent (visible).
Inspection steps
Below are the main steps of Liquid Penetrant Inspection:
1. Pre-cleaning:
The test surface is cleaned to remove any dirt, paint, oil, grease or any loose scale that could either keep penetrant out of a defect, or cause irrelevant or false indications. Cleaning methods may include solvents, alkaline cleaning steps, vapor degreasing, or media blasting. The end goal of this step is a clean surface where any defects present are open to the surface, dry, and free of contamination. Note that if media blasting is used, it may "work over" small discontinuities in the part, and an etching bath is recommended as a post-blasting treatment.

2. Application of Penetrant:
The penetrant is then applied to the surface of the item being tested. The penetrant is allowed "dwell time" to soak into any flaws (generally 5 to 30 minutes). The dwell time mainly depends upon the penetrant being used, material being tested and the size of flaws sought. As expected, smaller flaws require a longer penetration time. Due to their incompatible nature one must be careful not to apply solvent-based penetrant to a surface which is to be inspected with a water-washable penetrant.
3. Excess Penetrant Removal:
The excess penetrant is then removed from the surface. The removal method is controlled by the type of penetrant used. Water-washable, solvent-removable, lipophilic post-emulsifiable, or hydrophilic post-emulsifiable are the common choices. Emulsifiers represent the highest sensitivity level, and chemically interact with the oily penetrant to make it removable with a water spray. When using solvent remover and lint-free cloth it is important to not spray the solvent on the test surface directly, because this can remove the penetrant from the flaws. If excess penetrant is not properly removed, once the developer is applied, it may leave a background in the developed area that can mask indications or defects. In addition, this may also produce false indications severely hindering your ability to do a proper inspection. Also, the removal of excessive penetrant is done towards one direction either vertically or horizontally as the case may be.
4. Application of Developer:
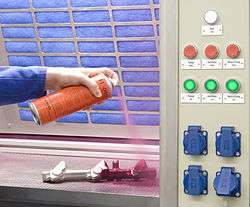
After excess penetrant has been removed, a white developer is applied to the sample. Several developer types are available, including: non-aqueous wet developer, dry powder, water-suspendable, and water-soluble. Choice of developer is governed by penetrant compatibility (one can't use water-soluble or -suspendable developer with water-washable penetrant), and by inspection conditions. When using non-aqueous wet developer (NAWD) or dry powder, the sample must be dried prior to application, while soluble and suspendable developers are applied with the part still wet from the previous step. NAWD is commercially available in aerosol spray cans, and may employ acetone, isopropyl alcohol, or a propellant that is a combination of the two. Developer should form a semi-transparent, even coating on the surface.
The developer draws penetrant from defects out onto the surface to form a visible indication, commonly known as bleed-out. Any areas that bleed out can indicate the location, orientation and possible types of defects on the surface. Interpreting the results and characterizing defects from the indications found may require some training and/or experience [the indication size is not the actual size of the defect].
5. Inspection:
The inspector will use visible light with adequate intensity (100 foot-candles or 1100 lux is typical) for visible dye penetrant. Ultraviolet (UV-A) radiation of adequate intensity (1,000 micro-watts per centimeter squared is common), along with low ambient light levels (less than 2 foot-candles) for fluorescent penetrant examinations. Inspection of the test surface should take place after 10- to 30-minute development time, depends of product kind. This time delay allows the blotting action to occur. The inspector may observe the sample for indication formation when using visible dye. It is also good practice to observe indications as they form because the characteristics of the bleed out are a significant part of interpretation characterization of flaws.
6. Post Cleaning:
The test surface is often cleaned after inspection and recording of defects, especially if post-inspection coating processes are scheduled.
Advantages and disadvantages
The main advantages of DPI are the speed of the test and the low cost. Disadvantages include the detection of only surface flaws, skin irritation, and the inspection should be on a smooth clean surface where excessive penetrant can be removed prior to being developed. Conducting the test on rough surfaces, such-as "as-welded" welds, will make it difficult to remove any excessive penetrant and could result in false indications. Water-washable penetrant should be considered here if no other option is available. Also, on certain surfaces a great enough color contrast cannot be achieved or the dye will stain the workpiece.[1]
Limited training is required for the operator — although experience is quite valuable. Proper cleaning is necessary to assure that surface contaminants have been removed and any defects present are clean and dry. Some cleaning methods have been shown to be detrimental to test sensitivity, so acid etching to remove metal smearing and re-open the defect may be necessary.[2]
Standards
- ISO 3059, Non-destructive testing - Penetration testing and magnetic particle testing - Viewing conditions
- ISO 3452-1, Non-destructive testing. Penetrant testing. Part 1. General principles
- ISO 3452-2, Non-destructive testing - Penetrant testing - Part 2: Testing of penetrant materials
- ISO 3452-3, Non-destructive testing - Penetrant testing - Part 3: Reference test blocks
- ISO 3452-4, Non-destructive testing - Penetrant testing - Part 4: Equipment
- ISO 3452-5, Non-destructive testing - Penetrant testing - Part 5: Penetrant testing at temperatures higher than 50 °C
- ISO 3452-6, Non-destructive testing - Penetrant testing - Part 6: Penetrant testing at temperatures lower than 10 °C
- ISO 10893-4: Non-destructive testing of steel tubes. Liquid penetrant inspection of seamless and welded steel tubes for the detection of surface imperfections.
- ISO 12706, Non-destructive testing - Penetrant testing - Vocabulary
- ISO 23277, Non-destructive testing of welds - Penetrant testing of welds - Acceptance levels
- EN 1371-1, Founding - Liquid penetrant inspection - Part 1: Sand, gravity die and low pressure die castings
- EN 1371-2, Founding - Liquid penetrant inspection - Part 2: Investment castings
- EN 2002-16, Aerospace series - Metallic materials; test methods - Part 16: Non-destructive testing, penetrant testing
- EN 10228-2, Non-destructive testing of steel forgings - Part 2: Penetrant testing
- ASTM International (ASTM)
- ASTM E 165, Standard Practice for Liquid Penetrant Examination for General Industry
- ASTM E 1417, Standard Practice for Liquid Penetrant Testing
- ASME Boiler and Pressure Vessel Code, Section V, Art. 6, Liquid Penetrant Examination
- ASME Boiler and Pressure Vessel Code, Section V, Art. 24 Standard Test Method for Liquid Penetrant Examination SE-165 (identical with ASTM E-165)
See also
References
- ↑ Kohan, Anthony Lawrence (1997), Boiler operator's guide (4th ed.), McGraw-Hill Professional, p. 240, ISBN 978-0-07-036574-2.
- ↑ http://www.ndt-ed.org/EducationResources/CommunityCollege/PenetrantTest/MethodsTech/materialsmear.htm
External links
| Wikimedia Commons has media related to Liquid penetrant inspection. |
- Penetrant and Magnetic Particle Testing at Level 2, International Atomic Energy Agency, 2000 (pdf, 2.5 MB).
- - technical reports summarizing fluorescent penetrant inspection research efforts
- - an article on how to perform a sensitive visible dye penetrant examination
- Liquid penetrant testing on NDTWiki.com - Dye penetrant on professional Non Destructive Testing Wiki (NDTWiki.com)
- Video on dye penetrant inspection, Karlsruhe University of Applied Sciences