Historical examples of flanking maneuvers
In military tactics, a flanking maneuver, or flanking manoeuvre (also called a flank attack), is an attack on the sides of an opposing force. If a flanking maneuver succeeds, the opposing force would be surrounded from two or more directions, which significantly reduces the maneuverability of the outflanked force and its ability to defend itself.
Flanking maneuvers played an important role in nearly every major battle in history, and have been used effectively by famous military leaders like Hannibal, Julius Caesar, Khalid ibn al-Walid,[1] Napoleon, Saladin, Nader Shah, William Tecumseh Sherman and Stonewall Jackson throughout history. Sun Tzu's The Art of War strongly emphasizes the use of flanking, although it does not advocate completely surrounding the enemy force as this may induce it to fight with greater ferocity if it cannot escape.[2]
A flanking maneuver is not always effective, as the flanking force may itself be ambushed while maneuvering, or the main force is unable to pin the defenders in place, allowing them to turn and face the flanking attack.
Ancient warfare
Battle of Salamis
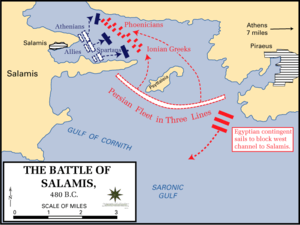
During the second Persian invasion of Greece, after great losses at the Battle of Thermopylae and the Battle of Artemisium, the Greeks once again brought the Persians to blows in the Battle of Salamis in the year 480 BC. The Greek fleet numbered 378 triremes while the Persian may have numbered more than four times that.[3] However, in the narrow confines of the straits, the numerical superiority of the Persians became an active hindrance. The Persians became disorganized in the cramped straits, and the Greeks were in a position to flank from the northwest. Retreating Persian ships were befouled by the approaching second and third lines who were advancing to the line of battle.
In the aftermath of the battle, Xerxes retreated to Asia with the majority of his army. In his wake he left Mardonius, who would be decisively defeated by the Greek army the following year in the Battle of Plataea.
Battle of Leuctra
In 371 BC, the armies of Sparta and Thebes gave battle near the city of Leuctra, despite the superior numbers and fearful reputation of the Spartan army, the unbalanced Theban attack, with the Sacred Band of Thebes on the extreme left and in echelon formation disorganized the Spartan lines and spread confusion in its army. Before even the extreme Spartan right wing had enteerd the fray, the battle was lost for them. It was Epaminondas greatest triumph and shattered the muyth of Spartan invencibility.
The battle of Leuctra has become the archetypical example of a flanking attack since. It inspired the adoption of the echelon formation by the Macedonian armies of Philip II and Alexander the Great.
Battle of Cannae

In 216 BC Hannibal accomplished one of the most famous flanking maneuvers of all history at the Battle of Cannae. Using a double flanking maneuver known as a Pincer movement, Hannibal managed to surround and kill nearly the entirety of a larger Consular Roman Army. The defeat sent the Roman Republic into complete disarray [4] and remains a singular example of outstanding tactical leadership. As military historian Theodore Ayrault Dodge wrote:
Few battles of ancient times are more marked by ability ... than the battle of Cannae. The position was such as to place every advantage on Hannibal's side. The manner in which the far from perfect Hispanic and Gallic foot was advanced in a wedge in échelon ... was first held there and then withdrawn step by step, until it had the reached the converse position ... is a simple masterpiece of battle tactics. The advance at the proper moment of the African infantry, and its wheel right and left upon the flanks of the disordered and crowded Roman legionaries, is far beyond praise. The whole battle, from the Carthaginian standpoint, is a consummate piece of art, having no superior, few equal, examples in the history of war.[5]
Battle of Pharsalus
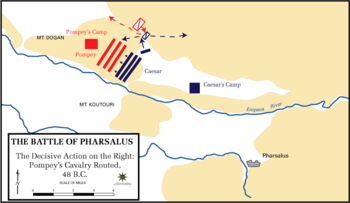
In 48 BC at the Battle of Pharsalus, Julius Caesar faced the army of Pompey, which not only outnumbered his more than four to one, but was also in more or less friendly territory. Conversely, Caesar's own army, due to his blocked crossing of the Adriatic Sea, had been cut in half as well as cut off from their supply lines. The rest of the army lay on the opposing shores of the Adriatic, unable to aid their comrades.[6]
Anticipating a turning of his flank, Caesar had hidden a line of reserves in this area. When Pompey turned Caesar's cavalry, rather than finding a route through which to attack his enemy in the rear, he encountered 2,000 legionnaires. These were armed with pila, normally a missile weapon such as a javelin, but the legionnaires used their length as a stabbing anti-cavalry weapon instead. Having turned back the flank of his enemy, Caesar now found his own open flank, which he used to route the army of Pompey.[7][8]
After his defeat, Pompey fled to Egypt, and the battle marked the effective end of the Wars of the First Triumvirate.
Early modern warfare
Battle of Garigliano
On 29 December 1503, the Spanish army of Gonzalo Fernández de Córdoba crossed the River Garigliano using an upriver pontoon bridge to defeat the French army. The outnumbered Spaniard and Italian troops left the main army in front of the same positions they had keep against the French army of the Marquis of Saluzzo. The bold maneuver of the Gran Capitán spread terror in the demoralizad French army that began to retreat. The Spanish main body, led by Andrade and Mendoza, crossed the river in front of the retreating army and transformed the retreat into a rout.
Despite Chevalier Bayard brave rearguard actions at Mola bridge, the French army was forced to seek refuge in Gaeta where the surrendered a few days later.
This victory and the previous one at the battle of Cerignola formed the basis for the fearful reputation of the Spanish infantry, the Tercios Viejos that lasted for more than a century until the battle of Rocroi.
Napoleon Bonaparte
Ulm Campaign
The Ulm Campaign of September to October 1805 saw Napoleon Bonaparte engage in a monthlong maneuver aimed at severing Austrian lines and eventually capturing an entire Austrian army. The casualties were exceptionally one-sided for a modern battle, with the French suffering 2,000 casualties and the Austrians suffering 60,000, mostly captured.[9] As Trevor Dupuy put it:
Ulm was not a battle; it was a strategic victory so complete and so overwhelming that the issue was never seriously contested in tactical combat. Also, This campaign opened the most brilliant year of Napoleon's career. His army had been trained to perfection; his plans were faultless.[10]
The aftermath of the campaign would quickly see the fall of Vienna, and the final exit of Austria as a member of the Allied forces. It is widely regarded as the inspiration for the Schlieffen Plan, as the world would see it unfold some 100 years later. The campaign would also prove the effectiveness of la manoeuvre sur les derrières, wherein a pinning force was utilized to occupy the enemy while a flanking force descended at the critical moment to decide the battle.[11]
Battle of Austerlitz

The December 1805 Battle of Austerlitz is widely seen as a tactical masterpiece of the same stature as Cannae, the celebrated triumph by Hannibal some 2,000 years before.[12] Prior to the engagement, Napoleon went to great lengths to indicate to the Russians and Austrians that his forces were weak and he was on the verge of seeking a peace.[13] He successfully hid the presence of some 75,000 troops from his enemies while still keeping them within reinforcement range, and even went so far as to retire, and give his enemies the confidence of occupying the high ground, as well as intentionally weakening his right flank.[14][15]
The engagement resulted in the final exit of Austria from the war, and the expulsion of the Russian Army from the continental war. The French Army had lost about 13% of its numbers, while the Allies lost a full 36,000 men, 42% of their total force.[16][17]
Franco-Prussian War
The Franco-Prussian War was marked by two devastating encirclements by the Prussian Army of the French. Although a spirited resistance movement continued in France for some time, these effectively ended large scale fighting for the rest of the war.
Siege of Metz
Following a loss at the Battle of Gravelotte, the French Army of the Rhine retreated to the defenses of Metz.[18][19] Given their fortified entrenchment, the Prussians readily encircled the position and laid siege. The army would be forced to surrender two months later, but not before a doomed attempt by Napoleon III to rescue the Army of the Rhine.
Battle of Sedan
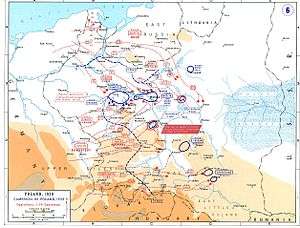
.jpg)
In September 1870, Napoleon III had formed the Army of Châlons to attempt to relieve the 150,000 French troops invested at Metz. After losing a hard battle at Beaumont-en-Argonne, the Army of Châlons retreated toward Sedan. Exhausted and short on supplies, the French planned to rest in the town before reengaging the Prussian forces.[20]
Unfortunately for the French, the well rested and supplied Prussians split their forces into three groups, which they quickly used to flank and encircle the French, forcing them to fight the quite adverse Battle of Sedan. After staggering casualties, the force along with the king surrendered the following morning. Along with the surrender of the King, came the implicit surrender of the French government. Along with the surrender of the Army of Châlons, came the inevitable surrender of the force at Metz, which they were intended to relieve.
The First World War
Western Front

The First World War began with one of the largest flanking maneuvers in military history, both in terms of the strength of the forces in the field as well as the vast geographic area through which they were deployed. Originally, the Schlieffen Plan for invasion of France by Germany called for a force of 1.36 million troops in a "scythe-sweep" through Belgium and into France toward Paris [21][22] The eventual force deployed by Helmuth von Moltke the Younger in 1914 totaled instead, 970,000 troops.[23] While the German Army did manage to successfully occupy virtually all of Belgium, the offensive became mired in a number of costly and indecisive battles, such as those in Yser and Ypres, and eventually was halted in large part with the First Battle of the Marne. In November 1914 Erich von Falkenhayn, who had replaced Moltke in September, informed the Kaiser that no great successes could be expected on the Western Front, and that strength, morale, and supplies were exhausted.[24]
The eventual outcome of this strategy was the Race to the Sea, where a series of flanking attempts by both sides resulted in an unbroken line stretching from Switzerland in the south to the North Sea in the north. From this point forward on the Western Front, flanking became impossible and the war eventually devolved into a protracted war of attrition.[25]
Sinai and Palestine Front
On several occasions during the Sinai and Palestine Campaign the German and Ottoman forces were successfully outflanked by the mobile Egyptian Expeditionary Force. At the Battle of Mughar Ridge and Battle of Megiddo they were outflanked, while at the Battle of Magdhaba and Battle of Beersheba they were surrounded.
The Second World War
While the First World War saw the introduction of large scale mechanization in modern warfare, the lack of tactical experience of the commanders and the technical limitations of the weapon systems greatly limited their usefulness.[26] For example, the Mark V tank employed by the allies boasted a maximum speed of five miles per hour and an operational limit of 10 hours under ideal circumstances. In the reality of the battlefield, this could be greatly reduced, and many tanks were greatly slowed or dead-lined by adverse terrain.[27]
However, by the start of the Second World War armies had been thoroughly mechanized and the available weapon systems had greatly increased their capabilities. In comparison to the Mark V, the M4 Sherman utilized by the Allies featured a maximum speed of 30 miles per hour and an operational range of up to 120 miles.[28] These increased capabilities revolutionized the battlefield. Whereas cavalry, the traditional flanking force, had been rendered moot in the previous war by artillery and automatic weapons fire, armor emerged in this new conflict as the mobile flanking force of the modern era.
Invasion of Poland
In the Invasion of Poland Germany utilized the speed of its mechanized strength to break through the flanks of, or between the flanks of Polish forces and into the interior of the country. The result of this was, rather than maintaining a front line opposing the enemy, the Poles found themselves in multiple isolated pockets with the mass of the German army occupying the original front, and the German mobile divisions behind their own positions.
They were therefore unable to retreat, resupply, or be reinforced. Furthermore, as makes intuitive sense, a less mobile force finding itself in a pocket or salient, even if a breakout is achieved, cannot but find themselves encircled again.
 German Dispositions of the opposing forces on 31 August 1939 with the German order of battle overlaid in pink. |
 The advances made by the Germans, and the disposition of all troops from 1 to 14 September |
Desert Storm

The ground campaign of Desert Storm during the 1991 Gulf War was characterised by the flanking attack of the Coalition forces, the massive "left hook" which avoided the Iraqi forces dug in along the Kuwait–Saudi border; but instead swept past them in the west. Once the allies had penetrated deep into Iraqi territory, they turned eastward, launching a flank attack against the elite Republican Guard before it could escape. The Iraqis resisted fiercely from dug-in positions and stationary vehicles, and even mounted armored charges.
Unlike many previous engagements, the destruction of the first Iraqi tanks did not result in a mass surrender. The Iraqis suffered massive losses and lost dozens of tanks and vehicles, while U.S. casualties were comparatively low, with a single Bradley knocked out.[29]
References
- ↑ A.I. Akram (1970). The Sword of Allah: Khalid bin al-Waleed, His Life and Campaigns. National Publishing House. Rawalpindi. ISBN 0-7101-0104-X.
- ↑ The Art of War Section VII, 36
- ↑ http://www.perseus.tufts.edu/cgi-bin/ptext?lookup=Hdt.+toc Perseus online version
- ↑ Livy. The History of Rome by Titus Livius: Books Nine to Twenty-Six, trans. D. Spillan and Cyrus Edmonds. London: Henry G. Bohn, 1868.
- ↑ Theodore Ayrault Dodge, Hannibal (N.Y., N.Y.: Perseus Publishing, 2004), pages 378–379.
- ↑ Plutarch Pompey 65.5, Dryden translation: p. 465.
- ↑ Julius Caesar, Commentarii de Bello Civili, III 89,2
- ↑ http://www.britannica.com/EBchecked/topic/455221/Battle-of-Pharsalus
- ↑ Chandler, David G. The Campaigns of Napoleon. New York: Simon & Schuster, 1995. ISBN 0-02-523660-1
- ↑ Trevor Dupuy, Harper Encyclopedia of Military History. p. 816.
- ↑ Chandler, David G. The Campaigns of Napoleon. New York: Simon & Schuster, 1995. ISBN 0-02-523660-1
- ↑ Adrian Gilbert (2000). The Encyclopedia of Warfare: From Earliest Time to the Present Day. Taylor & Francis. p. 133. ISBN 978-1-57958-216-6. Retrieved 11 July 2014.
- ↑ Frank McLynn, Napoleon: A Biography. p. 342
- ↑ Chandler, David G. The Campaigns of Napoleon. New York: Simon & Schuster, 1995. ISBN 0-02-523660-1
- ↑ Richard Brooks (editor), Atlas of World Military History. p. 109
- ↑ French numbers at the battle vary depending on the account; 65,000, 67,000, 73,000, or 75,000 are other figures often present in the literature. The discrepancy arises because about 7,000 men of Davout's III Corps were not at the battle right when it started. Including or not including these troops is a matter of preference (in this article, they will be included as separate from the 67,000 French soldiers originally on the field). David G. Chandler, The Campaigns of Napoleon. p. 416 gives 67,000 (without Davout's III Corps)
- ↑ Allied numbers at the battle vary depending on the account; 73,000, 84,000, or 85,000 are other figures often present in the literature. Andrew Uffindell, Great Generals of the Napoleonic Wars. p. 25 gives 73,000. David G. Chandler, The Campaigns of Napoleon. p. 417 gives 85,000. In Napoleon and Austerlitz (1997), Scott Bowden writes that the traditional number given for the Allies, 85,000, reflects their theoretical strength, and not the true numbers present on the battlefield.
- ↑ Michael Howard, The Franco Prussian War ISBN 0-415-26671-8
- ↑ Michael Howard, The Franco Prussian War ISBN 0-415-26671-8
- ↑ The Nest in the Altar or Reminiscences of the Franco-Prussian War of 1870 reprinted by Chapter Two, London in 1999, ISBN 1-85307-123-4.
- ↑ Ritter, G. (1958). The Schlieffen Plan, Critique of a Myth. London: O. Wolff. ISBN 0-85496-113-5. Retrieved 23 January 2015.
- ↑ Holmes, T. M. (April 2014). "Absolute Numbers: The Schlieffen Plan as a Critique of German Strategy in 1914". War in History (Thousand Oaks, CA: Sage) 21 (2). ISSN 0968-3445
- ↑ Holmes, T. M. (April 2014). "Absolute Numbers: The Schlieffen Plan as a Critique of German Strategy in 1914". War in History (Thousand Oaks, CA: Sage) 21 (2). ISSN 0968-3445
- ↑ Foley, R. T. (2005). German Strategy and the Path to Verdun: Erich Von Falkenhayn and the Development of Attrition, 1870–1916. Cambridge: CUP. ISBN 978-0-521-04436-3.
- ↑ Kaye, C.A. 1957. "Military Geology in the United States Sector of the European Theater of Operations during World War II". Bulletin of the Geological Society of America 68(1): 47–54, 1 fig.
- ↑ Hart, Peter (2004) The Somme: The darkest hour on the Western Front. Cassell Military Paperbacks. ISBN 0304367354
- ↑ Fletcher, David (2011). British Mark V Tank. Osprey Publishing. ISBN 1-84908-351-7.
- ↑ Zaloga, Steven (1993). Sherman Medium Tank 1942–1945. UK: Osprey Publishing. ISBN 978-1-85532-296-7.
- ↑ Twentieth Century Battlefields: The Gulf War