Hobart Area Transportation Study
.jpg)
The Hobart Area Transportation Study was a comprehensive transport plan released in 1965 for the purpose of examining the transport needs of the Hobart metropolitan area over the proceeding 20 years. The study predicted the majority of the proposed traffic corridors would need to be operational by the 1985 target year.
Ultimately, the majority of the study's recommendations were brought to fruition in some form or another. Sections of Hobart's three major radial highways—the Tasman Highway (Tasman Bridge to Airport), the Brooker Highway (North of Berriedale) and the Southern Outlet—were influenced in their construction by the study's recommendations for grade-separated, limited-access freeway designs.
History
From the advent of the Motor vehicle to the sixties, the number of vehicles registered had increased to almost 40,000 in the Hobart Area. The influx of motor vehicles in and around Hobart placed great Burdon on the road system as it then existed.[1]
In 1963, the Department of Public Works, the Transport Commission and Hobart City Council initiated the first urban transportation study conducted in Australia. The Study was undertaken by Wilbur Smith and Associates[2] during the years 1963 and 1964, and the findings and suggestions were published in 1965.[1][3]
Application
The Hobart Area Transport study area was to encompass Hobart's estimated metropolitan boundary in 1985 which extended as far as Granton in the north; Sorell to the east; Howrah to the south east; and Kingston to the south west.[1]
The study was engaged through detailed surveys from the public, analysing traffic statistics and analysing past traffic trends, in an attempt to predict traffic patterns in Hobart with a target year of 1985 – 20 years from the time of publication.[1]
Publication of the Study
The Hobart area Transportation Study proposed the construction of four Freeways and one Expressway, a significant upgrade and expansion of the Brooker Highway, a duplication of the Tasman Bridge, the possible creation of an additional crossing of the River Derwent and several smaller projects within the Hobart CBD. The study also encouraged greater use of roads through public and private transport and discouraged the use of Hobart's passenger train services as a primary mode of Transport in the city.[1] The study acknowledged the capital costs of the proposed Freeways would be too much for the Tasmanian government to undertake alone, but suggested the possibility of Australian Government assistance if pursued.[1] The study was composed of the following principle segments:
| Side of River | Name | Image | Purpose | Status | Built | Notes |
|---|---|---|---|---|---|---|
| Western Shore | Northside Freeway | N/A | Inner city Freeway | Abandoned | N/A | A proposed Link north of the Hobart CBD extending from the Southern Outlet at Davey Street via the foot hills of West Hobart, crossing the Brooker Highway between Melville and Brisbane Streets, and extending through the Queens Domain to the Tasman Highway.[2] Termed the Northside Freeway, its function was intended to relieve local streets of excess traffic. The Northside Freeway was proposed to be a fully grade separated Freeway. Momentum for this Freeway stalled which has resulted in other proposals for a Hobart Bypass.[2][4] |
| Davey Street | 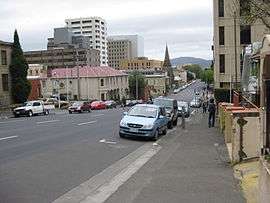 |
Inner city couplet | Complete | 1987 | A recommended connection to join the Southern Outlet with the Tasman Highway with the use of the then-proposed One-way couplet of Davey and Macquarie streets as complimentary arterial roads. At the time, separate viaducts were proposed to be constructed over the rail lines east of Brooker Avenue to provide better access from the south side of the Hobart CBD to the Tasman Highway. At the time the study was released, Hobart CBD's roads were all two way with no direct way to get between the Tasman Highway/Brooker Highway and the Southern Outlet. The construction of the Sheraton was the catalyst for the new couplet road system. By this time the need for a viaduct over the rail yards had diminished as that section of the rail yards had fallen into disuse. | |
| Macquarie Street | .jpg) | |||||
| Grosvenor Expressway | N/A | Sandy Bay Link | Abandoned | N/A | The Grosvenor Expressway was proposed to commence at Sandy Bay Road (Lord Street) and travel towards the Northside Freeway connecting with the Freeway near Liverpool Street. This bypass route was designed with the intention of alleviating traffic from Sandy Bay Road.[1] | |
| Domain Freeway | ? | City Bypass | Complete (highway) |
? | This proposal was suggested to be a limited access route parallel to the River Derwent just east of the Queens Domain. This route was designed to connect the Tasman Bridge with the Brooker Highway as a six-lane divided highway. This Freeway was also intended to function as an alternative to the Brooker Highway and improve connections to the bridge over the River Derwent.[1] This route was constructed as a Single carriageway Limited-access highway, featuring At-grade intersections. | |
| Brooker Highway | 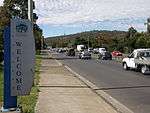 |
Northern Radial | Partially Complete
(Only 4 lanes) |
1954 onwards | At the time of the study's release, parts of the Brooker Highway were already operational. This study proposed that the highway be expanded to a six-lane divided Highway extending from a connection with the Northside Freeway north to Elwick Road in Glenorchy. From this point to Berriedale, minor improvements would have been required to achieve complete four-lane freeway operation. From Berriedale, The continuation of the Highway to Granton would follow a new corridor bypassing the suburbs of Claremont and Austins Ferry.[1] Specific points for Grade separated Interchanges were suggested at Burnett Street, Cleary's Gates Road, New Town Road, Hopkins Street, Derwent Park Road, Elwick/Goodwood Roads, Main Road, Berriedale Road, Claremont Link Road, and Abbotsfield Roads.[1] The extension to Granton was completed as a four-lane divided Highway from Berriedale, however the grade separation proposal for the southern section of the Highway has not been addressed with several new traffic lights installed since this plan was released. | |
| Southern Outlet Freeway |  |
Southern Radial | Complete (highway) |
1969 Onwards | Sections of the Southern Outlet were already under construction as a two-lane expressway at the time of the study's release. The study recommended construction of a four-lane divided highway to connect to the Huon Highway and also proposed bypassing Kingston.[1] Today, the Southern Outlet is a grade-separated dual carriageway highway for its entire length between Davey Street, Hobart and the Kingston Interchange.
The Channel Highway reaching an 18,000 AADT was the catalyst to complete the remaining section of the transportation study – The Kingston Bypass.[5][6][7] Completed in 2011, the AU$41 million bypass was designed to relieve the road network within Kingston by diverting through traffic around the town.[5] While this bypass has only been constructed as a two-lane expressway, The transport corridor it passes through has been designed to cater for future expansion.[6] | |
| Kingston Bypass |  | |||||
| Eastern Shore | Southeastern Freeway | N/A | Southern Radial | Abandoned | N/A | The Southeastern Freeway was proposed to travel from Rosny Hill To Howrah running Parallel to Clarence Street.[1] However, this Highway was deemed to be unrealistic in that it was too expensive and would have come in close proximity to Schools and other vital services. The idea of this Arterial road was a product of the "Hobart Transport Revision", released several years later.[3] This new proposal entailed construction of a Bellerive Bypass,[3] which was constructed to avoid already developed land. |
| Bellerive Bypass |  |
Complete | 1989 | |||
| Eastern Outlet Freeway |  |
Eastern Radial | Complete to Airport (highway) |
1964 Onwards | The Eastern Outlet (known today as the Tasman Highway) was proposed to extend as a Freeway from Rosny Hill to Sorell.[1] The construction of this Freeway was not believed to be warranted before 1985.[1] The Tasman Highway's construction has been influenced by this study with bypasses constructed at Warrane, Mornington and Cambridge since the publication of this study. Additionally the Tasman Highway has also been duplicated to the Hobart Airport since the study's release. | |
| Tasman Bridge |  |
Complete | Upon the release of this study, The Tasman Bridge had only recently replaced the Hobart Bridge as the primary River Derwent crossing, and it was perceived that more traffic would make use of the new bridge than first estimated. The study proposed the duplication of the Tasman bridge.[1] However the Tasman Bridge disaster occurred not long after this plan was released and it was then decided to upgrade the existing bridge rather than duplicate it.[3] | |||
| Lindisfarne Road | 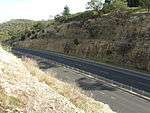 |
Northern Radial (eastern shore) | Complete | 1964 Onwards | Lindisfarne Road (known today as the East Derwent Highway) was (at the time of this study) proposed to service the immediate suburbs on the eastern shore to North of the Tasman Bridge. The Tasman Bridge disaster made apparent the need for an alternate river crossing further North,[3] and thus this road was partially upgraded and in the southern sections constructed from scratch north of Geilston Bay. The northbound highway exists parallel to the river all the way to its conclusion at Bridgewater.
While not directly proposed at the time of this study's publication, further investigation of the area as a potential river crossing was suggested. The Bowen Bridge is a 4 Lane Bridge located 8 km upstream of the Tasman Bridge.[3] Due to the distance from the city and the lack of development on the eastern shore at this location, the bridge is currently underutilised. With this said when the bridge is relied upon due unforeseen circumstances on the Tasman Bridge it fails to live up to its expectations due to inadequate connecting road infrastructure of the eastern shore. | |
| Bowen Bridge |  |
Complete | 1984 |
Estimates
The Hobart Area Transportation study was also released with estimates of daily Traffic of the proposals for the Target year of 1985.[1]
|
|
See also
Melbourne:
Adelaide:
- Metropolitan Adelaide Transport Study - analogous 1968 transport plan.
References
- 1 2 3 4 5 6 7 8 9 10 11 12 13 14 15 16 17 Hobart Area Transportation Study. Hobart, Tasmania: Wilbur Smith and Associates. 1965.
- 1 2 3 "The city bypass that stalled". The Mercury. 2010. Retrieved 2011-10-17.
- 1 2 3 4 5 6 Hobart Transport Revision. Hobart, Tasmania: Department of Public Works. 1970.
- ↑ "Streets switch sparks divide". The Mercury. 2010. Retrieved 2011-10-17.
- 1 2 "Kingston bypass opens". The Mercury. 2011-11-22. Retrieved 2013-03-17.
- 1 2 "Channel Highway, Kingston Bypass" (PDF). Government of Tasmania. 2009. Retrieved 2013-03-17.
- ↑ "Kingston Bypass Bridges" (PDF). VEC Civil Engineering. 2012. Retrieved 2011-10-17.
- ↑ "Urban Traffic Planning in Hobart 2007". John Livermore
Enterprises. 2007. Retrieved 2011-10-17. line feed character in
|publisher=at position 16 (help) - ↑ "Kingston & Environs Transport Study" (PDF). Department of Infrastructure, Energy and Resources. 2006. Retrieved 2011-10-18.
External links
| Highways | ||
|---|---|---|
| Major roads | ||
| Bridges | ||
| Interchanges | ||
| Proposals | ||