Kirriemuir Sculptured Stones

Kirriemuir 2 rear. Photograph by Kyle Munro
Coordinates: 56°38′39″N 2°53′21″W / 56.6441°N 2.8891°W / 56.6441; -2.8891
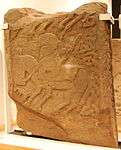
The Kirriemuir Sculptured Stones are a series of Class II and III Pictish stones found in Kirriemuir, Angus, Scotland. Their existence points to Kirriemuir being an important ecclesiastical centre in the late first millennium AD.
Location
The stones were found in the grounds of Kirriemuir Kirk grid reference NO38955448. The stones are now on display at the Meffan Institute in Forfar, Angus.
Description
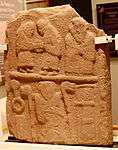
Kirriemuir 1
The slab is carved on both faces in relief and, as it bears Pictish symbols, it falls into John Romilly Allen and Joseph Anderson's classification system as a class II stone.[1][2] The stone bears a number of figural representations and a mirror and comb symbol. The figures have been identified as Saints Anthony and Paul.[3]
The stone is one of the latest to include pictish symbols and can be dated with confidence to the late 9th/early 10th century.[4]
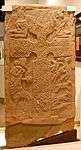
Kirriemuir 2
Cross slab carved on both faces in relief. It too contains Pictish symbols and falls into John Romilly Allen and Joseph Anderson's classification system as a class II stone.[1]
References
- 1 2 Allen, J. Romilly; Anderson, J. (1903), Early Christian Monuments of Scotland, 1, Balgavies, Angus: Pinkfoot Press (1993 facsimile), pp. 242–245
- ↑ Allen, J. Romilly (1890), "Preliminary list of sculptured stones older than A.D. 1100, with symbols and Celtic ornament, in Scotland" (PDF), Proceedings of the Society of Antiquaries of Scotland, 24: 510–525, retrieved November 29, 2010
- ↑ "Site record for Kirriemuir 1 stone", Royal Commission on the Ancient and Historic Monuments of Scotland. Canmore database., retrieved December 6, 2010
- ↑ Laing, Lloyd R. (2000), "How late were Pictish symbols employed" (PDF), Proceedings of the Society of Antiquaries of Scotland, 130: 637–650, retrieved December 6, 2010
Gallery
| Kirriemuir 1 front. Photograph by Kyle Munro. |
| Kirriemuir 1 rear. Photograph by Kyle Munro. |
| Kirriemuir 2 front. Photograph by Kyle Munro. |
| Kirriemuir 2 rear. Photograph by Kyle Munro. |
| Kirriemuir 3 front. Photograph by Kyle Munro. |
| Kirriemuir 3 rear. Photograph by Kyle Munro. |
|