Unsharp masking

Unsharp masking (USM) is an image sharpening technique, often available in digital image processing software.
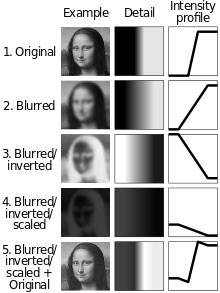
The "unsharp" of the name derives from the fact that the technique uses a blurred, or "unsharp", negative image to create a mask of the original image.[1] The unsharped mask is then combined with the positive (original) image, creating an image that is less blurry than the original. The resulting image, although clearer, may be a less accurate representation of the image's subject. In the context of signal processing, an unsharp mask is generally a linear or nonlinear filter that amplifies the high-frequency components of a signal.
Photographic unsharp masking
The technique was first used in Germany during the 1930s as a way of increasing the acutance, or apparent resolution, of photographic images.
For the photographic process, a large-format glass plate negative is contact-copied onto a low contrast film or plate to create a positive image. However, the positive copy is made with the copy material in contact with the back of the original, rather than emulsion-to-emulsion, so it is blurred. After processing this blurred positive is replaced in contact with the back of the original negative. When light is passed through both negative and in-register positive (in an enlarger for example), the positive partially cancels some of the information in the negative.
Because the positive has been blurred intentionally, only the low frequency (blurred) information is cancelled. In addition, the mask effectively reduces the dynamic range of the original negative. Thus, if the resulting enlarged image is recorded on contrasty photographic paper, the partial cancellation emphasizes the high spatial frequency (fine detail) information in the original, without loss of highlight or shadow detail. The resulting print appears more acute than one made without the unsharp mask: its acutance is increased.
In the photographic procedure, the amount of blurring can be controlled by changing the "softness" or "hardness" (from point source to fully diffuse) of the light source used for the initial unsharp mask exposure, while the strength of the effect can be controlled by changing the contrast and density (i.e., exposure and development) of the unsharp mask.
For traditional photography, unsharp masking is usually used on monochrome materials; special panchromatic soft-working black and white films have been available for masking photographic colour transparencies. This has been especially useful to control the density range of a transparency intended for photomechanical reproduction.
Digital unsharp masking
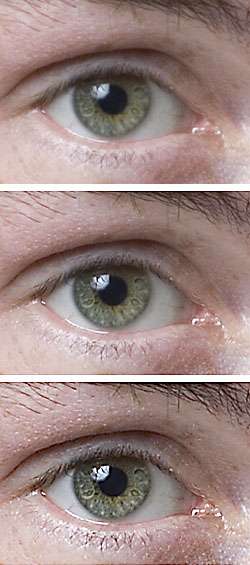
sharpened image (middle),
highly sharpened image (bottom).
The same differencing principle is used in the unsharp-masking tool in many digital-imaging software packages, such as Adobe Photoshop and GIMP.[2] The software applies a Gaussian blur to a copy of the original image and then compares it to the original. If the difference is greater than a user-specified threshold setting, the images are (in effect) subtracted. The threshold control constrains sharpening to image elements that differ from each other above a certain size threshold, so that sharpening of small image details, such as photographic grain, can be suppressed.
Digital unsharp masking is a flexible and powerful way to increase sharpness, especially in scanned images. Unfortunately, it may create unwanted conspicuous edge effects, or increase image noise. However, these effects can be used creatively, especially if a single channel of an RGB or Lab image is sharpened. Undesired effects can be reduced by using a mask—particularly one created by edge detection—to only apply sharpening to desired regions, sometimes termed "smart sharpen".
Typically three settings control digital unsharp masking:
- Amount is listed as a percentage, and controls the magnitude of each overshoot (how much darker and how much lighter the edge borders become). This can also be thought of as how much contrast is added at the edges. It does not affect the width of the edge rims.
- Radius affects the size of the edges to be enhanced or how wide the edge rims become, so a smaller radius enhances smaller-scale detail. Higher Radius values can cause halos at the edges, a detectable faint light rim around objects. Fine detail needs a smaller Radius. Radius and Amount interact; reducing one allows more of the other.
- Threshold controls the minimum brightness change that will be sharpened or how far apart adjacent tonal values have to be before the filter does anything. This lack of action is important to prevent smooth areas from becoming speckled. The threshold setting can be used to sharpen more-pronounced edges, while leaving subtler edges untouched. Low values should sharpen more because fewer areas are excluded. Higher threshold values exclude areas of lower contrast.
Various recommendations exist as to good starting values for these parameters,[3][4] and the meaning may differ between implementations. Generally a radius of 0.5 to 2 pixels and an amount of 50–150% is a reasonable start.
It is also possible to implement USM manually, by creating a separate layer to act as the mask;[2] this can be used to help understand how USM works, or for fine customization.
The typical blending formula for unsharp masking is:
Sharpened = Original + ( Original - Blurred ) * Amount
Local contrast enhancement
Unsharp masking may also be used with a large radius and a small amount (such as 30–100 pixel radius and 5–20% amount[5]) which yields increased local contrast, a technique termed local contrast enhancement.[5][6] USM can increase either sharpness or (local) contrast because these are both forms of increasing differences between values, increasing slope—sharpness referring to very small-scale (high-frequency) differences, and contrast referring to larger-scale (low-frequency) differences. More powerful techniques for improving tonality are referred to as tone mapping.
Comparison with deconvolution
For image processing, deconvolution is the process of approximately inverting the process that caused an image to be blurred. Specifically, unsharp masking is a simple linear image operation—a convolution by a kernel that is the Dirac delta minus a gaussian blur kernel. Deconvolution, on the other hand, is generally considered an ill-posed inverse problem that is best solved by nonlinear approaches. While unsharp masking increases the apparent sharpness of an image in ignorance of the manner in which the image was acquired, deconvolution increases the apparent sharpness of an image, but based on information describing some of the likely origins of the distortions of the light path used in capturing the image; it may therefore sometimes be preferred, where the cost in preparation time and per-image computation time are offset by the increase in image clarity.
With deconvolution, "lost" image detail may be approximately recovered—although it generally is impossible to verify that any recovered detail is accurate. Statistically, some level of correspondence between the sharpened images and the actual scenes being imaged can be attained. If the scenes to be captured in the future are similar enough to validated image scenes, then one can assess the degree to which recovered detail may be accurate. The improvement to image quality is often attractive, since the same validation issues are present even for un-enhanced images.
For deconvolution to be effective, all variables in the image scene and capturing device need to be modeled, including aperture, focal length, distance to subject, lens, and media refractive indices and geometries. Applying deconvolution successfully to general-purpose camera images is usually not feasible, because the geometries of the scene are not set. However, deconvolution is applied in reality to microscopy and astronomical imaging, where the value of gained sharpness is high, imaging devices and the relative subject positions are both well defined, and the imaging devices would cost a great deal more to optimize to improve sharpness physically. In cases where a stable, well-defined aberration is present, such as the lens defect in early Hubble Space Telescope images, deconvolution is an especially effective technique.
See also
References
- ↑ http://www.scantips.com/simple6.html A few scanning tips, Sharpening - Unsharp Mask
- 1 2 3.7. Unsharp Mask, esp. 3.7.4. How does an unsharp mask work?, Gimp documentation
- ↑ Guide to Image Sharpening, Cambridge in Color
- ↑ Photography Jam: Unsharp Mask: suggested starting values, by Simon Mackie (values by Scott Kelby)
- 1 2 Local Contrast Enhancement, Cambridge in Color
- ↑ Understanding Local Contrast Enhancement, The Luminous Landscape
- Sharpening With a Stiletto, Dan Margulis, February, 1998
- Life on the Edge, Dan Margulis, January, 2005
External links
- Interactive Example of Unsharp Mask
- PhotoKit Sharpener User Guide
- Sharpening 101, by thom, Aug 1, 2003
- Sharpening in Photoshop – Part I, Ron Bigelow – detailed discussion of sharpening, beginning with USM
- The Unsharp Mask: Analog Photoshop, Sample of unsharp masking in the darkroom, before digital