Attack on Sydney Harbour
| ||||||||||||||||||||||||||||||||
In late May and early June 1942, during World War II, submarines belonging to the Imperial Japanese Navy made a series of attacks on the cities of Sydney and Newcastle in New South Wales, Australia. On the night of 31 May – 1 June, three Ko-hyoteki-class midget submarines, each with a two-member crew, entered Sydney Harbour, avoided the partially constructed Sydney Harbour anti-submarine boom net, and attempted to sink Allied warships. Two of the midget submarines were detected and attacked before they could successfully engage any Allied vessels, and the crews scuttled their boats and committed suicide. These submarines were later recovered by the Allies. The third submarine attempted to torpedo the heavy cruiser USS Chicago, but instead sank the converted ferry HMAS Kuttabul, killing 21 sailors. This midget submarine's fate was unknown until 2006, when amateur scuba divers discovered the wreck off Sydney's northern beaches.
Immediately following the raid, the five Japanese fleet submarines that carried the midget submarines to Australia embarked on a campaign to disrupt merchant shipping in eastern Australian waters. Over the next month, the submarines attacked at least seven merchant vessels, sinking three ships and killing 50 sailors. During this period, between midnight and 02:30 on 8 June, two of the submarines bombarded the ports of Sydney and Newcastle.
The midget submarine attacks and subsequent bombardments are among the best-known examples of Axis naval activity in Australian waters during World War II, and are the only occasion in history when either city has come under attack. The physical effects were minimal: the Japanese had intended to destroy several major warships, but sank only an unarmed depot ship, caused minimal damage to Allied shipping, and failed to damage any significant targets during the bombardments. The main impact was psychological; creating popular fear of an impending Japanese invasion and forcing the Australian military to upgrade defences, including the commencement of convoy operations to protect merchant shipping.
Forces
.jpg)
Japanese
The Imperial Japanese Navy originally intended to use six submarines in the attack on Sydney Harbour: B1-type submarines I-21, I-27, I-28, and I-29, and C1-type submarines I-22 and I-24.[2][3] The six submarines made up the Eastern Attack Group of the 8th Submarine Squadron, under the command of Captain Hankyu Sasaki.[2][4]
On 8 June 1942, I-21 and I-29—each carrying a Yokosuka E14Y1 "Glen" floatplane for aerial reconnaissance—scouted various Australasian harbours to select the ones most vulnerable to attack by midget submarines.[5][6] I-21 scouted Nouméa in New Caledonia, Suva in Fiji, then Auckland in New Zealand, while I-29 went to Sydney, Australia.[6]
On 11 May, I-22, I-24, I-27, and I-28 were ordered to proceed to the Japanese naval base at Truk Lagoon, in the Caroline Islands, to each receive a Ko-hyoteki-class midget submarine.[5] I-28 failed to reach Truk; she was torpedoed on the surface by the US submarine USS Tautog on 17 May.[7] The three remaining submarines left Truk around 20 May for a point south of the Solomon Islands.[8] I-24 was forced to return a day later when an explosion in her midget submarine's battery compartment killed the midget's navigator and injured the commander.[9] The midget submarine intended for I-28 replaced the damaged midget.[9]
Allies
.jpg)
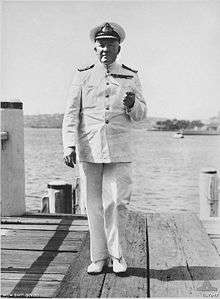
The naval officer-in-charge of Sydney Harbour at the time of the attack was Rear Admiral Gerard Muirhead-Gould of the Royal Navy.[10] On the night of the attack, three major vessels were present in Sydney Harbour; the heavy cruisers USS Chicago and HMAS Canberra, and the light cruiser HMAS Adelaide.[11] Other warships in the harbour included: destroyer tender USS Dobbin, auxiliary minelayer HMAS Bungaree, corvettes HMAS Whyalla, HMAS Geelong, and HMIS Bombay, armed merchant cruisers HMS Kanimbla and HMAS Westralia, and Dutch submarine K-IX.[11] A converted ferry—HMAS Kuttabul—was alongside at Garden Island where she served as a temporary barracks for sailors transferring between ships.[12] The hospital ship Oranje had also been in the harbour, but departed an hour before the attack.[13]
Harbour defences
At the time of the attack, the static Sydney Harbour defences consisted of eight anti-submarine indicator loops — six outside the harbour, one between North Head and South Head, and one between South Head and Middle Head, as well as the partially constructed Sydney Harbour anti-submarine boom net between George's Head on Middle Head and Green Point on Inner South Head.[14][15] The central section of the net was complete and support piles were in place to the west, but 400 m (1,300 ft) wide gaps remained on either side.[14][16] Material shortages prevented the completion of the boom net prior to the attack.[17] On the day of the attack, the six outer indicator loops were inactive; two were not functioning and there were not enough trained personnel to man both the inner and outer loop monitoring stations.[18][19] The North Head – South Head indicator loop had been giving faulty signals since early 1940, and as civilian traffic regularly passed over the loop, readings were often ignored.[20]
Harbour defence craft included the anti-submarine vessels HMAS Yandra and Bingera; the auxiliary minesweepers HMAS Goonambee and Samuel Benbow; pleasure launches converted to channel patrol boats (and armed with depth charges), namely HMAS Yarroma, Lolita, Steady Hour, Sea Mist, Marlean, and Toomaree; and four unarmed auxiliary patrol boats.[21]
Prelude

The Japanese Navy used five Ko-hyoteki-class midget submarines in an unsuccessful operation against US battleships during the attack on Pearl Harbor. The navy hoped that upgrades to the submarines, intensified crew training, and the selection of a less well defended target would lead to better results and an increased chance of the crews of the midgets to return alive from their mission.[22] Therefore, on 16 December 1941, the navy initiated plans for a second midget submarine operation.[22]
The plans called for two simultaneous attacks against Allied naval vessels in the Indian and South Pacific oceans.[4] These attacks were intended as diversions ahead of the attack on Midway Island in the North Pacific, with the Japanese hoping to convince the Allies that they intended to attack to the south or west of their conquests.[23] Eleven submarines of the 8th Submarine Squadron were to carry out the two attacks, the five submarines of the Western Attack Group in the Indian Ocean, and the six submarines of the Eastern Attack Group in the Pacific Ocean .[2] The submarine groups were to select a suitable port of attack, based on their own reconnaissance.
The Western Attack Group selected the port of Diégo-Suarez in Madagascar.[24] This attack—which occurred at nightfall on 30 May and resulted in the damaging of the battleship HMS Ramillies and the sinking of the tanker British Loyalty—came 22 days after the British captured the port from Vichy France at the beginning of the Battle of Madagascar.[14]
The four potential targets for the Eastern Attack Group were Nouméa, Suva, Auckland, and Sydney.[6] I-21 and I-29 were sent to select the final target, with I-29 sailing to Sydney.[5] On the evening of 16 May, I-29 fired on the 5,135 long tons (5,217 t) Russian merchant vessel Wellen, 30 mi (26 nmi; 48 km) from Newcastle, New South Wales.[8] Although Wellen escaped with minimal damage, shipping between Sydney and Newcastle was halted for 24 hours while aircraft and all available anti-submarine ships from Sydney, including Dutch light cruiser HNLMS Tromp, Australian destroyer HMAS Arunta and US destroyer USS Perkins, searched unsuccessfully for the submarine.[8] Muirhead-Gould concluded that the submarine had operated alone and had left the area immediately after the attack.[25]
I-29's floatplane made a reconnaissance flight over Sydney on 23 May.[26] A secret radar unit set up in Iron Cove detected the flight, but authorities dismissed its report as a glitch, as there were no Allied aircraft operating over Sydney.[27] The aircraft was damaged or destroyed on landing, although its two crew survived.[28] They reported the presence of several capital ships, including two battleships or large cruisers, five other large warships, several minor war vessels and patrol boats, and prolific merchant shipping.[29] The report, which the Allied FRUMEL signals intelligence network partially intercepted, resulted in the Japanese Navy selecting Sydney as the target.[29][30] The three midget-carrying submarines rendezvoused with I-29 and I-21 approximately 35 mi (30 nmi; 56 km) north-east of Sydney Heads, with all five submarines in position by 29 May.[31]
Midget submarine operation
Final reconnaissance
Before dawn on 29 May,[I] I-21's floatplane performed a final reconnaissance flight over Sydney Harbour, with the mission of mapping the locations of the major vessels and of the anti-submarine net.[32][33] Multiple observers spotted the floatplane but assumed it was a US Navy Curtiss Seagull.[31][34] No alarm was raised until 05:07, when it was realised that the only ship in the area carrying Seagulls was the U.S. cruiser Chicago, and all four of her aircraft were on board.[31][34] Richmond Air Force Base launched RAAF Wirraway fighters, which failed to locate I-21 or the floatplane.[16] Therefore, the reconnaissance flight did not result in the authorities in Sydney taking any special defence measures.[31] The floatplane was seriously damaged on landing and had to be scuttled, but both aircrew survived.[30]
Plan of attack
The Japanese planned to launch the midgets one after the other between 17:20 and 17:40, from points 5–7 nmi (5.8–8.1 mi; 9.3–13.0 km) outside Sydney Harbour.[35] The first midget was to pass through the Heads just after 18:30, but heavy seas delayed her by over an hour.[35] The other two midgets followed at twenty-minute intervals and were similarly delayed.[35]
The choice of targets was left up to the midget commanders, with advice that they should primarily target aircraft carriers or battleships, with cruisers as secondary targets.[36] The midgets were to operate to the east of the Harbour Bridge, although if no suitable targets were to be found in this area they were to move under the Bridge and attack a battleship and large cruiser believed to be in the inner harbour.[36] When the second reconnaissance flyover revealed that the expected British battleship—HMS Warspite—was nowhere to be found, USS Chicago became the priority target.[37]
After completing their mission, the midgets were to depart Sydney Harbour and head south for 20 nmi (23 mi; 37 km) to the recovery point off Port Hacking.[38] Four of the mother submarines would be waiting in an east–west line 16 km (8.6 nmi; 9.9 mi) long, with the fifth waiting 6 km (3.2 nmi; 3.7 mi) further south.[38]
Attack
Midget submarine M-14—launched from I-27, was the first to enter Sydney Harbour.[39] The Middle Head - South Head loop detected it at 20:01, but dismissed the reading due to heavy civilian traffic.[40] At 20:15, a Maritime Services Board watchman spotted the midget after it passed through the western gap, collided with the Pile Light, then reversed and trapped its stern in the net.[41] The submarine's bow broke the surface; the watchman rowed toward it to determine what it was and then rowed to the nearby patrol boat HMAS Yarroma to report his finding.[42][43] Despite efforts by Yarroma to pass on this information, Sydney Naval Headquarters did not receive the report until 21:52.[43][44] HMAS Yarroma and Lolita were dispatched to investigate.[43] Upon confirming that the object in the net was a "baby submarine", Lolita dropped two depth charges while Yarroma's commander requested permission from Sydney Naval Headquarters to open fire.[45][46] The depth charges failed to detonate, as the water was too shallow for the hydrostatic fuse setting.[46] At 22:35, while Yarroma was waiting for permission to fire, and Lolita was setting up to deploy a third depth charge, the two crewmen on M-14 activated one of the submarine's scuttling charges, killing themselves and destroying the submarine's forward section.[46][47]
Muirhead-Gould gave the general alarm, along with orders for ships to take anti-submarine measures, at 22:27; the alarm was repeated at 22:36 with advice for ships to take precautions against attack, as an enemy submarine might be in the harbour.[48][49] At the time of the first alarm, Sydney Harbour was closed to external traffic, but Muirhead-Gould ordered ferries and other internal traffic to continue, as he believed that having multiple ships travelling around at speed would help force any submarines to remain submerged.[49]
Midget submarine M-24[II] was the second to enter the harbour. HMAS Falie grazed M-24's hull and reported the contact to command.[50] The report was not followed up. M-24 crossed the indicator loop undetected at 21:48, and at approximately 22:00 followed a Manly ferry through the anti-submarine net.[39][48] At 22:52, M-24 was spotted by a Chicago searchlight operator less than 500 m (1,600 ft) to the moored cruiser's starboard, and on a course roughly parallel to the ship's facing.[48][51] Chicago opened fire with a 5 in (130 mm) gun and a quadruple machinegun mount, but inflicted minimal damage as the weapons could not depress far enough.[52] Some of the 5 in (130 mm) shells skipped off the water and hit Fort Denison's Martello tower, while fragments were later found in the suburbs of Cremorne and Mosman.[53] The senior officer present aboard Chicago ordered the crew to begin preparing for departure, and for USS Perkins to begin an anti-submarine screening patrol around the cruiser, orders that were revoked by the sceptical Captain Howard Bode when he arrived on board at around 23:30.[54]
HMAS Whyalla and Geelong also fired upon M-24 as it fled west toward the Sydney Harbour Bridge, before the midget was able to submerge and escape.[55] When it returned to periscope depth, the midget found itself west of Fort Denison.[55] It turned and sailed east for about 1 nmi (1.2 mi; 1.9 km), then took up a firing position south-west of Bradley's Head, from where its commander could see Chicago's stern silhouetted against the construction floodlights at Garden Island's new Captain Cook Graving Dock.[56]
Midget submarine M-21—from I-22—probably entered the harbour at the same time that USS Chicago opened fire on M-24.[57] The unarmed auxiliary patrol boat HMAS Lauriana spotted M-21 and illuminated the submarine's conning tower, while sending an alert signal to the Port War Signal Station at South Head, and the nearby anti-submarine vessel HMAS Yandra.[57] Yandra attempted to ram the submarine, lost contact, regained contact at 23:03, and dropped six depth charges.[58] At the time of the attack, it was assumed that the depth charges had destroyed or disabled the midget, but M-21 survived.[58] Historians believe that the midget took refuge on the harbour floor and waited until the Allied vessels had moved away before it resumed the attack.[58]
At 23:14, Muirhead-Gould ordered all ships to observe blackout conditions.[59] Just after 23:30, he set off on a barge towards the boom net, to make a personal inspection.[60] The Admiral reached Lolita at about midnight and indicated to her crew that he did not take the reports of enemy submarines seriously, reportedly saying: "What are you all playing at, running up and down the harbour dropping depth charges and talking about enemy subs in the harbour? There's not one to be seen."[60] The crew reiterated that a submarine had been seen, but Muirhead-Gould remained unconvinced and before he left, added sarcastically: "If you see another sub, see if the captain has a black beard. I'd like to meet him."[61]
.jpg)
Despite the blackout order, the Garden Island floodlights remained on until 00:25 the next morning.[59] About five minutes later, M-24 fired the first of its two torpedoes; it delayed firing the second torpedo for several minutes as the midget submarines would lose longitudinal stability immediately after firing a torpedo.[62] Historians are divided as to the exact paths of the torpedoes relative to Chicago, although all agree that the US cruiser was the intended target. Both torpedoes missed Chicago, while one torpedo may have also passed close to Perkins' starboard bow.[63][64] One of the torpedoes continued underneath the Dutch submarine K-IX and HMAS Kuttabul, then hit the breakwater Kuttabul was tied up against.[64] The explosion broke Kuttabul in two and sank her, and damaged K-IX.[12][65] The attack killed 19 Royal Australian Navy and two Royal Navy sailors, and wounded another 10.[66] The explosion shook residences in the area and damaged Garden Island's lights and telecommunications.[65] The other torpedo ran aground on the eastern shore of Garden Island without exploding.[65] M-24 then dived and moved to leave the harbour.[67]
.jpg)
A crossing over the indicator loop that was recorded at 01:58 was initially believed to be another midget submarine entering the harbour, although later analysis showed that the reading indicated an outbound vessel and was therefore most likely represented M-24's exit.[68] M-24 did not return to its mother submarine, and its fate remained unknown until 2006.[69][70]
Ships were ordered to make for the open ocean. Chicago left her anchorage at 02:14, leaving a sailor behind on the mooring buoy in her haste to depart.[67] Bombay, Whyalla, Canberra, and Perkins began their preparations to depart.[71]
Just before 03:00, as Chicago was leaving the harbour, the lookouts spotted a submarine periscope passing alongside the cruiser.[72] At 03:01, the indicator loop registered an inbound signal; M-21 was re-entering Sydney Harbour after recovering from the attack four hours previously.[72] HMS Kanimbla fired on M-21 in Neutral Bay at 03:50, and at 05:00, three auxiliary patrol boats—HMAS Steady Hour, Sea Mist, and Yarroma—spotted the submarine's conning tower in Taylors Bay.[72] The patrol boats had set their depth charge fuses to 15 m (49 ft), and when Sea Mist passed over where the submarine had just submerged and dropped a depth charge, she had only five seconds to clear the area.[72] The blast damaged M-21, which inverted and rose to the surface before sinking again.[73] Sea Mist dropped a second depth charge, which damaged one of her two engines in the process and prevented her from making further attacks.[73] Steady Hour and Yarroma continued the attack, dropping seventeen depth charges on believed visual sightings and instrument contacts of the midget over the next three and a half hours.[73] At some point during the night, the crew of M-21 committed suicide.[73]
At 04:40, HMAS Canberra recorded that the Japanese may have fired torpedoes at her.[74] This may have been one of many false alarms throughout the night. However, M-21 had attempted to fire its two torpedoes, but failed because of damage to the bow either from HMAS Yandra's ramming or depth charges, or a possible collision with USS Chicago, making it possible that M-21 attempted to attack the cruiser.[74] The observer aboard Canberra may have seen bubbles from the compressed air released to fire the torpedoes.[74]
Secondary missions
As per the operation plan, the five mother submarines waited off Port Hacking on the nights of 1 and 2 June for the midget submarines to return.[75][76] FRUMEL picked up wireless traffic between the five submarines, leading the RAAF to task three Lockheed Hudsons and two Bristol Beauforts with finding the source of the communications.[75] They were unsuccessful.[75] On 3 June, Sasaki abandoned hope of recovering the midget submarines, and the submarines dispersed on their secondary missions.[70]
Attacks on Allied merchant shipping
Four of the submarines began operations against Allied merchant shipping. I-21 patrolled north of Sydney, while I-24 patrolled south of Sydney.[77] I-27 began searching off Gabo Island for ships departing Melbourne, and I-29 travelled to Brisbane.[77] I-22 left the group to conduct reconnaissance operations, first at Wellington and Auckland in New Zealand, and then at Suva in Fiji.[77]
Between 1 and 25 June, when the four submarines arrived at Kwajalein Atoll in the Marshall Islands to re-supply before proceeding to Japanese shipyards for maintenance, the four submarines attacked at least seven Allied merchant vessels.[78] Three of these were sunk: Iron Chieftain by I-24 on 3 June, Iron Crown by I-27 on 4 June, and Guatemala by I-21 on 12 June.[79] The first two attacks resulted in 12 and 37 fatalities respectively, though the third attack killed no one.[80] The attacks forced the authorities to institute changes in merchant traffic; travel north of Melbourne was restricted until a system of escorted convoys was established.[81]
I-21 was the only submarine to return to Australian waters, where she sank three ships and damaged two others during January and February 1943.[82] During her two deployments, I-21 sank 44,000 long tons (45,000 t) of Allied shipping, which made her the most successful Japanese submarine to operate in Australian waters.[83]
Bombardment
.jpg)
On the morning of 8 June, I-24 and I-21 briefly bombarded Sydney and Newcastle.[17] Just after midnight, I-24 surfaced 9 mi (14 km) south-south-east of Macquarie Lighthouse.[84] The submarine's commander ordered the gun crew to target the Sydney Harbour Bridge.[84] They fired 10 shells over a four-minute period; nine landed in the Eastern Suburbs and one landed in water.[85] I-24 then crash dived to prevent successful retaliation by coastal artillery batteries.[86] Only one shell detonated, and the only injuries inflicted were cuts and fractures from falling bricks or broken glass when the unexploded shells hit buildings.[87] A United States Army Air Forces pilot, 1st Lieutenant George Cantello, based at Bankstown Airport was ordered into the air to retaliate, but was killed when engine failure caused his Airacobra to crash in a paddock at Hammondville.[88] In 1988, following efforts by residents and the US Consulate in Sydney, the City of Bankstown established a memorial park in his honour.[88]
At 02:15, I-21 shelled Newcastle, from 9 km (4.9 nmi; 5.6 mi) north-east of Stockton Beach.[89] She fired 34 shells over a 16-minute period, including eight star shells.[89] The target of the attack was the BHP steelworks in the city.[90] However, the shells landed over a large area, causing minimal damage and no fatalities: the only shell to detonate damaged a house on Parnell Place, while an unexploded shell hit a tram terminus.[90][91] Fort Scratchley returned fire, the only time an Australian land fortification has fired on an enemy warship during wartime, but the submarine escaped unscathed.[91][92]
Analysis
The attack on Sydney Harbour ended in failure on both sides, and revealed flaws in both the Allied defences and the Japanese tactics. During the primary attack, the Japanese lost all three midget submarines in exchange for the sinking of a single barracks ship. The subsequent operations were no more successful as the five large Japanese submarines sank only three merchant ships and caused minimal property damage during the two bombardments. The performance of the Allied defenders was equally poor. However, one historian states that the lack of damage in Sydney Harbour was due to "a combination of good luck and aggressive counter-attack".[93]
The main impact of the midget submarine attack and subsequent operations was psychological; dispelling any belief that Sydney was immune to Japanese attack and highlighting Australia's proximity to the Pacific War.[75][93] There was no official inquiry into the attacks, despite demand from some sections of the media, as there was concern that an inquiry would lead to defeatism and reduce faith in John Curtin's government, particularly after the damaging inquiry into Australian defences that had followed the Japanese aerial attack on Darwin three months earlier.[94]
Failures in Allied defences
The Allies failed to respond adequately to several warnings of Japanese activity off the east coast of Australia prior to the attack; they simply ignored the warnings or explained them away. They attributed the unsuccessful attack on the freighter Wellen on 16 May to a single submarine, and assumed it had departed Australian waters immediately after the attack.[95] The first reconnaissance flight went unnoticed, and although FRUMEL intercepted the report and distributed it to Allied commanders on 30 May, Muirhead-Gould apparently did not react.[29] New Zealand naval authorities detected radio chatter between the Japanese submarines on 26 and 29 May, and although they could not decrypt the transmissions, radio direction finding indicated that a submarine or submarines were approaching Sydney.[95] The Allies considered dispatching an anti-submarine patrol in response to the 29 May fix, but were unable to do so as all anti-submarine craft were already committed to protecting a northbound troop convoy.[30] The only response to the second reconnaissance flight on 29 May was the launching of search planes.[96] No other defence measures were put into place.[96] Although the midget attack on Diego Suarez in Madagascar occurred on the morning of 31 May (Sydney time), the Allies sent no alert to other command regions, as they believed that Vichy French forces had launched the attack.[97]
Historians have questioned the competence of the senior Allied officers. Muirhead-Gould had been hosting a dinner party on the night of the attack, and one of the main guests was the senior United States Navy officer in Sydney Harbour, Captain Howard Bode of USS Chicago.[98] Both officers were sceptical that any attack was taking place.[60] Muirhead-Gould arrived aboard HMAS Lolita at approximately midnight, an action he described as attempting to learn about the situation. But members of Lolita's crew later recounted that when Muirhead-Gould came aboard he immediately chastised the patrol boat's skipper and crew, and quickly dismissed their report.[60][99] Junior officers on Chicago provided similar descriptions of Bode's return on board, and members of both crews later claimed that Muirhead-Gould and Bode were intoxicated.[100] It was only after the destruction of HMAS Kuttabul that both officers began to take the attack seriously.[101]
During the attack, there were several delays between events and responses to them. Over two hours passed between the observation of M-14 in the boom net and Muirhead-Gould's first order for ships to commence anti-submarine actions.[102] It took another two hours to mobilise the auxiliary patrol boats, which did not leave their anchorage for a further hour.[102] Part of these delays was due to a lack of effective communications.[103] None of the auxiliary patrol craft in the harbour had radio communications, so all instructions and reports came from signal lights via the Port War Signal Station or Garden Island, or by physical communication via launches.[103][104] In Muirhead-Gould's preliminary report on the attack, he stated that the Port War Signal Station was not designed for the volume of communications traffic the attack caused.[105] Telephone communications with Garden Island were unreliable during the early part of the attack, and then the first torpedo explosion disabled them completely.[52][103]
The need to keep information secret may also have contributed to the delays and the defenders' scepticism.[106] As the auxiliary patrol boat crews, the indicator loop staff, and other personnel manning defensive positions would have been outside 'need to know' and would not have been informed about any of the incidents prior to the attack, they would not have been alert, contributing to the disbelief demonstrated in the early hours of the attack.[106]
Flaws in Japanese tactics

The main flaw in the Japanese plans was the use of midget submarines for the primary attack. Midget submarines were originally intended to operate during fleet actions: they would be released from modified seaplane carriers to run amok through the enemy fleet.[107] This concept went out of favour as changing Japanese naval thinking and experience led to recognition that naval warfare would centre around carrier-supported aerial combat.[108] As a result, the midget program's focus changed to the infiltration of enemy harbours, where they would attack vessels at anchor.[108] This concept failed completely during the attack on Pearl Harbor, where the midgets had no effect, and tying up 11 large submarines for six weeks in support of further midget submarine attacks on Sydney and Diego Suarez proved a waste of resources.[22][109]
Moreover, the failures at Sydney Harbour and Diego Suarez demonstrated that the improvements to the midget submarines made after Pearl Harbor had not increased the overall impact of the midget program.[22][109] The modifications had various effects. The ability to man and deploy the midgets while the mother ships were submerged prevented the Army coastal radars from detecting the mother submarines.[110] However, the midgets were still difficult to control, unstable, and prone to surfacing or diving uncontrollably.[111] These manoeuvrability issues contributed to M-14's entanglement in the anti-submarine net, and the repeated detection of M-21 and M-24.
Beyond the use of the unreliable midgets, historians have identified areas in the plan of attack where the Japanese could have done significantly more damage. If the Japanese midget submarines had conducted a simultaneous, co-ordinated attack, they would have overwhelmed the defences.[110] A chance for more damage came following the destruction of Kuttabul, when several naval vessels headed to sea, including USS Chicago, USS Perkins, Dutch submarine K-IX, HMAS Whyalla, and HMIS Bombay.[68] The five mother submarines were already en route to the Port Hacking recovery position, and although Sasaki's plan at Pearl Harbor had been to leave some submarines at the harbour mouth to pick off fleeing vessels, he did not repeat this tactic.[112]
USS Chicago's survival
Several factors beyond the control of any of the combatants contributed to the survival of USS Chicago. At the time of M-24's attack on Chicago, the latter had spent some time preparing to depart from Sydney Harbour, and although still moored and stationary, was producing large volumes of white smoke as the boilers warmed up.[113] This smoke, streaming aft under the influence of the wind, and contrasting against the dark, low-lying cloud, may have given the impression that Chicago was moving, causing M-24 to lead the target when firing its torpedoes, and consequently sending its torpedoes across the bow.[114] Another factor that may have influenced Chicago's survival was the extinguishing of Garden Island's floodlights minutes before M-24 fired its first torpedo, impeding targeting.[103]
Bombardment impact

The bombardments failed to cause significant physical damage, but had a major psychological impact on the residents of Sydney and Newcastle. Due to the inaccuracy of the submarines' range-finding equipment, coupled with the unstable firing platform of a submarine at sea, specific targeting was impossible.[89] The intention of the submarine bombardment was to frighten the population of the target area.[89]
The failure of the majority of the shells to detonate may have had various causes. As the submarines fired armour piercing shells, intended for use against steel ship hulls, the relatively softer brick walls may have failed to trigger the impact fuses.[87] Sea water may have degraded the shells, which the Japanese had stored in deck lockers for several weeks.[87] The age of the shells may also have been a factor; some of the shells recovered from the Newcastle bombardment were found to be of English manufacture; surplus munitions from World War I.[115]
In Sydney, fear of an impending Japanese invasion caused people to move west; housing prices in the Eastern Suburbs dropped, while those beyond the Blue Mountains rose significantly.[116] The attack also led to a significant increase in the membership of volunteer defence organisations, and strengthening of defences in Sydney Harbour and Port Newcastle.[117]
Aftermath
The papers did not publish news of the submarine attack until 2 June, as most of the attack occurred after the newspapers went to press on the morning of 1 June.[75] Instead, on the morning after the attack, the front pages carried news of Operation Millennium, the Royal Air Force's first 1,000-bomber raid, although several newspapers included a small interior article mentioning the final reconnaissance flyover.[75] The Federal Censor ordered total censorship of the events, issuing an official statement on the afternoon of 1 June which reported that the Allies had destroyed three submarines in Sydney Harbour, and described the loss of Kuttabul and the 21 deaths as the loss of "one small harbour vessel of no military value".[118] Smith's Weekly finally released the real story on 6 June, and follow-up material in the 13 June issue caused more political damage, prompting the Royal Australian Navy to attempt to charge the newspaper with releasing defence information.[119]
.jpg)
It was several days before the 21 dead sailors aboard Kuttabul could all be recovered.[120] On 3 June, Muirhead-Gould and over 200 Navy personnel attended a burial ceremony for these sailors.[120] On 1 January 1943, the Navy base at Garden Island was commissioned as HMAS Kuttabul in commemoration of the ferry and the lives lost.[66]
The Australians recovered the bodies of the four Japanese crew of the two midget submarines sunk in Sydney Harbour and had them cremated at Rookwood Cemetery. For the cremation, the Allies draped the Japanese flag over each coffin and rendered full naval honours.[102] Muirhead-Gould was criticised for this, but defended his actions as respecting the courage of the four submariners, regardless of their origin.[121] Australian politicians also hoped that the Japanese Government would notice the respect paid to the sailors and improve the conditions Australian prisoners-of-war were experiencing in Japanese internment camps.[122] Japanese authorities noted the funeral service, but this did not lead to any major improvement in conditions for Australian POWs.[122] Following the use of the midget submariners' funeral by the Japanese for propaganda purposes, the Australian High Command forbade similar funerals for enemy personnel in the future.[63]
An exchange of Japanese and Allied diplomatic personnel stranded in the opposing nations occurred in August 1942, which allowed Tatsuo Kawai, the Japanese ambassador to Australia, to return home with the ashes of the four Japanese submariners.[123] When the exchange ship Kamakura Maru arrived in Yokohama, several thousand people were present to honour the four men.[123]

The two main targets of the attack, USS Chicago and HMAS Canberra, were both lost within the next year: Canberra sinking on 9 August 1942 during the Battle of Savo Island, and Chicago on 30 January 1943 following the Battle of Rennell Island.[124] None of the Japanese submarines involved in the attack survived the war. USS Charrette and Fair sank I-21 on 5 February 1944 off the Marshall Islands.[125] An American torpedo boat sank I-22 on 25 December 1942 off New Guinea.[125] An American patrol craft sank I-24 on 10 June 1943 near the Aleutian Islands.[125] HMS Paladin and Petard sank I-27 on 12 February 1943 off the Maldives.[125] Lastly, USS Sawfish sank I-29 on 26 July 1944 in the Philippines.[125]
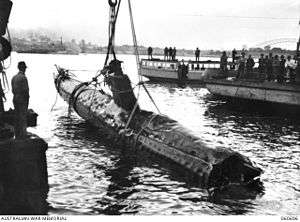
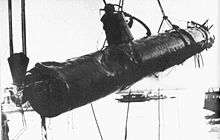
M-14 and M-21

The Allies located and recovered M-21 on 3 June and M-14 on 8 June.[126] Although both were damaged during the attack, it was possible to assemble a complete submarine from the two vessels.[102] The centre section of the rebuilt submarine was mounted on a trailer and taken on a 4,000 km (2,500 mi) tour throughout southern New South Wales, Victoria, and western South Australia.[102][127] The purpose of the tour was twofold; it allowed Australians to see a Japanese midget submarine up close, and was used to raise A£28,000 for the Naval Relief Fund and other charities.[102][128] The submarine arrived at the Australian War Memorial in Canberra on 28 April 1943, flying the White Ensign and a paying-off pennant.[102] The submarine was originally displayed outside the museum in three separate pieces,[129] but was moved inside in the 1980s due to heavy vandalism; on one occasion in 1966, a group of university students painted it bright yellow in response to The Beatles' song Yellow Submarine.[130] The composite submarine was restored and remains on display inside the Memorial as part of a permanent exhibition on the attack, next to the recovered wheelhouse of HMAS Kuttabul.[130] The conning tower from M-21 is on display at the Royal Australian Navy Heritage Centre on Garden Island.[129] Leftover material from M-21 was melted down and made into souvenirs following the construction of the combined vessel.[131]
M-24
.jpg)
Over the 64 years following the disappearance of M-24 after the attacks, more than 50 people approached the Royal Australian Navy claiming to have found the submarine.[132] All of these claims were found to be false.[132] One early theory about the midget's fate was that it was damaged or destroyed, along with M-21, in or around Taylors Bay, which would account for reports from Steady Hour and Yarroma of multiple submarines during their three-hour attack against M-21.[133][134] A second theory was that the midget attempted to return to the mother submarines but exhausted its battery power before reaching the Port Hacking recovery point and would therefore be outside and to the south of Sydney Heads.[134] The third theory was that the midget's crew decided to avoid endangering the five larger submarines during the recovery process, and either ran straight out to sea or headed north.[134][135]
A group of seven amateur scuba divers solved the mystery in November 2006, when they found a small submarine sitting upright on the seabed, 55 metres (180 ft) below sea level and approximately 5 kilometres (2.7 nmi; 3.1 mi) from Bungan Head, off Sydney's Northern Beaches.[69][136] Commander Shane Moore, the officer responsible for the Royal Australian Navy's heritage collection, confirmed that the wreck was M-24 after viewing footage from multiple dives, along with measurements the group had taken.[69] The wreck had several bullet holes in it, most likely from Chicago's quadruple machine-gun mount.[69] The location of the wreck was kept secret by both the divers and the navy, with Defence Minister Brendan Nelson promising to have the wreck protected as a war grave.[69] The wreck was gazetted on 1 December 2006 as a heritage site.[137] A 500 m (1,600 ft) exclusion zone was established around the wreck site, and any vessel entering the zone is liable to a fine under New South Wales law of up to A$1.1 million, with additional fines and confiscation of equipment under Commonwealth law.[138] Shore- and buoy-mounted surveillance cameras and a sonar listening device further protect the site.[138]
On 7 February 2007, during JMSDF Admiral Eiji Yoshikawa's visit to Australia, Yoshikawa and RAN Vice Admiral Russ Shalders presided over a ceremony held aboard HMAS Newcastle to honour M-24's crew.[139] Relatives of the midget submarines' crews, one of the survivors from Kuttabul, and dignitaries and military personnel from Australia and Japan attended another ceremony on 6 August 2007 at HMAS Kuttabul.[132] HMAS Melbourne then carried relatives of M-24's crew to the wreck site, where they poured sake into the sea before being presented with sand taken from the seabed around the submarine.[132]
In May 2012, the NSW state government announced that, with the approval of the Japanese government and the submariners' families, divers would be allowed to observe the M-24 wreck for a short period of time.[136] Divers would enter a ballot for places on controlled dives run on several days.[136] If successful, opening the site would become an annual event to commemorate the attack.[136]
Footnotes
^I Some sources give the date of the reconnaissance flight as 30 May.
^II As this midget submarine was the only one not recovered, its specific designation is unknown, and is referred to differently in the various sources. Gill refers to it as Midget A, Jenkins identifies it as Ban's midget (after the midget's commander, Sub–Lieutenant Katsuhisa Ban), and Carruthers uses I-24, naming it after the mother submarine. Numerous sources discussing the 2005 and 2006 findings (such as newspaper articles) refer to it as M-24 or M24. This article uses the M-24 designation for consistency with the identified midget submarines and to avoid confusion with the mother submarine.
Notes
- ↑ Nichols, Robert (31 May 2002). "Sydney Under Attack: Japanese Midget Submarine 31 May – 1 June 1942". Remembering 1942. Australian War Memorial. Retrieved 9 February 2014.
- 1 2 3 Jenkins, Battle Surface, p 161
- ↑ Type B1, CombinedFleet.com; Type C1, CombinedFleet.com
- 1 2 Carruthers, Japanese Submarine Raiders 1942, p 59
- 1 2 3 Gill, Royal Australian Navy, 1942–1945, p 61
- 1 2 3 Jenkins, Battle Surface, p 163
- ↑ Gill, Royal Australian Navy, 1942–1945, pp 61–62
- 1 2 3 Gill, Royal Australian Navy, 1942–1945, p 62
- 1 2 Jenkins, Battle Surface, p 164
- ↑ Carruthers, Japanese Submarine Raiders 1942, p 30
- 1 2 Jenkins, Battle Surface, pp 193–194
- 1 2 Carruthers, Japanese Submarine Raiders 1942, p 143
- ↑ Jenkins, Battle Surface, p 190
- 1 2 3 Gill, Royal Australian Navy, 1942–1945, p 65
- ↑ Stevens, A Critical Vulnerability, pp 192–194
- 1 2 Stevens, A Critical Vulnerability, p 193
- 1 2 Stevens, A Critical Vulnerability, p 194
- ↑ Grose, A Very Rude Awakening, p 6
- ↑ Carruthers, Japanese Submarine Raiders 1942, p 177
- ↑ Fullford, We Stood And Waited, p 190
- ↑ Gill, Royal Australian Navy, 1942–1945, p 66; Jenkins, Battle Surface, p 194
- 1 2 3 4 Carruthers, Japanese Submarine Raiders 1942, p 58
- ↑ Morison, History of United States Naval Operations in World War II, p 68
- ↑ Jenkins, Battle Surface, p 162
- ↑ Carruthers, Japanese Submarine Raiders 1942, p 87
- ↑ Grose, A Very Rude Awakening, p 62
- ↑ Grose, A Very Rude Awakening, pp 63–64
- ↑ Grose, A Very Rude Awakening, p 64
- 1 2 3 Jenkins, Battle Surface, pp 170–171
- 1 2 3 Stevens, A Critical Vulnerability, p 192
- 1 2 3 4 Gill, Royal Australian Navy, 1942–1945, p 64
- ↑ Grose, A Very Rude Awakening, p 71
- ↑ Carruthers, Japanese Submarine Raiders 1942, p 89
- 1 2 Jenkins, Battle Surface, pp 189–193
- 1 2 3 Jenkins, Battle Surface, p 205
- 1 2 Sasaki, Telegraphic Order 3. (Reproduced in Grose, A Very Rude Awakening, p 66)
- ↑ Grose A Very Rude Awakening, pgs 75, 79
- 1 2 Grose, A Very Rude Awakening, p 79
- 1 2 Gill, Royal Australian Navy, 1942–1945, p 67
- ↑ Jenkins, Battle Surface, p 206
- ↑ Grose, A Very Rude Awakening, p 105
- ↑ Grose, A Very Rude Awakening, p 106
- 1 2 3 Jenkins, Battle Surface, p 208
- ↑ Grose, A Very Rude Awakening, p 108
- ↑ Grose, A Very Rude Awakening, p 115
- 1 2 3 Jenkins, Battle Surface, p 209
- ↑ Grose, A Very Rude Awakening, pp 116–117
- 1 2 3 Jenkins, Battle Surface, p 210
- 1 2 Grose, A Very Rude Awakening, p 119
- ↑ Rickard, Dave (8 November 2008). "Is the Falie Finished?". Afloat (229).
- ↑ Grose, A Very Rude Awakening, p 123
- 1 2 Jenkins, Battle Surface, p 211
- ↑ Grose, A Very Rude Awakening, p 125
- ↑ Grose, A Very Rude Awakening, pgs 127, 133
- 1 2 Jenkins, Battle Surface, p 212
- ↑ Jenkins, Battle Surface, pp 212–214
- 1 2 Gill, Royal Australian Navy, 1942–1945, p 68
- 1 2 3 Jenkins, Battle Surface, p 213
- 1 2 Jenkins, Battle Surface, pp 213–214
- 1 2 3 4 Grose, A Very Rude Awakening, p 135
- ↑ Grose, A Very Rude Awakening, p 136
- ↑ Jenkins, Battle Surface, p 214
- 1 2 Warner & Seno, The Coffin Boats, p 130
- 1 2 Grose, A Very Rude Awakening, p 139
- 1 2 3 Jenkins, Battle Surface, p 215
- 1 2 Elbourne, Wonderful Kuttabul
- 1 2 Jenkins, Battle Surface, p 216
- 1 2 Gill, Royal Australian Navy, 1942–1945, p 70
- 1 2 3 4 5 Found it! [60 Minutes segment]
- 1 2 Carruthers, Japanese Submarine Raiders 1942, p 189
- ↑ Grose, A Very Rude Awakening, pp 153–154
- 1 2 3 4 Jenkins, Battle Surface, p 218
- 1 2 3 4 Jenkins, Battle Surface, p 219
- 1 2 3 Grose, A Very Rude Awakening, pp 160–162.
- 1 2 3 4 5 6 Jenkins, Battle Surface, p 225
- ↑ Carruthers, Japanese Submarine Raiders 1942, pp 88–89
- 1 2 3 Jenkins, Battle Surface, p 239
- ↑ Jenkins, Battle Surface, p 254
- ↑ Jenkins, Battle Surface, pgs 241, 244, 253
- ↑ Carruthers, Japanese Submarine Raiders 1942, pgs 191, 193, 199
- ↑ Stevens, A Critical Vulnerability, p 195
- ↑ Jenkins, Battle Surface, pgs 254, 260–261
- ↑ Stevens, The Royal Australian Navy, opp. p 112
- 1 2 Jenkins, Battle Surface, p 247
- ↑ Jenkins, Battle Surface, p 248
- ↑ Jenkins, Battle Surface, pp 248–249
- 1 2 3 Jenkins, Battle Surface, p 249
- 1 2 P-400 Serial Number ?, Pacific Wreck Database
- 1 2 3 4 Jenkins, Battle Surface, p 250
- 1 2 Carruthers, Japanese Submarine Raiders 1942, p. 197
- 1 2 Jenkins, Battle Surface, p. 251
- ↑ Vale, Fort Scratchley Dedication Dinner [speech]
- 1 2 Gill, Royal Australian Navy, 1942–1945, p 74
- ↑ Carruthers, Japanese Submarine Raiders 1942, pgs 169, 176
- 1 2 Carruthers, Japanese Submarine Raiders 1942, p 174
- 1 2 Jenkins, Battle Surface, p 193
- ↑ Jenkins, Battle Surface, p 198
- ↑ Grose, A Very Rude Awakening, p 87
- ↑ Carruthers, Japanese Submarine Raiders 1942, p 136
- ↑ Grose, A Very Rude Awakening, pp 133–135
- ↑ Grose, A Very Rude Awakening, pp 142–143
- 1 2 3 4 5 6 7 Gill, Royal Australian Navy, 1942–1945, p 72
- 1 2 3 4 Gill, Royal Australian Navy, 1942–1945, p 73
- ↑ Carruthers, Japanese Submarine Raiders 1942, p 176
- ↑ Reproduced in Carruthers, Japanese Submarine Raiders 1942, p 244
- 1 2 Fullford, We Stood And Waited, pp 194–195
- ↑ Jenkins, Battle Surface, p 68
- 1 2 Jenkins, Battle Surface, p 71
- 1 2 Jenkins, Battle Surface, p 291
- 1 2 Fullford, We Stood And Waited, p 188
- ↑ Jenkins, Battle Surface, p 70
- ↑ Grose, A Very Rude Awakening, p 155
- ↑ Carruthers, Japanese Submarine Raiders 1942, p 137
- ↑ Carruthers, Japanese Submarine Raiders 1942, pp 137–139
- ↑ Carruthers, Japanese Submarine Raiders 1942, p 197
- ↑ Jenkins, Battle Surface, p 258
- ↑ Nichols, The Night the War Came to Sydney, pp 28–29
- ↑ Grose, A Very Rude Awakening, pgs 156, 187
- ↑ Grose, A Very Rude Awakening, pgs 212, 223–227
- 1 2 Carruthers, Japanese Submarine Raiders 1942, p 151
- ↑ Jenkins, Battle Surface, p 230
- 1 2 Jenkins, Battle Surface, p 231
- 1 2 Jenkins, Battle Surface, pp 232–233
- ↑ Gill, Royal Australian Navy, 1942–1945, pgs 150–153, 273
- 1 2 3 4 5 Carruthers, Japanese Submarine Raiders 1942, p 216
- ↑ Grose, A Very Rude Awakening, pgs 209, 219
- ↑ Grose, A Very Rude Awakening, p 250
- ↑ Warner & Seno, The Coffin Boats, p 169
- 1 2 Grose, A Very Rude Awakening, p 251
- 1 2 Grose, A Very Rude Awakening, pp 253–255
- ↑ Grose, A Very Rude Awakening, p 253
- 1 2 3 4 McNicoll, Ceremony ends missing sub saga
- ↑ Gill, Royal Australian Navy, 1942–1945, p 71
- 1 2 3 Jenkins, Battle Surface, p 217
- ↑ Carruthers, Japanese Submarine Raiders 1942, p 184
- 1 2 3 4 Hasham, Depths of knowledge
- ↑ M24 Japanese Midget Submarine wreck site, New South Wales Heritage Office
- 1 2 Grose, A Very Rude Awakening, p 255
- ↑ Wurth, Fallen submariners honored in Australia
References
- Carruthers, Steven (2006) [1982]. Japanese Submarine Raiders 1942: A maritime mystery (Revised ed.). Narrabeen, NSW: Casper Publications. ISBN 0-9775063-0-4.
- Elbourne, Sean (Winter 2006). "Wonderful Kuttabul – a long history of service" (PDF). Sea Talk (Winter 2006). Royal Australian Navy. pp. 11–19. Retrieved 2008-09-07.
- Liam Bartlett (reporter), Stephen Taylor & Julia Timms (producers) (2006-11-26). "Found it!". 60 Minutes. Nine Network.
- Fullford, Richard (1994). We Stood And Waited: Sydney's anti-ship defences 1939–1945. North Fort: Royal Australian Artillery Historical Society. ISBN 0-646-04599-7.
- Gill, George Hermon (1968). "Australia's Coast Raided – Her Flanks Strengthened" (PDF). Royal Australian Navy, 1942–1945. Australia in the War of 1939–1945, Series 2, Volume II. Canberra: Australian War Memorial. ISBN 0-00-217480-4.
- Grose, Peter (2007). A Very Rude Awakening. Crows Nest: Allen & Unwin. ISBN 978-1-74175-219-9.
- Hasham, Nicole (28 May 2012). "Depths of knowledge: divers to explore secrets of submarine site". The Sydney Morning Herald. Retrieved 28 May 2012.
- Jenkins, David (1992). Battle Surface! Japan's Submarine War Against Australia 1942–44. Milsons Point: Random House Australia. ISBN 0-09-182638-1.
- McNicoll, D.D. (7 August 2007). "Ceremony ends missing sub saga". The Australian. News Corporation. Retrieved 2007-08-07.
- Morison, Samuel Eliot (2001) [1949]. History of United States Naval Operations in World War II. Volume 4. Coral Sea, Midway and Submarine Actions. May 1942 – August 1942. Champaign, Illinois: University of Illinois Press. ISBN 0-252-06995-1.
- "M24 Japanese Midget Submarine wreck site". State Heritage Inventory Database. New South Wales Heritage Office. Archived from the original on 29 August 2007. Retrieved 2007-08-07.
- Nichols, Robert (2006). "The Night the War Came to Sydney". Wartime (33): 26–31.
- "P-400 Serial Number ?". Pacific Wreck Database. Retrieved 2007-08-07.
- Stevens, David (June 2005). A Critical Vulnerability: The Impact of the Submarine Threat on Australia's Maritime Defence (1915–1954) (PDF). Papers in Australian Maritime Affairs (No. 15). Canberra: Sea Power Centre. ISBN 0-642-29625-1. Archived (PDF) from the original on 4 October 2008. Retrieved 2008-09-07.
- Stevens, David, ed. (2001). The Royal Australian Navy. The Australian Centenary History of Defence. South Melbourne, VIC: Oxford University Press. ISBN 0-19-555542-2. OCLC 50418095.
- "Type B1". CombinedFleet.com. Archived from the original on 14 August 2007. Retrieved 2007-08-07.
- "Type C1". CombinedFleet.com. Archived from the original on 14 August 2007. Retrieved 2007-08-07.
- Vale, Dana (31 May 2002). Fort Scratchley Dedication Dinner (Speech). Newcastle, New South Wales. Archived from the original on 28 August 2007. Retrieved 2007-08-07.
- Warner, Peggy; Seno, Sadao (1986). The Coffin Boats. London: Leo Cooper in association with Secker & Warburg. ISBN 0-436-56330-4.
- Wurth, Bob (24 February 2007). "Fallen submariners honored in Australia". The Japan Times. p. 3. Retrieved 2007-08-07.
External links
| Wikimedia Commons has media related to Attack on Sydney Harbour. |
| Wikimedia Commons has media related to Sydney Harbour defences. |
- Found It! – the 60 Minutes segment revealing the discovery of M-24
- Australia's War 1939–1945: Australia Attacked – Sydney Harbour Overview of the events. Includes an animation showing the events immediately prior to and during the attack.
- Midget Submarines at Sydney, Australia 1942 at Combinedfleet.com.
Coordinates: 33°51′30″S 151°14′00″E / 33.85833°S 151.23333°E