Battle of Custoza (1866)
| Second Battle of Custoza[1] | |||||||
|---|---|---|---|---|---|---|---|
| Part of the Austro-Prussian War | |||||||
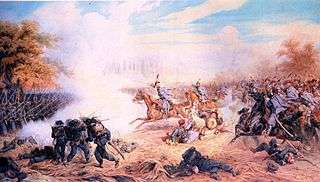 The charge of the 13th Regiment of Austrian Uhlans. | |||||||
| |||||||
| Belligerents | |||||||
|
|
| ||||||
| Commanders and leaders | |||||||
|
|
| ||||||
| Strength | |||||||
|
120,000 total 50'000 engaged | 72,000 | ||||||
| Casualties and losses | |||||||
|
7,403 total: |
7,956 total: | ||||||
The Second Battle of Custoza [1] took place on June 24, 1866 during the Third Italian War of Independence in the Italian unification process.
The Austrian Imperial army commanded by Archduke Albrecht of Habsburg, defeated the Italian army, led by Alfonso Ferrero la Marmora, despite the Italians' strong numerical advantage.
Background
In June 1866, the German Kingdom of Prussia declared war on the Austrian Empire. The recently formed Kingdom of Italy decided to seize the opportunity and allied with Prussia with the intention of annexing Venetia and thus uniting the Italian Peninsula.
Order
Austrian South Army (Field Marschal Archduke Albrecht)
- V Corps (General Gabriel Freiherr von Rodich)
- Moering, Piret Brigades
- VII Corps (General Joseph Freiherr von Maroicic)
- Scudier, Töply, Welsersheimb Brigades
- IX Corps (General Ernst Ritter von Hartung)
- Böck, Kirchsberg, Weckbecker Brigades
- Reserve Division (General Friedrich Rupprecht)
- Two weak brigades
- Cavalry Division (General Ludwig Freiherr von Pulz)
Italian Mincio Army (General Alfonso Ferrero La Marmora)
- I Corps (General Giovanni Durando)
- 1st, 2nd, 3rd and 5th Divisions
- III Corps (General Della Rocca)
- 7th, 8th, 9th and 16th Divisions. Also a Cavalry Division[2]
Battle
In the fourth week of May, the Italians divided their forces into two armies: the 12 division strong Army of the Mincio led by General Alfonso Ferrero La Marmora and accompanied by King Vittorio Emanuele II, and the 8 division strong Army of the Po, led by Enrico Cialdini. The Austrians, using the advantage of interior lines and the protection given by the Quadrilateral forts, concentrated against the Army of the Mincio and left a small covering force against the Army of the Po.
The division of the Italian forces (criticized by some commentators) was the fruit of dissensions between the leading Italian generals, namely La Marmora and Cialdini, which resulted in both commanders believing that theirs was the main attack, and the other having to lead a mere diversion; La Marmora allowed Cialdini to behave as he thought best, thus renouncing to unity of command.[3][4]
The King's force was to move into the Trentino region, while La Marmora's crossed the Mincio River and invaded Venetia. Meanwhile, the Austrian soldiers under Archduke Albrecht of Habsburg marched west from Verona to the north of the Italians, in an attempt to move behind the Italians so as to cut them off from the rear, and thus, slaughter them. At the start of June 24, 1866, La Marmora changed the direction of his front, toward the same heights the Austrians were trying to use as launching point for their attack. Instead of an enveloping battle, the two forces collided head on, with both headquarters trying to discover what happened in the heights near Villafranca.[5]
However, La Marmora's disposition for the march were confused and unclear, as it was borne out of belief that the Imperial army was behind the river Adige, and the cavalry was not employed to recon the area; as a result, the Italian army was strung out on a very large front, with excessive forces being kept behind to observe the fortresses of Mantova (the whole II Corps) and Peschiera (more than a division), or even outright forgotten (the army artillery reserve, left without orders far from the battlefield). As a result, the numerical advantage was squandered, and only some 50'000 Italian soldiers faced off against the whole Imperial army, some 70'000 strong. Moreover, when the fighting began, neither La Marmora nor his corps commanders (generals Durando and Della Rocca) exercised any significant command action; therefore, the battle was fought on the Italian side by isolated Italian units, with no one actually in overall command.[6][7]
On the Austrian left, the Austrian cavalry attacked the Italian III Corps at Villafranca without orders at 7 AM. Although the attack was ineffectual and only crippled the Austrian cavalry, it created a panic in the Italian rear (among the civilian baggage train, manned by civilian contractors) and immobilized three Italian divisions, who for the rest of the battle only took a defensive posture; general Della Rocca for the rest of the day refused repeated suggestions by general Nino Bixio and the Crown Prince Umberto di Savoia to either support the divisions on their left or to advance towards Verona, citing orders from La Marmora to hold the position.[8][9] During the morning isolated fights broke out in Oliosi, San Rocco, Custoza and San Giorgio between Rodic’s V Corps and Durando’s I Corps. After fierce fighting the division of Cerale was thrown out of Oliosi, broke, and fled to the Mincio. Sirtori’s division was blocked from Monte Vento by Rodic’s other troops and by 8 AM, he was thrown back by fierce bayonet attacks. By 8:30 AM however, gaps were opening in the Austrian line. Brignone’s division had taken Belvedere Hill near Custoza after fighting with Hartung’s IX Corps.[10] By 9 AM, Hartung started launching attacks up Monte Croce, trying to dislodge Brignone, but by 10 AM the Austrians seemed spent; however no support or reinforcements came to help Brignone's division. The King’s younger son Amadeo led a counterattack, which failed, with the prince being severely wounded, and Brignone was ultimately forced to leave the position.[11]
La Marmora then ordered the divisions of Cugia and Govone up the heights to relieve Brignone. This forced the Austrian brigades of Böck and Scudier out of Custoza. Scudier then retired from the field, opening another gap in the Austrian line. On the Italian left the situation changed as general Giuseppe Salvatore Pianell, originally deployed on the other side of the Mincio, decided on his own to cross the river and engage the advancing Austrians; together with the I Corps reserve and the remains of Sirtori's division, this stabilized the Italian left flank. At this point in the battle, both sides were thinking they were facing a lost battle.[12][13][14] By 1 PM La Marmora, deciding the battle was lost and wanting to secure his bridgeheads, ordered a retreat. Unbeknownst to him, Govone’s division had beaten back the VII Corps and captured Belvedere Hill. By 2 PM Rodic launched an attack on Monte Vento and Santa Lucia. When Sirtori’s division gave way, a hole appeared in the Italian line, which the Austrians exploited. Govone, who thought he had finally broken through the Austrian line, suddenly found himself isolated near Custoza, with Rodic on one flank and an Austrian brigade making for the bridge at Monzambano. At this point, he was attacked in his other flank by Maroicic, who without orders had committed the two Austrian reserve brigades to the fight. At the same time Hartung’s Corps was ordered to restart the fight. They drove off Cugia's division, capturing six guns and many prisoners on the top of Monte Torre, which they had earlier failed to capture. After a bombardment by 40 Austrian guns, at 5 PM the Italians were driven out of Custoza by Maroicic.[15]
Aftermath
The Austrians were victorious; it was, however, not a decisive defeat. Wavro claims that it was mainly due to the Archduke Albert's unwillingness to pursue and finish off the Army of the Mincio that this battle turned out to be indecisive.[16] Other authors, however, point to the fact that losses from both sides were almost equal, and that all Austrian units had been hotly engaged in the battle, while on the Italian side only three divisions were to be considered "lost", and plenty of fresh units were available (the II Corps, and Cialdini's force). However, the morale on the Italian high command was "deplorable"; La Marmora was completely crushed, and initially thought that it would be necessary to retreat to the line of the Adda river, although general Govone convinced him to retreat only to the line of the Oglio. Cialdini, who had remained immobile throughout the battle, despite orders from the King and La Marmora "beseeching" him otherwise, decided to retreat to Modena himself.[17][18][19]
After their loss at Königgrätz (July 3), the Austrians were forced to transfer one corps from South Army to Austria to cover Vienna, weakening their forces in the Veneto. The Italians, however, resumed their offensive only in mid-July; leaving six infantry and one cavalry divisions under La Marmora to screen the Austrian fortresses, Cialdini with the remaining fifteen divisions (150'000 men) crossed the Po and occupied Rovigo (July 11), Padua (July 12), Treviso (July 14), San Donà di Piave (July 18), Valdobbiadene and Oderzo (July 20), Vicenza (July 21) and finally Udine, in Friuli (July 22). In the meantime Garibaldi's volunteers had pushed forward from Brescia towards Trento (see Invasion of Trentino) fighting victoriously at the battle of Bezzecca of July 21.
Despite their victories both at Custoza and at the naval battle of Lissa, due to the defeat suffered against the Prussians at Königgrätz the Austrians were forced to surrender to Prussia and to cede Venice to Italy.
Scenes from the Italian side of this battle were recreated for the 1954 Luchino Visconti film "Senso".
Notes
- 1 2 "First battle of Custoza". EncyclopædiaBritannica.
- ↑ II Corps, with its 6th, 10th and 19th Divisions, did not engage in the battle. Wavro pp. 96-116
- ↑ Heyriès, p. 100-4
- ↑ Pollio, p. 5-9
- ↑ Wawro, pp. 100-103.
- ↑ Heyriès, p. 110
- ↑ Pollio, p. 55-73
- ↑ Wawro, pp. 104-107.
- ↑ Heyriès, p. 112-6
- ↑ Wawro, pp. 107-109.
- ↑ Wawro, pp. 109-111.
- ↑ Wawro, pp. 111-112.
- ↑ Heyriès, p. 115
- ↑ Pollio, p. 137-79
- ↑ Wawro, pp. 114-116.
- ↑ Wawro, pp. 116-120.
- ↑ Heyriès, p. 117-9
- ↑ Pollio, p. 265
- ↑ Heiryès, p. 117-8
References
- "Details on Custozza - from the Clash of Steel online battle database". clash-of-steel.co.uk. 2012. Retrieved July 16, 2012.
- Encyclopædia Britannica: Second Battle of Custoza
- Geoffrey Wawro, The Austro-Prussian War. Austria's war with Prussia and Italy in 1866 (New York 2007)
- Hubert Heyriès, Italia 1866, Storia di una guerra perduta e vinta, Bologna, Il Mulino, 2016
- Alberto Pollio, Custoza, Roma, 1935 (fourth edition)
Further reading
- Friedrich Engels. Notes on the War in Germany No. III, The Manchester Guardian, No. 6197, June 28, 1866. A contemporary news paper article.
See also
Coordinates: 45°22′44″N 10°47′45″E / 45.37889°N 10.79583°E