Battle of the Philippine Sea
| Battle of the Philippine Sea | |||||||
|---|---|---|---|---|---|---|---|
| Part of the Pacific War of World War II | |||||||
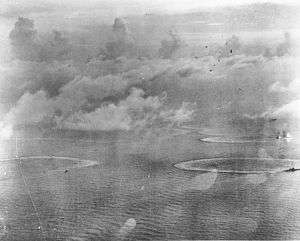
 The carrier Zuikaku (center) and two destroyers under attack by U.S. Navy carrier aircraft, June 20, 1944 | |||||||
| |||||||
| Belligerents | |||||||
|
|
| ||||||
| Commanders and leaders | |||||||
|
|
| ||||||
| Strength | |||||||
|
129 warships: 7 fleet carriers 8 light fleet carriers 7 battleships 8 heavy cruisers 13 light cruisers 58 destroyers 28 submarines 956 carrier aircraft |
90 warships: 5 fleet carriers 4 light carriers 5 battleships 13 heavy cruisers 6 light cruisers 27 destroyers 24 submarines 6 oilers ~450 carrier aircraft ~300 land-based aircraft | ||||||
| Casualties and losses | |||||||
|
1 battleship damaged 123 aircraft destroyed[1] 109 dead |
3 fleet carriers sunk 2 oilers sunk 550–645 aircraft destroyed[1] 6 other ships damaged 2,987 dead (estimate) | ||||||
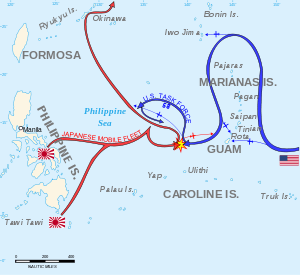
The Battle of the Philippine Sea (June 19–20, 1944) was a decisive naval battle of World War II that eliminated the Imperial Japanese Navy's ability to conduct large-scale carrier actions. It took place during the United States' amphibious invasion of the Mariana Islands during the Pacific War. The battle was the last of five major "carrier-versus-carrier" engagements between American and Japanese naval forces, and pitted elements of the United States Navy's Fifth Fleet against ships and aircraft of the Imperial Japanese Navy's Mobile Fleet and nearby island garrisons.
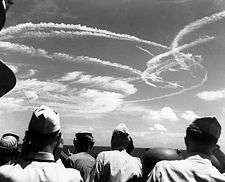
The aerial theatre of the battle was nicknamed the Great Marianas Turkey Shoot by American aviators for the severely disproportional loss ratio inflicted upon Japanese aircraft by American pilots and anti-aircraft gunners.[2] During a debriefing after the first two air battles a pilot from USS Lexington remarked "Why, hell, it was just like an old-time turkey shoot down home!"[3] The outcome is generally attributed to American improvements in pilot and crew training and tactics, war technology (including the top-secret anti-aircraft proximity fuze), and ship and aircraft design.[N 1][N 2] Although at the time the battle appeared to be a missed opportunity to destroy the Japanese fleet, the Imperial Japanese Navy had lost the bulk of its carrier air strength and would never recover.[1] During the course of the battle, American submarines torpedoed and sank two of the largest Japanese fleet carriers taking part in the battle.[4]:331–333
This was the largest carrier-to-carrier battle in history.[5]
Background
Admiral Isoroku Yamamoto was killed on April 18, 1943. The following day, Admiral Mineichi Koga succeeded Yamamoto as Commander-in-Chief of the Combined Fleet. Koga wanted the Imperial Japanese Navy to engage the American fleet in a single decisive battle in early 1944.
From the very start of the conflict in December 1941, the Japanese war plan had been to discourage America by inflicting such severe and painful losses on her military that the public would become war weary and the American government would be convinced to sue for peace and allow Japan to keep her conquests in east and southeast Asia.[6] Though at a numerical disadvantage from the outset, and an industrial disadvantage that would add to that disparity over the course of time, the Japanese high command believed they could fight the U.S. Navy in a single, decisive engagement, known as the Kantai Kessen, which would allow them to defeat the Americans. However, their ability to fight and win such a battle was slipping away. Imperial Navy aircrew losses suffered over the course of the earlier carrier battles at Coral Sea and Midway, and the long Solomon Islands campaign of 1942-43, had greatly weakened the Japanese Navy's ability to project force with its carriers.[7] As the Guadalcanal campaign was largely fought by the Imperial Navy, losses suffered there drastically reduced the number of skilled carrier pilots available to fill the carrier air groups. Losses suffered in the Solomons could be readily absorbed, replaced and made good by the U.S. Navy, but not by the Japanese. It took nearly a year for the Japanese to reconstitute their airgroups following the Solomons campaign.[6]
The initial Japanese plan was to engage the U.S. Pacific Fleet in early 1944, whenever it launched its next offensive, but the decisive battle consequently had to be delayed.[8] Meanwhile, American material production capacity, aircrew training, and technological advances made a Japanese victory increasingly difficult to achieve. By the end of 1942, the Allied navies had overcome most of the technological edges Japan's ships and planes had held at the start of the war. Furthermore, by mid-1943 mass production of ships and improved aircraft began to tip the balance of forces in the favor of the Allies. Allied training practices similarly adapted to new developments. The US revised fleet operations, with parallel developments in both the Combat Information Center and in doctrine, training, and practices to get the most out of the new communications and sensor technologies.
After puncturing Japan's 'outer' defensive ring at the costly Battle of Tarawa in late 1943, the U.S. Navy brought these improvements together in the form of the Fast Carrier Task Force, under Admiral Marc Mitscher (known as Task Force 58 when part of Admiral Raymond Spruance's Fifth Fleet and Task Force 38 when part of Admiral William F. Halsey's Third Fleet). Led by this main strike force, in early 1944 the U.S. fleet continued its advance in a steady progression across the islands of the Central Pacific.[9] After achieving their goals in the Gilbert Islands campaign, the Americans began a series of softening-up missions aimed at weakening Japanese land-based airpower to limit Japan's ability to interfere with future amphibious invasions. Few U.S. commanders realized how powerful Task Force 58 had become. Though initially undertaken with trepidation, the raids proved to be successful beyond anything U.S. planners had imagined—notably with Operation Hailstone, which effectively neutralized the primary central Pacific warbase of the Imperial Japanese Navy at Truk Lagoon—and changed the manner in which the war would be pursued.
While U.S. commanders, particularly Admiral Spruance, were wary of the Japanese trying to attack U.S. transports and newly landed forces, the Japanese were looking to engage and defeat the Fast Carrier Task Force.[10] The Japanese commanders saw the Marianas island group in the central Pacific, including Guam, Tinian, and Saipan, as their inner circle of defense. Land-based fighter and bomber aircraft on these islands controlled the sea lanes to Japan and protected the home islands. As the Americans prepared for the Marianas campaign, the IJN concluded that the Kantai Kessen could be delayed no longer.
The Japanese had a number of advantages they hoped would turn the battle in their favor. Though outnumbered in ships and aircraft, they planned to supplement their carrier airpower with land-based aircraft.[11] In addition, the Japanese aircraft had superior range, which could allow them to engage the American carriers beyond the range of American aircraft. Furthermore, with island bases in the area, the Japanese hoped to launch at distance, have their aircraft attack the U.S. fleet and then land on island airfields. They then could shuttle back and attack again on the return flight. Thus the U.S. fleet would be in the position of receiving punishment without being able to deliver it. Lastly, the area was dominated by the easterly trade winds. Naval aircraft of the era needed a head wind blowing across the flight deck to enable the aircraft to launch. The easterly trade winds that dominated the Central Pacific seas meant that aircraft carriers would necessarily have to be steaming eastward to launch and recover aircraft. This meant that a fleet located to the west of the Marianas would be in position to initiate and break off the battle, placing the initiative in the hands of the Japanese.[11][12]
In March 1944, Admiral Koga was killed when his aircraft flew into a typhoon and crashed.[11] A new Commander-in-Chief of the Combined Fleet, Admiral Soemu Toyoda, was appointed. He continued the current work, finalizing the Japanese plans known as Plan A-Go or Operation A-Go.[13] The plan was adopted in early June 1944, then within weeks quickly put into place to engage the American fleet now detected heading for Saipan.
Opposing forces
U.S. fleet
For this battle, the American force was designated the Fifth Fleet, under the command of Admiral Raymond Spruance. The Fast Carrier group was designated Task Force 58, commanded by Vice Admiral Marc Mitscher. Spruance flew his flag aboard the heavy cruiser USS Indianapolis, which was sailing in the outer defensive ring of Task Group 58.3.[14] Mitscher's flagship was USS Lexington, also in Task Group 58.3.
TF 58 was made up of five task groups. Deployed in front of the carriers to act as an anti-aircraft screen was the battle group of Vice Admiral Willis Lee, Task Group 58.7 (TG-58.7): seven fast battleships (Washington (flagship), North Carolina, Indiana, Iowa, New Jersey, South Dakota, and Alabama), and eight heavy cruisers (Baltimore, Boston, Canberra, Indianapolis, Wichita, Minneapolis, New Orleans, and San Francisco). Just north of them was the weakest of the carrier groups, Rear Admiral William K. Harrill's Task Group 58.4 of one fleet carrier (Essex) and two light carriers (Langley, and Cowpens). To the east, in a line running north to south, were three groups, each containing two fleet carriers and two light carriers: Rear Admiral Joseph Clark's Task Group 58.1 (Hornet, Yorktown, Belleau Wood and Bataan); Rear Admiral Alfred E. Montgomery's Task Group 58.2 (Bunker Hill, Wasp, Cabot, and Monterey); and Rear Admiral John W. Reeves's Task Group 58.3 (Enterprise, Lexington, San Jacinto, and Princeton). These capital ships were supported by 13 light cruisers, 58 destroyers, and 28 submarines.
_Philippine_Sea.jpg)
The Fifth Fleet also controlled the Saipan invasion force, Task Force 52, under Vice Admiral Kelly Turner. TF 52 included two Fire Support Groups with seven older battleships and eleven cruisers, and two Carrier Support Groups with seven escort carriers. [15] None of these ships participated in the carrier action; planes from the escort carriers engaged the Japanese land-based aircraft along with TF 58's planes.
Japanese fleet
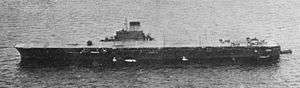
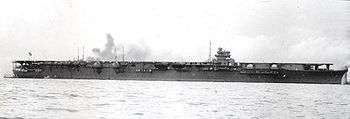
The Japanese fleet, commanded by Vice-Admiral Jisaburo Ozawa, consisted of three large fast fleet carriers (Taihō, Shōkaku, and Zuikaku), two slower carriers converted from ocean liners (Junyō and Hiyō), four light carriers (Ryūhō, Chitose, Chiyoda, and Zuihō), five battleships (Yamato, Musashi, Kongō, Haruna, and Nagato), 13 heavy cruisers, 6 light cruisers, 27 destroyers, six oilers, and 24 submarines.
Initial stages
On June 12, 1944, U.S. carriers made air strikes on the Marianas, convincing Admiral Toyoda that the U.S. was preparing to invade. This move came as a surprise; the Japanese had expected the next U.S. target to be farther to the south, either the Carolines or the Palaus, and had protected the Marianas with only 50 land-based aircraft. On June 13–15, American carriers made additional airstrikes while surface forces bombarded the Marianas. On June 15, the first American troops went ashore on Saipan.
Since control of the Marianas would bring American strategic bombers in range of the Japanese home islands, the IJN decided it was time for the long-awaited Kantai Kessen (decisive battle). Toyoda immediately ordered a fleet-based counterattack, committing nearly all of the Japanese navy's serviceable ships.[6]
The main portions of the fleet rendezvoused on June 16 in the western part of the Philippine Sea and completed refueling on June 17. Ozawa commanded this force from his newly commissioned flagship, Taihō. In addition to extensive command facilities, reinforced torpedo blisters, and a large air group, Taihō was the first Japanese carrier to possess an armor-plated flight deck, designed to withstand bomb hits with minimal damage.
At 18:35 on 15 June, submarine USS Flying Fish sighted a Japanese carrier and battleship force coming out of San Bernardino Strait. An hour later USS Seahorse spotted a battleship and cruiser force steaming up from the south, 200 miles east of Mindanao. The submarines were under orders to report sightings first, before attempting to attack. Thus Flying Fish waited till nightfall, then surfaced to radio in its report.[16] Fifth Fleet commander Spruance was convinced that a major battle was at hand. After consulting with Admiral Chester Nimitz at Pacific Fleet Headquarters in Hawaii, he ordered Task Force 58, which had sent two carrier task groups north to intercept aircraft reinforcements from Japan, to reform and move west of Saipan into the Philippine Sea.[17]
TF 52's old battleships, cruisers, and escort carrier were ordered to remain near Saipan to protect the invasion fleet and provide air support for the landings.
Shortly before midnight on June 18, Nimitz radioed Spruance that a Japanese vessel had broken radio silence. The message intercepted was an apparent dispatch from Ozawa to his land-based air forces on Guam. Radio direction-finding placed the sender approximately 355 miles (560 km) west-southwest of TF 58.[18] Mitscher considered whether the radio messages was a Japanese deception, as the Japanese were known to send a single vessel off to break radio silence, to mislead their adversaries about the actual location of the main force.[19]
Mitscher realized that there was a chance of a night surface encounter with Ozawa's forces. Arleigh Burke, Mitscher's Chief of Staff (a former destroyer squadron commander who had won several night battles in the Solomons), assumed that battleline commander Lee would welcome the opportunity. But Lee strongly opposed such an encounter.[17] Having personally experienced a confused night action off Guadalcanal, Lee was not enthusiastic about a night engagement with Japanese surface forces, believing that his crews were not adequately trained for it. Shortly after learning Lee's opinion, Mitscher requested permission from Spruance to move TF 58 west during the night, to reach a launch position at dawn that would allow for a maximum aerial assault on the enemy force.
Spruance considered for an hour, then refused Mitscher's request.[20] Mitscher's staff was disappointed with Spruance's decision.[21] On the situation, Captain Burke later commented: "We knew we were going to have hell slugged out of us in the morning. We knew we couldn't reach them. We knew they could reach us."[22] Spruance said "if we were doing something so important that we were attracting the enemy to us, we could afford to let him come—and take care of him when he arrived." This was in stark contrast to the Battle of Midway in 1942, where Spruance advocated immediately attacking even when his own strike force wasn't fully assembled, as neutralizing enemy carriers before they could launch their planes was the key to the survival of his carriers.[23]
Spruance's decision was influenced by his orders from Nimitz, who had made it clear that the protection of the invasion fleet was the primary mission of Task Force 58. Spruance had concerns that the Japanese would attempt to draw his main fleet away from the Marianas with a diversionary force, while slipping an attack force in to destroy the landing fleet.[24] Locating and destroying the Japanese fleet was not his primary objective, and he was unwilling to allow the main strike force of the Pacific Fleet to be drawn westward, away from the amphibious forces. Mitscher accepted the decision without comment.[21] Spruance's decision in this matter, although subsequently criticized, was certainly justified; by this point in the war, it was well known that Japanese operational plans frequently relied on the use of decoys and diversionary forces. However, in this particular engagement (and in sharp contrast to the subsequent Battle of Leyte Gulf), there was no such aspect in the Japanese plan.
Before daybreak, Spruance suggested if the daybreak searches revealed no targets, the bombers could be sent to crater the airfields on Rota and Guam. But the fleet's contact-fused bombs had been largely used up in the earlier strikes. Mitscher was left with only the armor-piercing bombs needed to combat the Japanese fleet, so he informed Spruance he could not launch such strikes.[25] As the morning broke, TF 58 launched search aircraft, combat air patrols (CAP), and anti-submarine patrols, and then turned the fleet west to gain maneuvering room from the islands.[26] The U.S. Navy had developed a sophisticated air control system, which vectored CAP fighters by radar to intercept enemy bombers well before they reached the fleet. Any attackers that got through the CAP would then face a "gun line" of screening battleships and cruisers, putting up devastating barrages of VT fuzed anti-aircraft fire.[27][N 1][N 2]
Battle
Early actions
The Japanese had already launched their morning search patrols, using some of the 50 aircraft stationed on Guam, and at 05:50, one of these, a Mitsubishi A6M Zero, found TF-58. After radioing his sighting of U.S. ships, the Zero attacked a picket destroyer and was shot down.
Alerted, the Japanese began launching their aircraft on Guam for an attack. These were spotted on radar by U.S. ships. A group of thirty Grumman F6F Hellcats were dispatched from the Belleau Wood to deal with the threat. The Hellcats arrived while aircraft were still launching from Orote Field. Minutes later, additional radar contacts were seen, which were later discovered to be the additional forces being sent north from the other islands. A huge battle broke out. 35 Japanese aircraft were shot down, for the loss of a single Hellcat. It was a pattern that would be repeated throughout the day. At 09:57 large numbers of bogeys were picked up approaching the fleet. Mitscher said to Burke "Get those fighters back from Guam". The call "Hey, Rube!" was sent out.[26][N 3] The fleet held steady until 10:23, when Mitscher ordered TF 58 to turn into the wind on course east-southeast, and ordered all fighter aircraft aloft, deployed in several layers of (CAP) to await the Japanese.[28] He then sent his bomber aircraft aloft to orbit open waters to the east, so they wouldn't be in danger of a Japanese bomb going off in a hangar deck full of aircraft.[29]
Japanese raids
The recall had been ordered after several ships in TF 58 picked up radar contacts 150 miles (240 km) to the west around 10:00. This was the first of the raids from the Japanese carrier forces, with 68 aircraft. TF 58 started launching every fighter it could, and by the time they were in the air, the Japanese had closed to 70 miles (110 km). However, the Japanese began circling to regroup their formations for the attack. This 10-minute delay proved critical, and the first group of Hellcats met the raid, still at 70 miles (110 km), at 10:36. They were quickly joined by additional groups. Within minutes, 25 Japanese aircraft had been shot down, against the loss of only one U.S. aircraft.
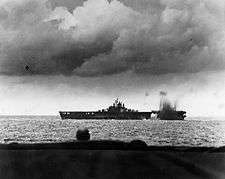
The Japanese aircraft that survived were met by other fighters, and 16 more were shot down. Of the 27 aircraft which now remained, some made attacks on the picket destroyers USS Yarnall and USS Stockham but caused no damage. Between three and six bombers broke through to Lee's battleship group and attacked; one scored a direct hit on the main deck of USS South Dakota, which killed or injured over 50 men, but failed to disable her. South Dakota was the only American ship damaged in this attack. Not one aircraft of Ozawa’s first wave got through to the American carriers.
At 11:07, radar detected another, larger attack. This second wave consisted of 107 aircraft. They were met while still 60 miles (97 km) out, and at least 70 of these aircraft were shot down before reaching the ships. Six attacked Rear Admiral Montgomery’s group, nearly hitting two of the carriers and causing casualties on each. Four of the six were shot down. A small group of torpedo aircraft attacked Enterprise, one torpedo exploding in the wake of the ship. Three other torpedo-aircraft attacked the light carrier Princeton but were shot down. In all, 97 of the 107 attacking aircraft were destroyed.
The third raid, consisting of 47 aircraft, came in from the north. It was intercepted by 40 fighters at 13:00, while 50 miles (80 km) out from the task force. Seven Japanese aircraft were shot down. A few broke through and made an ineffective attack on the Enterprise group. Many others did not press home their attacks. This raid therefore suffered less than the others, and 40 of its aircraft managed to return to their carriers.
The fourth Japanese raid was launched between 11:00 and 11:30, but pilots had been given an incorrect position for the U.S. fleet and could not locate it. They then broke into two loose groups and turned for Guam and Rota to refuel.
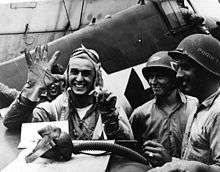
One group flying toward Rota stumbled upon Montgomery’s task group. Eighteen aircraft joined battle with American fighters and lost half their number. A smaller group of nine Japanese dive bombers of this force evaded U.S. aircraft and attacked Wasp and Bunker Hill, but scored no hits. Eight were shot down . The larger group of Japanese aircraft had flown to Guam and were intercepted over Orote Field by 27 Hellcats while landing. Thirty of the 49 Japanese aircraft were shot down, and the rest were damaged beyond repair. Aboard the Lexington afterward, a pilot was heard to remark "Hell, this is like an old-time turkey shoot!"[30]
Including the continued aerial slaughter over Orote Field, Japanese losses exceeded 350 planes on the first day of battle. American losses were relatively light, with about thirty planes being lost. Damage to American ships was minimal, and even the damaged South Dakota was able to remain in formation to continue her anti-aircraft duties.
Most of the Japanese pilots who successfully evaded the U.S. fighter screens were the small number of seasoned veterans who had survived the six-month Japanese advance early in the Pacific war, the Battle of Midway, and the Guadalcanal campaign.
Submarine attacks
Throughout the day, American scout aircraft had been unable to locate the Japanese fleet. However, two American submarines had already spotted Ozawa's carriers early that morning, and were about to provide important assistance to the Fast Carrier Task Force.
At 08:16 the submarine USS Albacore, which had sighted Ozawa’s own carrier group, had maneuvered into an ideal attack position; Lieutenant Commander James W. Blanchard selected the closest carrier as his target, which happened to be Taihō, the largest and newest carrier in the Japanese fleet and Vice Admiral Jisaburo Ozawa’s flagship. As Albacore was about to fire, however, her fire-control computer failed, and the torpedoes had to be fired "by eye". Determined to go ahead with the attack, Blanchard ordered all six torpedoes to be fired in a single spread to increase the chances of a hit.[4]:331–333
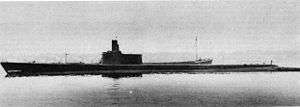
Taihō had just launched 42 aircraft as a part of the second raid when Albacore fired its torpedo spread. Of the six torpedoes fired, four veered off-target; Sakio Komatsu, the pilot of one of the recently launched aircraft, sighted one of the two which were heading for Taihō and dove his aircraft into its path, causing the torpedo to detonate prematurely. However, the sixth torpedo struck the carrier on her starboard side, rupturing two aviation-fuel tanks. After coming under depth charge attacks from the carrier's escorting destroyers, Albacore escaped with only minor damage.
Initially, the damage to Taihō seemed minor; the flooding was quickly contained and the carrier's propulsion and navigation were unaffected. Taihō quickly resumed regular operations; however, gasoline vapors from the ruptured fuel tanks began to fill the hangar decks, creating an increasingly dangerous situation on board.
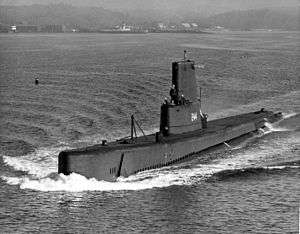
Another submarine, USS Cavalla, was able to maneuver to an attack position on the 25,675-ton carrier Shōkaku by about noon. The submarine fired a spread of six torpedoes, three of which struck Shōkaku on her starboard side.[4]:329–331 Badly damaged, the carrier came to a halt. One torpedo had hit the forward aviation fuel tanks near the main hangar, and aircraft that had just landed and were being refueled exploded into flames. Ammunition and exploding bombs added to the conflagration, as did burning fuel spewing from shattered fuel pipes. With her bows subsiding into the sea and fires out of control, the captain gave orders to abandon ship. Within minutes, there was a catastrophic explosion of aviation fuel vapor which had built up within between decks, which blew the ship apart. The carrier rolled over and slid beneath the waves about 140 miles (230 km) north of the island of Yap, taking 887 navy officers and men plus 376 men of the 601st Naval Air Group, a total of 1,263 men in all, to the seabed. There were 570 survivors, including the carrier's commanding officer, Captain Hiroshi Matsubara. Destroyer Urakaze attacked the submarine, but Cavalla escaped with relatively minor damage despite near misses from depth charges.[4]:330
Meanwhile, Taihō was falling victim to poor damage control. Hoping to clear the explosive fumes, an inexperienced damage-control officer ordered her ventilation system to operate at full blast. This action instead spread the vapors throughout Taihō, putting the entire vessel at risk. At approximately 14:30, a spark from an electric generator on the hangar deck ignited the accumulated fumes, triggering a series of catastrophic explosions. After the first explosions, it was clear that Taihō was doomed, and Ozawa and his staff transferred to the nearby Zuikaku.[4]:332 Soon thereafter, Taihō suffered a second series of explosions and sank. From a crew of 2,150, 1,650 officers and men were lost.
U.S. Counterattack
TF 58 sailed west during the night to attack the Japanese at dawn. Search patrols were put up at first light.
Admiral Ozawa had transferred to the destroyer Wakatsuki after Taihō had been hit, but the radio gear on board was incapable of sending the number of messages needed, so he transferred again, to the carrier Zuikaku, at 13:00. It was then he learned of the disastrous results of the previous day and that he had about 150 aircraft left. Nevertheless, he decided to continue the attacks, thinking there were still hundreds of aircraft on Guam and Rota, and started planning new raids for June 21.
The main problem for TF 58 was locating the enemy, who had been operating at a great distance. Early-morning American searches on June 20 found nothing. An extra mid-day search flown by Hellcat fighter pilots also came back empty. Finally at 15:12 a garbled message from an Enterprise search plane indicated a sighting. At 15:40 the sighting was verified, along with distance, course, and speed. The Japanese fleet was 275 miles out, moving due west at a speed of 20 knots.[31] The Japanese were at the limit of TF 58's strike range, and daylight was slipping away. Mitscher decided to launch an all-out strike. After the first attack group had launched, a third message arrived, indicating the Japanese fleet were 60 miles farther out than previously indicated.[32] The first launch would be at their limits of fuel, and would have to attempt landing at night. Mitscher canceled the second launch of aircraft, but chose not to recall the first launch. Of the 240 planes that were launched for the strike, 14 aborted for various reasons and returned to their ships. The 226 planes which continued on consisted of 95 Hellcat fighters (some carrying 500-pound bombs), 54 Avenger torpedo bombers (only a few carrying torpedoes, the rest four 500-pound bombs) and 77 dive bombers (51 Helldivers and 26 Dauntlesses).[33] The TF 58 aircraft arrived over the Japanese fleet just before sunset.[34]
The fighter cover Ozawa was able to put up would have been good by 1942 standards, but the 35 or so fighters he had available were overwhelmed by the incoming 230 aircraft of Mitscher's attack. Though these few were often skillfully handled and the Japanese antiaircraft fire was intense, the U.S. planes were able to press in on the attack.[35]
The first ships sighted by the U.S. strike were oilers, thirty miles before the carrier groups. The strike group from the Wasp, more concerned with their low fuel levels than with finding the more important Japanese carriers and battleships, dove on the tankers.[36] Two of these were damaged so severely that they were later scuttled, while a third was able to put out fires and get under way.
The carrier Hiyō was attacked and hit by bombs and aerial torpedoes from four Grumman TBF Avengers from Belleau Wood. Hiyō was set afire after a tremendous blast from leaking aviation fuel. Dead in the water, she slipped stern first under the waves, with the loss of 250 officers and men. The rest of her crew, about one thousand, were rescued by Japanese destroyers.
The carriers Zuikaku, Junyō, and Chiyoda were damaged by bombs. Returning American strike pilots generally assessed these carriers as more crippled than they actually were, mistaking for devastating direct hits what Japanese post-war records revealed to have actually been huge geysers caused by near misses.[37] The battleship Haruna was also hit by two bombs, including one directly on a main battery turret. Damage was contained and she was able to keep station, however, in some part thanks to her captain's prompt decision to flood the turret's magazine to avoid a chance of an explosion.
Twenty American aircraft in the strike were destroyed. These were lost both to Japanese fighters and to anti-aircraft fire that made up for a relative lack of accuracy with high volume of fire.[38]
After the protracted strike, it became clear that most of the aircraft returning to their carriers were running dangerously low on fuel, and to worsen matters, night had fallen. At 20:45, the first returning U.S. aircraft reached TF 58. Knowing his aviators would have difficulty finding their carriers, Mitscher decided to illuminate his carriers, shining searchlights directly up into the night, despite the risk of attack from submarines and night-flying aircraft. Picket destroyers fired starshells to help the aircraft find the task groups.
Planes were given clearance to land on any available flight deck (not just their home carriers, as usual), and many did land on other carriers. Despite this, 80 of the returning aircraft were lost, some crashing on flight decks, and the majority ditching into the sea. Some pilots intentionally went down in groups to facilitate rescue, and more ditched individually either in a controlled landing, with a few gallons of fuel left, or in a crash after their engines ran dry.[39] Most of the crews (approximately three-quarters) were fished from the seas, either that night from crash locations within the task forces, or over the next few days for those further out, as search planes and destroyers criss-crossed the ocean looking for them.[N 4]
Aftermath
Japanese
That night, Toyoda ordered Ozawa to withdraw from the Philippine Sea. U.S. forces gave chase, but the battle was over.
The four Japanese air strikes involved 373 carrier aircraft, of which 130 returned to the carriers. Many of these survivors were subsequently lost when Taiho and Shōkaku were sunk by submarine attacks. After the second day of the battle, losses totaled three carriers, more than 433 carrier aircraft, and around 200 land-based aircraft.
These losses to the already outnumbered Japanese fleet air arm were irreplaceable. The Japanese had spent the better part of a year reconstituting their carrier air groups, and the American Fast Carrier Task Force had destroyed 90% of it in two days. The Japanese only had enough pilots left to form the air group for one of their light carriers. As a consequence, during the Battle of Leyte Gulf, four months later, their carriers were used merely as decoys.
The Japanese military, which had shielded the Japanese public from the extent of their losses, continued this policy. Though the occurrence of the simultaneous Battle of the Philippine Sea and the Battle of Saipan were made known to the public, the extent of the disasters was withheld.[40]
American
Losses on the U.S. side on the first day were only 23 aircraft. The second day's airstrike against the Japanese fleet saw most of the aircraft losses for the U.S. Of the 215 aircraft launched on the strike, only 115 made it back. Twenty were lost to enemy action in the attack, while 80 more were lost when they ran out of fuel returning to their carriers and had to ditch into the sea, or crashed attempting to land at night.[41]
Spruance's conservative battle plan, while not destroying all of the Japanese aircraft carriers, severely weakened the Japanese naval aviation forces by killing most of the remaining trained pilots and destroying their last operational reserves of naval aircraft. Without the time or resources to build sufficient aircraft and train experienced pilots, the surviving Japanese carriers were useless as weapons, a fact the Japanese acknowledged by using them as sacrificial decoys at Leyte Gulf. With the effective crippling of her best striking arm, Japan was increasingly forced to rely on land-based kamikaze suicide aircraft in a last-ditch effort to make the war so costly that the U.S. would offer peace terms (other than unconditional surrender).
Spruance was heavily criticized after the battle by many officers, particularly the aviators, for his decision to fight the battle cautiously rather than exploiting his superior forces and intelligence data with a more aggressive posture. By failing to close on the enemy earlier and more forcefully, his critics argue, he squandered an opportunity to destroy the entire Japanese Mobile Fleet. "This is what comes of placing a non-aviator in command over carriers" was the common refrain.[42] Admiral John Towers, a naval aviation pioneer and Deputy Commander-in-Chief Pacific Fleet, demanded that Spruance be relieved.[43] The request was denied by Admiral Nimitz. Moreover, Spruance was supported in his decision by Nimitz, Kelly Turner, and the top naval commander, the acerbic and highly demanding Admiral Ernest King, Chief of Naval Operations.[44]
In retrospect, it certainly is instructive to compare Spruance's caution (in particular, his suspicion of a diversionary force) with Halsey's headlong pursuit of an actual diversionary force at Leyte Gulf four months later. Halsey left the American invasion fleet weakly protected, and exposed to a nearly successful attack by Japanese heavy surface units.
Although the American carrier aircraft strikes caused less destruction to enemy naval vessels than earlier battles, American submarines made up for it by sinking two of the three Japanese fleet carriers. The air defense of Task Force 58 also shattered the Japanese naval air arm, a blow from which it never recovered.[45]
The American F6F Hellcat fighter proved a capable weapon. Its powerful engine generated superior speed, and its protection and firepower made it rugged and deadly. The Japanese were still flying the A6M Zero which, though highly maneuverable and revolutionary during the early stages of the Pacific War, showed its age by 1943 standards as being underpowered and fragile, and quickly became obsolete in 1944. In addition, the D4Y "Judy", though fast, was also fragile and easily set afire. The Japanese naval airmen were also largely inadequately trained. The Japanese preparation programs could not replace the quality aviators lost during the past two years of the Pacific Campaign. Flying against the well-trained and often veteran U.S. aviators, it was a one-sided contest. The Americans lost fewer than two dozen Hellcats in air-to-air combat. Naval aviation and AA fire garnered nearly 480 Japanese kills, 346 of those carrier aircraft on 19 June alone.[46]
See also
- United States Navy in World War II
- Imperial Japanese Navy of World War II
- Imperial Japanese Navy Air Service
- Z Plan (Japan)
References
- Notes
- 1 2 The Americans now used and were becoming practiced with the new radar-based Command Information Center, and anti-air defensive firepower was delivered on target. Unlike the overburdened radio channels and lost messages experienced in the Battle of Midway, the U.S. fleet had sufficient frequencies and communications training, discipline, experience and doctrine to maintain good command coordination and control during the largest such battle ever.
- 1 2 Radar directed detection and interception allowed the Americans to intercept and surprise 370 inbound Japanese over fifty miles from the carriers and destroy about 250 in just that one encounter. ("The Race for Radar and Stealth", 2006, Weapons Races program on the Military Channel affiliate of the Discovery network, rebroadcast periodically.) Japanese aircraft which got through the Air Screen faced the highly effective VT fuzed anti-aircraft shells and the new command and control philosophy which concentrated anti-aircraft firepower.
- ↑ "Hey Rube!" was the old circus cry used to call for help in a fight. The navy borrowed it to signal fighters they were needed over the ship.
- ↑ The United States Navy customarily rewarded the crew of a ship that returned a downed pilot to his ship of origin with several gallons of ice cream. (Stark, Norman (2002-09-17). "My True Worth – 10 Gallons of Ice Cream". Archived from the original on 2008-11-20. Retrieved 2015-08-26.) (John, Philip (2004). USS Hancock CV/CVA-19 Fighting Hannah. Turner Publishing Company. p. 122. ISBN 1-56311-420-8.)
- Citations
- 1 2 3 Shores 1985, p. 205
- ↑ Shores 1985, p. 189.
- ↑ Potter 1990, p. 160.
- 1 2 3 4 5 Roscoe, T. (1949) Pig Boats New York: Bantam Books, ISBN 0553130404
- ↑ Polmar 2008, pp. 377–400.
- 1 2 3 Willmott 1984, p. 143.
- ↑ Willmott 1984, p. 175.
- ↑ Willmott 1984, p. 176.
- ↑ Willmott 1984, p. 181.
- ↑ Willmott 1984, p. 200.
- 1 2 3 Willmott 1984, p. 182.
- ↑ Potter 1990, p. 146.
- ↑ History of U.S. Marine Corps Operations in World War II, pp. 260-61. "Strategic Victory in the Marianas Liberation of Guam; Capture of Saipan and Tinian"
- ↑ Potter 1990, p. 152.
- ↑ Dyer, Vice Admiral George C. (1973) The Amphibians Came to Conquer. U.S. Navy Department. pp 885-887
- ↑ Potter 1990, p. 145.
- 1 2 Potter 1990, p. 148.
- ↑ Taylor 1991, p. 220.
- ↑ Potter 1990, p. 149.
- ↑ Potter 1990, p. 150.
- 1 2 Potter 1990, p. 151.
- ↑ Taylor 1991, p. 222.
- ↑ The Battle of the Philippine Sea 19-20 June 1944
- ↑ C. N. Trueman, "The Battle of the Philippine Sea" The History Learning Site
- ↑ Taylor 1991, p. 223.
- 1 2 Potter 1990, p. 154.
- ↑ Battle of the Philippine Sea at Combinedfleet.com
- ↑ Potter 1990, p. 155.
- ↑ Potter 1990, pp. 155-156.
- ↑ Hearn, Chester G. Navy: An Illustrated History: The U.S. Navy from 1775 to the 21st Century. Page 80.
- ↑ Taylor 1991, p. 231.
- ↑ Taylor 1991, p. 232.
- ↑ Y'Blood 1981, p. ?.
- ↑ Taylor 1991, p. 233.
- ↑ Potter 1990, p. 166.
- ↑ Tillman 2006, p. ?.
- ↑ Tillman 2006, p. ??.
- ↑ Tillman 2006, p. ???.
- ↑ Tillman 2006, p. ????.
- ↑ Hoyt 1986, p. 352.
- ↑ Potter 1990, p. 170.
- ↑ Potter 1990, pp. 174.
- ↑ Potter 1990, pp. 173-174.
- ↑ Potter 1990, pp. 175.
- ↑ Willmott 1984, p. 204.
- ↑ Morison 1953, p. ?.
- Bibliography
- Hoyt, Edwin Palmer (1986), Japan's war: the great Pacific conflict, 1853 to 1952, New York, NY: McGraw-Hill, ISBN 0-07-030612-5
- Morison, Samuel Eliot (1953), New Guinea and the Marianas, March 1944–August 1944, History of United States Naval Operations in World War II, 8
- Polmar, Norman (January 24, 2008), Aircraft Carriers: A History of Carrier Aviation and Its Influence on World Events, 1946-2006 (hardcover), II, Washington, D.C: Potomac Books Inc, pp. 377–400, ISBN 1574886657, ISBN 978-1574886658, retrieved June 1, 2014
- Potter, E. B. (1990), Admiral Arleigh Burke, U.S. Naval Institute Press, ISBN 978-1-59114-692-6
- Shores, Christopher (1985), Duel for the Sky: Ten Crucial Battles of World War II, London: Grub Street, ISBN 978-0-7137-1601-6
- Taylor, Theodore (1991) [1954], The Magnificent Mitscher, Annapolis, MD: Naval Institute Press, ISBN 1-55750-800-3
- Tillman, Barrett (2006), Clash of the Carriers: The True Story of the Marianas Turkey Shoot of World War II, Penguin Group (USA) LLC, ISBN 9780451219565
- Willmott, H. P. (1984), June 1944, New York, NY: Blandford Press, ISBN 0-7137-1446-8
- Y'Blood, William T. (1981), Red Sun Setting: The Battle of the Philippine Sea, Annapolis, Maryland: U.S. Naval Institute Press, ISBN 1-59114-994-0
- Further reading
- Bryan III, Lt. Cmdr. J. Mission Beyond Darkness: The story of USS Lexington's Air Group 16 June 20, 1944 attack on the Japanese carrier fleet as told by the men who flew that day (1945)
- Buell, Thomas B. The Quiet Warrior: A Biography of Admiral Raymond A. Spruance (1987).
- D'Albas, Andrieu (1965). Death of a Navy: Japanese Naval Action in World War II. Devin-Adair Pub. ISBN 0-8159-5302-X.
- Dull, Paul S. (1978). A Battle History of the Imperial Japanese Navy, 1941–1945. Naval Institute Press. ISBN 0-87021-097-1.
- Lacroix, Eric; Linton Wells (1997). Japanese Cruisers of the Pacific War. Naval Institute Press. ISBN 0-87021-311-3.
- Smith, Douglas V. (2006). Carrier Battles: Command Decision in Harm's Way. U.S. Naval Institute Press. ISBN 1-59114-794-8.
External links
| Wikimedia Commons has media related to Battle of the Philippine Sea. |
- Battle for the Mariana Islands on YouTube
- Order of battle
- WW2DB: The Marianas and the Great Turkey Shoot
- Battle of the Philippine Sea at Combinedfleet.com
- Animated History of The Battle of the Philippine Sea
- The Controversy over Spruance's Decision
- Air Group 31's participation in the Battle of the Philippine Sea
- A Brief Account of the Battle
Coordinates: 20°00′00″N 130°00′00″E / 20.0000°N 130.0000°E