CSS Virginia II
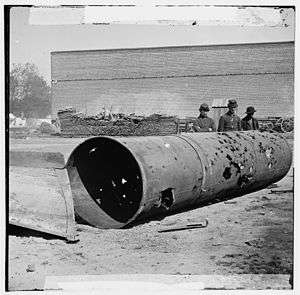 Shot-riddled smokestack from CSS Virginia II | |
| History | |
|---|---|
| Name: | Virginia II |
| Builder: | William Arthur Graves |
| Laid down: | April 1862? |
| Launched: | June 29, 1863 |
| Commissioned: | May 18, 1864 |
| Homeport: | Richmond, Virginia |
| Fate: | Burned to prevent capture; remains raised and salvaged for scrap |
| General characteristics | |
| Length: | 197 ft (60 m) |
| Beam: | 47 ft 6 in (14.48 m) |
| Draft: | 14 ft (4.3 m) |
| Propulsion: | Steam engine |
| Complement: | 150 officers and men |
| Armament: | 1 × 11" Brooke smoothbore, 1 × 8" Brooke rifle, 2 6.4" Brooke rifle |
| Armor: | sides 5", forward 6" |
CSS Virginia II was a Confederate Navy steam-powered ironclad ram laid down in 1862 at the William Graves' shipyard in Richmond, Virginia. Acting Constructor William A. Graves, CSN, was the superintendent in charge of her construction. In order to conserve scarce iron plating, he ordered the ship's armored casemate shortened from the specifications given in John L. Porter's original building plans; in addition, the ship's iron-plating, while six inches thick on the casemate's forward face, was reduced to five inches on her port, starboard, and aft faces. Due to the shortening of her casemate, the number of her cannon were reduced to a single 11" smoothbore, a single 8" rifle, and two 6.4" rifles.
The Virginia II was named after the more famous Confederate ironclad, CSS Virginia, also called the Merrimack because of the ship's origins as a Union frigate. The original Virginia's success at the Battle of Hampton Roads caused "gunboat associations" to emerge around the South, mainly driven by women; their efforts helped with the construction of the Virginia II.[1]
Construction
Money to help with the construction of this ironclad was largely contributed by the Richmond chapter of the "Ladies Aid and Defense Society" (called the "National Defense Association"), which adopted the ironclad in early April 1862 for the defense of Richmond. The chairman was Maria Gaitskell Clopton. It is estimated that the society contributed more than $30,000 towards Virginia II's construction.[2]
By November 1862, John Mercer Brooke was able to report that she was "pretty well advanced, frames up, clamps in, etc...She will be a strong and fine vessel."[1]
However, after this promising start, significant delays plagued the new ironclad. It was not until more than a year after she was laid down that Virginia II was finally launched without incident on June 29, 1863. "She glided into the water 'like a thing of life' amid the prolonged cheers of the spectators."[3] However, she suffered from further fitting-out delays and was not fully commissioned until May 18, 1864, almost a year later; she was made the flagship of the James River Squadron (replacing CSS Richmond in this role).[4]
Career
Virginia II went into action on June 21, 1864 as the flagship of Commodore John K. Mitchell, CSN, during the engagement between the Confederate James River Squadron and Federal ships in Trent's Reach. But the ironclad developed mechanical problems when an errant chain from the nearby CSS Richmond became entangled in her propeller, and she could no longer participate in the battle.[5]
On August 13, the Virginia II participated in the attack on the Union forces at Dutch Gap. USS Maugus and her gunboats joined in the battle but could not effectively train their guns, though they did manage to fire two shots that hit Virginia II.[6] On August 17, she participated in the capture of Signal Hill, shelling the Union defenses from 3 p.m. until 9 p.m. before finally ceasing fire.[7]
From September 29 through October 1, the Virginia II and the rest of the squadron attacked New Market Heights and Fort Harrison in conjunction with the Confederate Army; it was the largest operation north of the James River since the Cold Harbor and would remain so until the end of the war. Once again, though, the Virginia II suffered difficulty, delaying her entrance into the battle. She had just received a new cannon, and in the rush to leave the dock, the supply ship Gallego became entangled in her anchor chain, causing the Gallego to sink.[8]
In their routine patrol of the James River, the squadron was surprised to discover, on the morning of October 22, that the Union Army had finished fortifying Cox Hill. To cover the retreat of the Confederate wooden vessels, Virginia II approached the battery, followed by two ironclads, and effected a retreat upstream to Chaffin's Bluff.[9] During this, the Virginia II's smokestack was riddled by shells.[10] Though caught by surprise, this small action helped determine the effectiveness of the ironclads' armored casemates against close rifled cannon fire, and in the case of the Virginia II, the results were favorable: her casemate withstood 7 direct hits by 100-pound conical iron "bolts," which barely dented her plating.[9]
On December 7 Virginia II, along with the Fredericksburg and Richmond, steamed down to Fort Brady near Trent's Reach and near sunset exchanged cannon fire with the fort until darkness fell.[11]
Battle of Trent's Reach

Her final action took place on January 23–24, 1865 when the Confederate squadron in the James River, including ironclads Virginia II, CSS Richmond, and CSS Fredericksburg, with five smaller vessels, made a second unsuccessful attempt to circumvent obstructions in Trent's Reach. A reliable report indicated there was a passage through, as a result of a freshet of melting ice. To avoid the risk of collision, the gunboats and tenders were lashed to the starboard sides of the ironclads; Virginia II accreted to her bulk the gunboats Nansemond and Torpedo, with the torpedo boat Scorpion in tow. After passing the Union batteries at Fort Brady sometime after 8 p.m., the Virginia II accidentally beached Torpedo by cutting too close to the shore. The captain of Nansemond untied his ship from Virginia II in an attempt to free Torpedo. The fleet continued on and reached the obstructions at Trent's Reach.[12][13]
Again Virginia II ran into trouble, this time running aground; the smaller ships tried to free her for three hours. Only two ships made it through, the rest were either running aground or helping the ones that had already run aground. Dawn came with most of the squadron in full view of the Union fortifications at Battery Parsons, and they had to suffer fire until the water rose high enough to allow them to finally retreat. In late morning, just as the water was high enough to re-float Virginia II, the Union fleet arrived and added its firepower. This time it was much more deadly: the double-turreted monitor USS Onondaga was able to pierce her armor with its shot. Virginia II and the rest of the squadron retreated upstream until they were safely under the cover of Confederate Battery Dantzler. They attempted to run past again that night, but Union soldiers had erected a huge light illuminating the obstructions; this, combined with several other factors, forced the attempt to be abandoned.[12]
While leaving, Hampton managed to entangle her screw propeller in Virginia II's anchor chain. They suffered more heavy fire on their return upriver from Fort Brady, and Virginia II ran aground again before making it to the safety of Chaffin's Bluff. Virginia II had at least 6 killed and more than a half dozen wounded from the action; she also suffered heavy battle damage which required extensive repairs.[14] Her smokestack was destroyed, the engines became faulty, and her iron armor and underlying wooden framework were damaged.[12]
Destruction of Virginia II
Her repairs had just been completed when Virginia II and the other Confederate warships of the James River Squadron were ordered destroyed by squadron commander Admiral Raphael Semmes to prevent their capture by rapidly advancing Union forces during the evacuation and fall of Richmond on April 3, 1865.
Following the end war, the wreck of Virginia II was raised for salvage.
See also
Notes
- 1 2 Coski, Capital Navy, 82.
- ↑ Coski, Capital Navy, 82–85
- ↑ Coski, Capital Navy, 86
- ↑ Coski, Capital Navy, 153,156
- ↑ Coski, Capital Navy, 165–166
- ↑ Scharf, History of the Confederate States Navy, 735
- ↑ Coski, Capital Navy, 167
- ↑ Coski, Capital Navy, 168
- 1 2 Scharf, History of the Confederate States Navy, 736–737
- ↑ Coski, Capital Navy, 171
- ↑ Scharf, History of the Confederate States Navy, 738
- 1 2 3 Coski, Capital Navy, 198–207
- ↑ Scharf, History of the Confederate States Navy, 740–742
- ↑ Scharf, History of the Confederate States Navy, 741
References
- This article incorporates text from the public domain Dictionary of American Naval Fighting Ships.
- Chesneau, Roger; Kolesnik, Eugene M., eds. (1979). Conway's All the World's Fighting Ships 1860–1905. Greenwich, UK: Conway Maritime Press. ISBN 0-8317-0302-4.
- Coski, John M. (1996). Capital Navy: The Men, Ships and Operations of the James River Squadron. Campbell, CA: Savas Woodbury Publishers. ISBN 1-882810-03-1.
- Olmstead, Edwin; Stark, Wayne E.; Tucker, Spencer C. (1997). The Big Guns: Civil War Siege, Seacoast, and Naval Cannon. Alexandria Bay, New York: Museum Restoration Service. ISBN 0-88855-012-X.
- Scharf, J. Thomas (1996). History of the Confederate States Navy: From the Organization to the Surrender of Its Last Vessel. New York, NY: Gramercy Books. ISBN 0-517-18336-6.
- Silverstone, Paul H. (2006). Civil War Navies 1855–1883. The U.S. Navy Warship Series. New York: Routledge. ISBN 0-415-97870-X.
- Still, William N., Jr. (1985). Iron Afloat: The Story of the Confederate Armorclads (Reprint of the 1971 ed.). Columbia, South Carolina: University of South Carolina Press. ISBN 0-87249-454-3.