Battle of Cape Matapan
| ||||||||||||||||||||||||||||||
The Battle of Cape Matapan (Greek: Ναυμαχία του Ταίναρου) was a Second World War naval engagement fought from 27–29 March 1941. The cape is on the south-west coast of the Peloponnesian peninsula of Greece. Italian signals were intercepted and broken by the Government Code and Cypher School (GC&CS) at Bletchley Park.[1] British ships of the Royal Navy and Royal Australian Navy, under the command of Admiral Andrew Cunningham, intercepted and sank or severely damaged several ships of the Italian Regia Marina under Squadron-Vice-Admiral Angelo Iachino. The opening actions of the battle are also known in Italy as the Battle of Gaudo.
Background
In late March 1941, as British ships of the Mediterranean Fleet covered troop movements to Greece, Mavis Batey, a cryptographer at Bletchley Park, made a breakthrough, reading the Italian naval Enigma for the first time. The first message, the cryptic "Today’s the day minus three,"[2] was followed three days later by a second message reporting the sailing of an Italian battle fleet comprising one battleship, six heavy and two light cruisers, plus destroyers to attack the merchant convoys supplying British forces.[3] As always with Enigma, the intelligence breakthrough was concealed from the Italians by ensuring there was a plausible reason for the Allies to have detected and intercepted their fleet. In this case, it was a carefully directed reconnaissance plane.[4]
As a further deception, Admiral Cunningham made a surreptitious exit after dark from a golf club in Alexandria to avoid being seen going on board his flagship, the battleship HMS Warspite. He had made a point of arriving at the club the same afternoon, with his suitcase prominently paraded as if for an overnight stay and spent time on the golf course within sight of the Japanese consul.[1] An evening party on his flagship was advertised for that night but was never meant to take place.
At the same time, there was a failure of intelligence on the Axis side. The Italians had been wrongly informed that the Mediterranean Fleet had only one operational battleship and no aircraft carrier but there were three battleships and a damaged British aircraft carrier (HMS Illustrious) had been replaced by HMS Formidable.[5]
Prelude
Opposing forces
The Allied force was the British Mediterranean fleet, consisting of the aircraft carrier HMS Formidable and the battleships HMS Barham, Valiant and Warspite. The main fleet was accompanied by two flotillas of destroyers. The 10th Flotilla had: HMS Greyhound and Griffin and HMAS Stuart commanded by Commander "Hec" Waller, RAN. The 14th Flotilla consisted of: HMS Jervis, Janus, Mohawk and Nubian commanded by Philip Mack; also present were HMS Hotspur and Havock. A second force, under Admiral Sir Henry Pridham-Wippell, consisted of the British light cruisers HMS Ajax, Gloucester and Orion, the Australian light cruiser HMAS Perth and the British destroyers HMS Hasty, Hereward and Ilex. The Australian HMAS Vendetta had returned to Alexandria. Allied warships attached to convoys were available, such as: HMS Defender, Jaguar and Juno waited in the Kithira Channel and HMS Decoy, Carlisle, Calcutta and Bonaventure and HMAS Vampire were nearby.
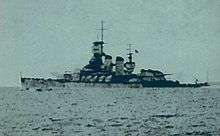
The Italian fleet was led by Iachino's flagship, the modern battleship Vittorio Veneto. It also included almost the entire Italian heavy cruiser force: Zara (under Vice-Admiral Carlo Cattaneo), Fiume and Pola; four destroyers of the 9th Flotilla (Alfredo Oriani, Giosué Carducci, Vincenzo Gioberti and Vittorio Alfieri). The heavy cruisers Trieste (Vice-Admiral Luigi Sansonetti), Trento and Bolzano were accompanied by three destroyers of the 12th Flotilla (Ascari, Corazziere and Carabiniere), plus the light cruisers Duca degli Abruzzi (Vice-Admiral A. Legnano) and Giuseppe Garibaldi (8th division) and two destroyers of the 16th Flotilla (namely Emanuele Pessagno and Nicoloso de Recco) from Brindisi.[6] None of the Italian ships had radar, while several Allied ships did.[7] The 13th Flotilla of Italian destroyers, with Alpino, Bersagliere, Fuciliere, Granatiere was also involved screening the flagship.
Battle
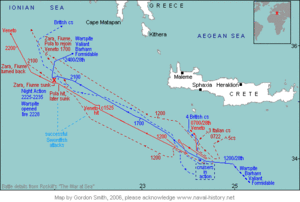
On 27 March, Vice-Admiral Pridham-Wippell—with the cruisers Ajax, Gloucester, Orion and Perth and a number of destroyers—sailed from Greek waters for a position south of Crete. Admiral Cunningham with Formidable, Warspite, Barham and Valiant left Alexandria on the same day to meet the cruisers.[8]
The Italian Fleet was spotted by a Sunderland flying boat at 12:00, depriving Iachino of any advantage of surprise. The Italian Admiral also learned that Formidable was at sea, thanks to the decryption team aboard Vittorio Veneto. Nevertheless, after some discussion, the Italian headquarters decided to go ahead with the operation, to show the Germans their will to fight and confidence in the higher speed of their warships.[8]
Action off Gavdos
On 28 March, an IMAM Ro.43 floatplane launched by Vittorio Veneto, spotted the British cruiser squadron at 06:35. At 07:55, the Trento group encountered Admiral Pridham-Wippell's cruiser group south of the Greek island of Gavdos. The British squadron was heading to the south-east. Thinking they were attempting to run from their larger ships, the Italians gave chase, opening fire at 08:12 from 24,000 yd (22,000 m). The three heavy cruisers fired repeatedly until 08:55, with Trieste firing 132 armour piercing rounds, Trento firing 204 armour-piercing and 10 explosive shells and Bolzano firing another 189 armour piercing shells, but the Italians experienced trouble with their rangefinding equipment and scored no significant hits.[9] HMS Gloucester fired three salvos in return. These fell short but did cause the Italians to make a course change.[9][10]
As the distance had not been reduced after an hour of pursuit, the Italian cruisers broke off the chase, turning to the north-west on a course to rejoin Vittorio Veneto. The Allied ships changed course in turn, following the Italian cruisers at extreme range. Iachino let them come on in hopes of luring the British cruisers into the range of Vittorio Veneto's guns.[9]
An officer on Orion's bridge remarked to a companion, "What's that battleship over there? I thought ours were miles away." The Italians eavesdropped on Orion's signal that she had sighted an unknown unit and was going to investigate.[11] At 10:55, Vittorio Veneto joined the Italian cruisers and immediately opened fire on the shadowing Allied cruisers. She fired 94 rounds from a distance of 25,000 yd (23,000 m), all well aimed but again with an excessive dispersal of her salvos. The Allied cruisers, until then unaware of the presence of a battleship, withdrew, suffering slight damage from 381 mm (15.0 in) shell splinters.[9][12][13][14] A series of photographs taken from HMS Gloucester showing Italian salvos falling amongst Allied warships was published by Life magazine on 16 June 1941.[13] Vittorio Veneto fired a total of 94 shells in 29 salvos. Another 11 rounds got jammed in the barrels.[15]
Air attacks
Cunningham's force, which had been attempting to rendezvous with Pridham-Wippell, had launched an attack by Fairey Albacore torpedo bombers from HMS Formidable at 09:38. They attacked Vittorio Veneto without direct effect but the required manoeuvring made it difficult for the Italian ships to maintain their pursuit. The Italian ships fired 152, 100 and 90 mm guns and also 37, 20 and 13.2 mm guns when at close range, repelling the attack, while one of the two Junkers Ju 88s escorting the Italian fleet was shot down by a Fairey Fulmar.[10] Iachino broke off the pursuit at 12:20, retiring towards his own air cover at Taranto.[16]
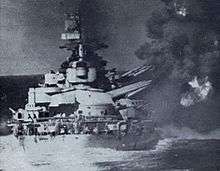
A second attack surprised the Italians at 15:09, when Lieutenant-Commander Dalyell-Stead flew his Albacore to 1,094 yards (1,000 m) from Vittorio Veneto, before releasing a torpedo which hit her outer port propeller and caused 4,000 long tons (4,100 t) of flooding. Dalyell-Stead and his crew were killed when their aircraft was shot down by antiaircraft fire from the battleship. The ship stopped while the damage was repaired but she was able to get under way again at 16:42, making 19 knots (35 km/h; 22 mph). Cunningham heard of the damage to Vittorio Veneto, and started a pursuit.[17]
A third attack by six Albacores and two Fairey Swordfish from 826 and 828 Naval Air Squadrons from Formidable and two Swordfish from 815 squadron from Crete, was made between 19:36 and 19:50. Admiral Iachino deployed his ships in three columns and used smoke, searchlights and a heavy barrage to protect the Vittorio Veneto. The tactics protected the battleship from further damage but one torpedo hit the Pola, which had nearly stopped to avoid running into the Fiume and could not take any avoiding action. This blow knocked out five boilers and the main steam line, causing Pola to lose electric power and drift to a stop.[18] The torpedo was apparently dropped by Lieutenant F.M.A. Torrens-Spence. Unaware of Cunningham's pursuit, a squadron of cruisers and destroyers were ordered to return and help Pola. This squadron was composed of Pola's sister ships, Zara and Fiume. The squadron did not start to return towards Pola until about an hour after the order had been given by Iachino, officially due to communication problems, while Vittorio Veneto and the other ships continued to Taranto.[19]
Night action
At 20:15, Orion's radar picked up a ship six miles to port, apparently dead in the water; she was the crippled Pola. The bulk of the Allied forces detected the Italian squadron on radar shortly after 22:00, and were able to close without being detected. The Italian ships had no radar and could not detect British ships by means other than sight; Italian thinking did not envisage night actions and the Italians had their main gun batteries disarmed. They managed to spot the Allied squadron at 22:20, which they thought to be Italian ships. The battleships Barham, Valiant and Warspite, unnoticed by the Italian ships, were able to close to 3,800 yards (3,500 m) — point blank range for battleship guns — at which point they opened fire. The Allied searchlights illuminated their enemy; the searchlights aboard Valiant were under the command of a young Prince Philip.[20] Some British gunners witnessed the cruiser's main turrets flying dozens of metres into the air. After just three minutes, Fiume and Zara had been destroyed. Fiume sank at 23:30, while Zara was finished off by a torpedo from the destroyer HMS Jervis at 02:40 of 29 March.[21]
Two Italian destroyers, Vittorio Alfieri and Giosué Carducci, were sunk in the first five minutes. The other two, Gioberti and Oriani, managed to escape, the former with heavy damage. Towing Pola to Alexandria as a prize was considered but daylight was approaching and it was thought that the danger of enemy air attack was too high.[7] The British boarding parties seized a number of the much needed Breda anti-aircraft machine guns.[22] Pola was eventually sunk with torpedoes by the destroyers Jervis and Nubian after her crew was taken off, shortly after 04:00. The only known Italian reaction after the shocking surprise was a fruitless torpedo charge by some destroyers and the aimless fire of one of Zara's 40 mm guns in the direction of the British warships.[7]
The Allied ships took on survivors but left the scene in the morning, fearing Axis air strikes. Admiral Cunningham ordered a signal to be made on the Merchant Marine emergency band. This signal was received by the Italian High Command. It informed them that due to air strikes the Allied ships had ceased their rescue operations and it granted safe passage to a hospital ship for rescue purposes. The location of the remaining survivors was broadcast and the Italian hospital ship Gradisca came to recover them.[7] Allied casualties during the battle were a single torpedo bomber shot down by Vittorio Veneto's 90 mm (3.5-inch) anti-aircraft batteries, with the loss of the three-man crew. Italian losses were up to 2,303 sailors, most of them from Zara and Fiume. The Allies rescued 1,015 survivors, while the Italians saved another 160.[7]
Aftermath
Balance of naval power
Matapan was Italy's greatest defeat at sea, subtracting from its order of battle a cruiser division. The British in the Mediterranean lost the heavy cruiser York and the new light cruiser Bonaventure in the same period (26–31 March 1941) but while the Royal Navy lost four heavy cruisers during the war (York, Exeter, Cornwall and Dorsetshire), at Matapan the Regia Marina lost three in a night. That the Italians had sortied so far to the east established a potential threat that forced the British to keep their battleships ready to face another sortie during the operations off Greece and Crete.[23]
After the defeat at Cape Matapan, the Italian Admiral Iachino wrote that the battle had,
... the consequence of limiting for some time our operational activities, not for the serious moral effect of the losses, as the British believed, but because the operation revealed our inferiority in effective aero-naval cooperation and the backwardness of our night battle technology.— Iachino[23]
The Italian fleet did not venture into the Eastern Mediterranean again until the fall of Crete two months later. Despite his impressive victory, Admiral Cunningham was somewhat disappointed with the failure of the destroyers to make contact with Vittorio Veneto. The escape of the Italian battleship was, in the words of the British Admiral, "much to be regretted".[24]
Bletchley Park (GC&CS)
For reason of secrecy, code breakers at the GC&CS were rarely informed about the operational effects of their work but the impact on The Battle of Cape Matapan was an exception. A few weeks after the end of the battle, Admiral Cunningham dropped into Bletchley Park to congratulate 'Dilly and his girls, with a positive impact on morale:[1] Mavis Batey (née Lever), one of the code breakers remembers: "Our sense of elation knew no bounds when Cunningham came down in person to congratulate us".[1] Admiral John Godfrey, the Director of Naval Intelligence stated: "Tell Dilly that we have won a great victory in the Mediterranean and it is entirely due to him and his girls".[1]
Post war
There is still controversy in Italy regarding the orders given by the Italian Admiral Angelo Iachino to the Zara division to recover the Pola, when it was clear that an enemy battleship force was steaming from the opposite direction.[7]
| “ | When Cunningham won at Matapan
By the grace of God and Dilly He was the brains behind them all And should ne'er be forgotten. Will he? |
” |
| — 'Nobby' Clarke, codebreaker [1] | ||
For decades after the end of the Second World War, the involvement of the GC&CS, as well as the code breaking methods used, were kept secret. A number of controversial theories were published before more complete accounts emerged after records were declassified in 1978. Only later, after Dilly's rodding method was demonstrated by Mavis Batey to the Admiral in charge of naval history, were Italian official records corrected.[1] In 1966, H. Montgomery Hyde published a story alleging that a spy (codename Cynthia) seduced Admiral Alberto Lais (the Italian naval attaché in Washington, D.C.) and that she obtained a codebook used by the British to defeat the Italians at Matapan. Hyde was found guilty of libelling the dead but evidence of GC&CS involvement was not made public at that time.[1] In 1980, the BBC series Spy! included similar allegations about a spy called 'Cynthia' who obtained a codebook.[1] In 1974, Frederick Winterbotham in The Ultra Secret falsely credited the decryption of Luftwaffe Enigma traffic.[1]
Order of battle
Italy
![]()
- Ammiraglio di squadra[25] Angelo Iachino
- One battleship: Vittorio Veneto (damaged)
- Four destroyers (13a Squadriglia Cacciatorpediniere): Alpino, Bersagliere, Fuciliere, Granatiere
- Ammiraglio di divisione[26] Antonio Legnani
- Two light cruisers (8a Divisione Incrociatori): Duca degli Abruzzi, Giuseppe Garibaldi
- Two destroyers (6a Squadriglia Cacciatorpediniere): Emanuele Pessagno, Nicoloso da Recco
- Ammiraglio di divisione Luigi Sansonetti
- Three heavy cruisers (3a Divisione Incrociatori): Bolzano, Trento, Trieste
- Three destroyers (12a Squadriglia Cacciatorpediniere): Ascari, Carabiniere, Corazziere
- Ammiraglio di divisione Carlo Cattaneo
- Three heavy cruisers (1a Divisione Incrociatori): Fiume (sunk), Pola (sunk), Zara (sunk)
- Four destroyers (9a Squadriglia Cacciatorpediniere): Vittorio Alfieri (sunk), Giosué Carducci (sunk), Vincenzo Gioberti, Alfredo Oriani
Allies
![]()
Force A, 14th Destroyer Flotilla, 10th Destroyer Flotilla (of Force C), Force B, 2nd Destroyer Flotilla, Force D
- Admiral Sir Andrew Cunningham
- Three battleships: HMS Barham, Valiant, and Warspite
- One aircraft carrier: HMS Formidable
- Nine destroyers: HMS Greyhound, Griffin, Jervis, Janus, Mohawk, Nubian, Hotspur and Havock and HMAS Stuart
- Vice-Admiral Henry Pridham-Wippell
- Four light cruisers: HMS Ajax, Gloucester and Orion and HMAS Perth
- Three destroyers: HMS Hasty, Hereward and Ilex
- AG 9 convoy (from Alexandria to Greece)
- Two light cruisers: HMS Calcutta and Carlisle
- Three destroyers: HMS Defender and Jaguar and HMAS Vampire
- GA 8 convoy (from Greece to Alexandria)
- One anti-aircraft cruiser: HMS Bonaventure
- Two destroyers: HMS Decoy and Juno
- One merchant ship: Thermopylæ (Norwegian)
Notes
- 1 2 3 4 5 6 7 8 9 10 Batey, Mavis (2011). "Chapter 6: Breaking Italian Naval Enigma". In Smith, Michael. The Bletchley Park Codebreakers. Biteback Publishing. pp. 79–92. ISBN 978-1849540780.
- ↑ "Mavis Batey - obituary". Daily Telegraph. 13 Nov 2013. Retrieved 14 Nov 2013.
- ↑ "Spanish Enigma Welcomed To Bletchley Park". Bletchley Park. 5 July 2012. Archived from the original on 2 October 2012. Retrieved 13 August 2012.
- ↑ See the report in the official Admiralty publication of 1943, East of Malta, West of Suez: The Admiralty Account of the Naval War in the Mediterranean (London, His Majesty's Stationery Office, 1943), where the detection of the Italian force is credited to "one of Formidable's aircraft on reconnaissance." (P. 56)
- ↑ Admiralty: East of Malta, West of Suez (London, His Majesty's Stationery Office, 1943) P. 55
- ↑ Anthony M. Scalzo (2001) – Battle of cape Matapan (2) history.net "Originally published by World War II magazine"
- 1 2 3 4 5 6 Greene & Massignani, pp. 157–159
- 1 2 Greene & Massignani, pp. 148–150
- 1 2 3 4 Greene & Massignani, pp. 150–151
- 1 2 Fraccaroli, Aldo: Lo combattimento navale di Gaudo, Storia militare magazine jan 2001, Albertelli editions, Parma
- ↑ O'Hara, 2009 p. 89
- ↑ E fecero tutti il loro dovere:Cause ed effetti, by Enrico Cernuschi. Rivista Maritima, November 2006 (Italian)
- 1 2 "Matapan: British fleet won sea victory over Italians"
- ↑ Battle of Matapan from "A Brief History of the Australian Cruiser HMAS Perth"
- ↑ Greene & Massignani, pp. 151-152
- ↑ Greene & Massignani, pp. 152–153
- ↑ Greene & Massignani, p. 153
- ↑ O'Hara, 2009 p. 91
- ↑ Greene & Massignani, pp. 152–156
- ↑ Philip: How I Sunk Italian Cruisers, by Tom Sykes, The Daily Beast, The Royalist, 24 April 2012
- ↑ Greene & Massignani, pp. 156–157
- ↑ Pack, S. W. C. (1961). The Battle of Matapan. British Battles Series. MacMillan, p. 151
- 1 2 O'Hara, 2009 p. 98
- ↑ Brown, David (2002). The Royal Navy and the Mediterranean: November 1940 – December 1941. Routledge, p. 76. ISBN 0-7146-5205-9
- ↑ Squadron Vice Admiral.(equivalent to Vice Admiral for RN)
- ↑ Vice Admiral.(equivalent to Rear Admiral for RN)
References
- Greene, Jack & Massignani, Alessandro (1998). The Naval War in the Mediterranean, 1940–1943, Chatam Publishing, London. ISBN 1-86176-057-4.
- O'Hara, Vincent P.: Struggle for the Middle Sea, Naval Institute Press, Annapolis, Maryland, 2009. ISBN 978-1-59114-648-3.
- Royal Navy Website history section, Battle of Cape Matapan
- Regiamarina.net Battle of Matapan
Further reading
- Sadkovich, James. J, 'Re-evaluating Who Won the Italo-British Naval Conflict 1940–2', European History Quarterly, October 198818:455-471.
External links
- "Battle of Cape Matapan: World War II Italian Naval Massacre" by Anthony M. Scalzo at HistoryNet.com
- (Italian) Battaglia di Gaudo at Plancia di Comando
- (Italian) La notte di Matapan at Plancia di Comando
- After The Battle Of Cape Matapan a video from British Pathé
Coordinates: 35°20′52.82″N 20°57′40.43″E / 35.3480056°N 20.9612306°E