Battle of the Tugela Heights
| Battle of the Tugela Heights | |||||||
|---|---|---|---|---|---|---|---|
| Part of Second Boer War | |||||||
| |||||||
| Belligerents | |||||||
|
|
| ||||||
| Commanders and leaders | |||||||
| Redvers Buller | Louis Botha | ||||||
| Strength | |||||||
| c. 20,000, 50 guns | c. 5,000, 8 guns | ||||||
| Casualties and losses | |||||||
| 2,300 dead, wounded or missing | 200 KIA | ||||||
The Battle of Tugela (or Thukela) Heights, consisted of a series of military actions lasting from 14 February through 27 February 1900 in which General Sir Redvers Buller's British army forced Louis Botha's Boer army to lift the Siege of Ladysmith during the Second Boer War.
Background
Buller's army had made three earlier attempts to raise the Boer siege of Ladysmith. The battles of Colenso, Spionkop and Vaal Krantz each resulted in embarrassing British defeats at the hands of Botha's army of Boer irregulars. In three months, British casualties rose to 3,400 men while Boer losses were much lower. On 12 February, Buller ordered a fourth attempt to relieve Ladysmith. He hoped to exploit his ten-to-one superiority in artillery and four-to-one advantage in numbers.[1]
Geography
The direct route to Ladysmith lay along the railroad, which ran mostly north and south. The railroad crossed the Tugela River at Colenso, ran along the north bank of the river, snaked between Railway Hill and Pieters Hill and continued to Ladysmith. While their main defences were north of the river, the Boers also held a number of ridges south of the river and east of Colenso. The Tugela runs generally east to Colenso, but near the railroad bridge the river turns north, then northeast. Along the northeasterly stretch, the river and railroad are commanded by a series of hills which represented the Boer main line of defence.
A 500 feet (150 m) high ridge named Hlangwane rose northeast of Colenso on the south bank and overlooked the railroad. During the Battle of Colenso, a British attack on Hlangwane was repulsed. Since that time, the Boers had greatly strengthened the ridge. With Hlangwane in his possession, Buller could dominate the Boer positions at Colenso, and safely cross there. To capture Hlangwane, Buller realized that he would first have to rout the Boers from all their positions south of the river, but even with the south bank in his possession, Buller would still have to fight through the Boer-held hills to the north on the river.
Battle on the south bank
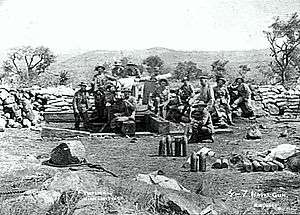
On 12 February, Lieutenant-Colonel Julian Byng led a reconnaissance in force to Hussar Hill, a position southeast of Colenso. The position fell on 14 February to Colonel the Earl of Dundonald's mounted brigade, and 34 artillery pieces soon crowned Hussar Hill. With the support of the guns, Major-General Neville Lyttelton's 4th Infantry Division struck to the northeast on 15 February. Cingolo Hill, to the northeast of Hussar Hill, fell next. On 18 February, while, hundreds of miles to the west, General Kitchener's army was fruitlessly attacking Piet Cronjé's surrounded army, an event known as Bloody Sunday, Major-General Henry J. T. Hildyard's 2nd Brigade captured the 1,000 feet (300 m) height of Monte Cristo, and Major-General Geoffrey Barton's 6th Brigade cleared Green Hill. The outflanked Boers abandoned Hlangwane and the south bank entirely on 19 February. Immediately, the British installed heavy artillery on the summit of Hlangwane.[2]
Battle on the north bank
Buller preferred to avoid the obvious route north along the railroad, but his intelligence officer informed him that an advance north across the river from Monte Cristo was impracticable. Therefore, the British were forced to find a way to overcome the main Boer positions. British infantry occupied Colenso on 19 February and the railhead was advanced to Colenso Station. On 21 February, the pontoon bridge was positioned under the western brow of Hlangwane and the army began to cross. Major-General Arthur S. Wynne's 11th Brigade captured Boer positions at Horse-shoe Hill and Wynne's Hill 3 miles (4.8 km) north of Colenso on the evening of 22 February. Major-General Fitzroy Hart's 5th (Irish) Brigade attacked the next high ground to the northeast, Hart's Hill on 23 February. Not waiting for all his battalions to arrive, Hart sent his troops up piecemeal and they were repulsed with almost 500 casualties. Two battalions of reinforcements arrived in time to prevent a rout. Two colonels were among the dead and the Royal Inniskilling Fusiliers lost 72% of their officers and 27% of their rank and file.[3] During this engagement Edgar Thomas Inkson carried a young officer, who was severely wounded and unable to walk, for three or four hundred yards, under very heavy fire, to a place of safety for which he was awarded the Victoria Cross.
On 25 February, a six-hour armistice was arranged to recover the British wounded on the upper slopes of Wynne's and Hart's Hills. On one section of hillside, 80 dead and only three survivors were recovered.[4]
Buller began to look for another way to flank the Boers. It turned out that in front of the Boer positions, the Tugela entered a gorge. The pontoon bridge was moved north to the mouth of the gorge so British soldiers could cross and move to the northeast along the riverbank, unseen by the Boers. Meanwhile, a trail was located by which the British artillery was moved into supporting distance on the south bank. Lieutenant-General Sir Charles Warren's 5th Infantry Division was directed to attack the Boer left flank. The brigades would strike from east to west, first at Pieters Hill, then Railway Hill and finally Hart's Hill. Meanwhile, Lyttelton's division would threaten the Boer center and right flank. For once, Botha failed to anticipate Buller's moves.[3]
Barton's brigade attacked Pieters Hill shortly after noon on 27 February. Behind an early use of the creeping barrage by field artillery pieces as heavy as 4.7-inch naval guns, the 6th Brigade's advance was rapid at first. Then, about 14:00, as the British infantry moved out of artillery observation and Botha reinforced his threatened flank, the attack stalled. The reserve was put in at 14:30 and repulsed due to tough Boer resistance and enfilading fire from Railway Hill to the west.[5]
At 15:00 Colonel Walter Kitchener's 5th Brigade attacked Railway Hill. After working their way slowly uphill, the soldiers carried the nek (saddle) between Hart's and Railway Hills in a brilliant bayonet charge, capturing 48 Boer prisoners. The last to move forward, Major-General Norcott's 4th Brigade, began its assault on Hart's Hill. The close artillery support proved decisive, as trench after trench was overwhelmed by direct fire. A final infantry charge cleared the crest, compelling a Boer retreat. As Botha's men fell back from the heights, the British infantry gave out a cheer.[6]
Aftermath
On 28 February, the besieged defenders of Ladysmith observed a great column of Boer horsemen and wagons moving rapidly north, just outside artillery range. Some time after 5:00 pm, two squadrons of British mounted infantry commanded by Major Hubert Gough from Buller's army rode into Ladysmith and ended the siege. Botha retreated to a new defensive line 60 miles to the north.
See also
| Wikimedia Commons has media related to Siege of Ladysmith. |
- Siege of Ladysmith
- Relief of Ladysmith
- Royal Navy inter-command Field gun competition
Bibliography
- Norris, Stephen Leslie (1900). The South African War, 1899-1900 : a military retrospect up to the relief of Ladysmith. John Murray. Available as The South African War, 1899-1900 : a military retrospect up to the relief of Ladysmith on the Internet Archive
- Wilkinson, Spenser (1900). Lessons of the War: Being Comments from Week to Week, to the Relief of Ladysmith. Constable. Available as Lessons of the War: Being Comments from Week to Week, to the Relief of Ladysmith on the Internet Archive
- Atkins, John Black (1900). The relief of Ladysmith. Methuen. Available as The relief of Ladysmith on the Internet Archive
- The Relief of Ladysmith, A poem by H.D. Rawnsley from Poems of South African history, A.D. 1497-1910 on the Internet Archive
References
- Dupuy, R. E.; Dupuy, T. N. (1977). The Encyclopedia of Military History. New York: Harper & Row. ISBN 0-06-011139-9.
- Gillings, Ken (1999). The Battle of the Thukela Heights. Randburg: Raven Press. ISBN 0-86975-518-8.
- Pakenham, Thomas (1979). The Boer War. New York: Avon Books. ISBN 0-380-72001-9.