Siege of Ladysmith
| ||||||||||||||||||||||||||||||

The Siege of Ladysmith was a protracted engagement in the Second Boer War, taking place between 2 November 1899 and 28 February 1900 at Ladysmith, Natal.
Background
As war with the Boer republics appeared likely in June 1899, the War Office in Britain dispatched a total of 15,000 troops to Natal, expecting that if war broke out they would be capable of defending the colony until reinforcements could be mobilized and sent to South Africa by steamship. Some of these troops were diverted while returning to Britain from India, others were sent from garrisons in the Mediterranean and elsewhere. Lieutenant General Sir George White was appointed to command this enlarged force. White was 64 years old and suffered from a leg injury incurred in a riding accident. Having served mainly in India, he had little previous experience of South Africa.
Outbreak of war
Contrary to the advice of several British officials such as Sir Alfred Milner, the High Commissioner for Southern Africa, the Boer governments were not over-awed by the despatch of British troops to Natal. Instead, they regarded it as evidence of Britain's determination to seize control of the Boer republics. The Transvaal government under President Paul Kruger considered launching an attack in September, but President Steyn of the Orange Free State, who would later become the spiritual heart of the Boer resistance, dissuaded them for several weeks while he tried to act as intermediary. With the complete breakdown in negotiations, both republics declared war and attacked on 12 October.
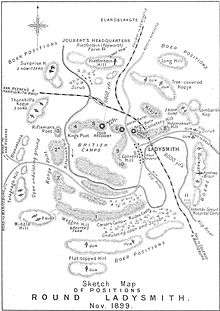
A total of 21,000 Boers advanced into Natal from all sides.[1] White had been advised to deploy his force far back, well clear of the area of northern Natal known as the "Natal Triangle", a wedge of land lying between the two Boer republics.[2] Instead, White deployed his forces around the garrison town of Ladysmith,[3] with a detachment even further forward at Dundee. The entire British force could concentrate only after fighting two battles at Talana Hill and Elandslaagte. As the Boers surrounded Ladysmith, White ordered a sortie by his entire force to capture the Boer artillery. The result was the disastrous Battle of Ladysmith, in which the British were driven back into the town having lost 1,200 men killed, wounded or captured.
Siege
The Boers then proceeded to surround Ladysmith and cut the railway link to Durban. Major General French and his Chief of Staff, Major Douglas Haig escaped on the last train to leave, which was riddled with bullets.
This town was then besieged for 118 days. White knew that large reinforcements were arriving, and could communicate with British units south of the Tugela River by searchlight and heliograph. He expected relief soon. Meanwhile, his troops carried out several raids and sorties to sabotage Boer artillery.
Louis Botha commanded the Boer detachment which first raided Southern Natal, and then dug in north of the Tugela to hold off the relief force. On 15 December, the first relief attempt was defeated at the Battle of Colenso. Temporarily unnerved, the relief force commander, General Redvers Henry Buller, suggested that White either break out or destroy his stores and ammunition and surrender. White could not break out because his horses and draught animals were weak from lack of grazing and forage, but also refused to surrender.
On Christmas Day 1899, the Boers fired into Ladysmith a carrier shell without fuze, which contained a Christmas pudding, two Union Flags and the message "compliments of the season". The shell is still kept in the museum at Ladysmith.
Battle of Wagon Hill (or Platrand)
The Boers around Ladysmith were also growing weak from lack of forage. With little action, many fighters took unauthorised leave or brought their families into the siege encampments. Eventually, with the Tugela in flood, preventing Buller from giving any support,[4] some younger leaders persuaded Joubert to order a storming attempt on the night of 5 January 1900, before another relief attempt could be made.
The British line south of Ladysmith ran along a ridge known as the Platrand. The occupying British troops had named its features Wagon Hill to the west and to the east Caesar's Camp (after features near Aldershot, well known to much of the British army).[5] Under Ian Hamilton, they had constructed a line of forts, sangars and entrenchments on the reverse slope of the Platrand, of which the Boers were unaware.
In the early hours of 6 January, Boer storming parties under General C.J. de Villiers began climbing Wagon Hill and Caesar's Camp. They were spotted and engaged by British working parties who were emplacing some guns. The Boers captured the edge of both features, but could not advance further. British counter-attacks also failed.[5]
At noon, de Villiers made another attack on Wagon Hill. Some exhausted defenders panicked and fled, but Hamilton led reserves to the spot and recaptured some empty gun pits. Late in the afternoon, a terrific rainstorm broke, and the Boers withdrew under cover of it.[5]
The British suffered 175 killed and 249 wounded. 52 dead Boers were left in the British positions, but their total casualties were not recorded.
Later siege and relief

While Buller made repeated attempts to fight his way across the Tugela, the defenders of Ladysmith suffered increasingly from shortage of food and other supplies, and from disease, mainly enteric fever or typhoid, which claimed among many others, the life of noted war correspondent G.W. Steevens. The Boers had long before captured Ladysmith's water supply, and the defenders could use only the muddy Klip River.
Towards the end of the siege, the garrison and townsfolk were living largely on their remaining draught oxen and horses (mainly in the form of "chevril", a meat paste named after the commercial beef extract "Bovril").
Eventually, Buller broke through the Boer positions on 27 February. Following their succession of reverses, his troops had developed effective tactics based on close cooperation between the infantry and artillery. After the protracted struggle, the morale of Botha's men at last broke and they and the besiegers retreated, covered by another huge thunderstorm. Buller did not pursue, and White's men were too weak to do so.
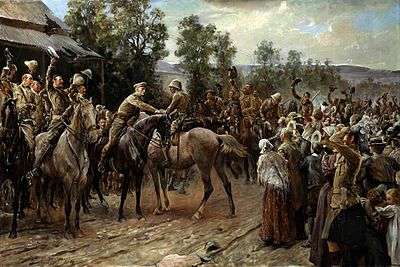
The first party of the relief column, under Major Hubert Gough and of which Winston Churchill was a part, rode in on the evening of 28 February.[6] White reportedly greeted them saying, "Thank God we kept the flag flying".[7]
Aftermath
The relief was widely celebrated,[8] followed by much larger celebrations after the Siege of Mafeking. There were four Victoria Crosses awarded during the siege: John Norwood on 30 October 1899, at Wagon Hill on 6 January 1900, Herman Albrecht and Robert James Thomas Digby-Jones (who both died), and James Edward Ignatius Masterson.
Medical treatment during the siege
Early in the siege an agreement between George Stuart White and Piet Joubert led to the creation of the neutral Intombi Military Hospital some 5 kilometres (3.1 mi) outside Ladysmith. This was run by Major General (later Sir) David Bruce and his wife Mary.[9] During the siege, the number of beds in the hospital camp grew from the initial 100 to a total of 1900. A total of 10,673 admissions were received and treated at Intombi.[10] One train per day was allowed to carry wounded from Ladysmith to Intombi.[11]
Notable casualties during the siege
- Arthur Stark, author of The Birds of South Africa, was killed after being hit by an unexploded Boer shell in the Royal Hotel.[12]
- George Warrington Steevens, British author and war correspondent, of enteric fever.
See also
- Battle of Ladysmith
- Relief of Ladysmith
- Clive MacDonnell Dixon
- Military history of South Africa, specifically the Second Boer War
- William Henry Wright
![]() Media related to Siege of Ladysmith at Wikimedia Commons
Media related to Siege of Ladysmith at Wikimedia Commons
References
- ↑ Pakenham, p.106
- ↑ Pakenham, pp.97, 107
- ↑ Durand, Henry Mortimer; White, George Stuart (1915). "III – Arrival in South Africa". The life of Field-Marshal Sir George White, V.C. Volume II. Edinburgh, London: W. Blackwood. pp. 17–27. Retrieved 1 December 2009.
- ↑ Symons, Julian (1963), "10 – Spion Kop", Buller's Campaign, London: The Cresset Press, p. 191
- 1 2 3 Spiers, Edward, ed. (2010), Letters from Ladysmith: Eyewitness Accounts from the South African War (illustrated ed.), Frontline Books, p. 77–84, ISBN 9781848325944
- ↑ Churchill, W.S. London to Ladysmith via Pretoria, London: Longmans, Green & Co. 1900, pp. 208–10
- ↑ "BOER TRAITS AND BRITISH TRAITS." (PDF). The New York Times. 6 March 1900. Retrieved 11 May 2009.
- ↑ "Small Riots In Cape Colony" (PDF). The New York Times. 5 March 1900. p. 2.
- ↑ Stirling's Talking Stones ISBN 1-870-542-48-7
- ↑ Watt, S. "Intombi Military Hospital and Cemetery". Military History Journal. Die Suid-Afrikaanse Krygshistoriese Vereniging. 5 (6).
- ↑ "Intombi". LadysmithHistory.com. Retrieved 11 May 2009.
- ↑ Nevinson, Henry. Ladysmith – The Diary of a Siege. p. 106.
Bibliography
- Kruger, Rayne; Goodbye Dolly Gray, New English Library, 1964
- Donald, MacDonald (1900). How We Kept the Flag Flying: The Story of the Siege of Ladysmith. Ward, Lock & Co. Available as How We Kept the Flag Flying: The Story of the Siege of Ladysmith on the Internet Archive
- McElwee, William; The Art of War: Waterloo to Mons, Bloomington: Indiana University Press, 1974. ISBN 0-253-20214-0
- Pakenham, Thomas; The Boer War, Weidenfeld & Nicolson, 1979, ISBN 0-7474-0976-5
External links
Deneys Reitz (1929). Commando: A Boer Journal Of The Boer War. ISBN 0-571-08778-7.
- The Record of a Regiment of the Line by M. Jacson at Project Gutenberg, Being a Regimental History of the 1st Battalion Devonshire Regiment during the Boer War 1899–1902. Deals extensively with the Siege of Ladysmith
- Conan Doyle, Arthur; The Great Boer War
- Creswicke, Louis; South Africa and the Transvaal War, Vol. 2 (of 6)
- free ebooks uk
Coordinates: 28°33.6′S 29°46.8′E / 28.5600°S 29.7800°E