Bougainville counterattack
| ||||||||||||||||||||||||||||||||||
The Bougainville counterattack (also known as the "Second Battle of Torokina"[3]) was an unsuccessful Japanese offensive against the Allied base at Empress Augusta Bay, Bougainville Island during the Pacific War. Concentrated against the US-held perimeter around Torokina, the Japanese attack began on 8 March 1944 after months of preparations, but was repulsed by United States Army forces in fighting which lasted until the 25th of the month. The attack was hampered by inaccurate intelligence and poor planning and was ultimately defeated by the well-prepared Allied defenders who greatly outnumbered the Japanese force. The Japanese suffered severe casualties, while Allied losses were light.
This battle was the final major Japanese offensive in the Solomon Islands campaign. Following the engagement the Japanese force withdrew from the Empress Augusta Bay area, and only limited fighting took place until late 1944 when Australian troops took over from the Americans and began a series of advances across the island which continued until the end of the war in August 1945.
Background
The Bougainville Campaign began on 1 November 1943 when the United States I Marine Amphibious Corps, under Major General Roy Geiger, landed at Empress Augusta Bay on the west coast of the Japanese-held island.[4] The Allied invasion aimed to establish a defensive perimeter around Cape Torokina in which airfields would be built to attack the major Japanese base at Rabaul and support other operations in the region. The Allied forces did not intend to conquer the entire island, however, and the invasion area was selected on the grounds that it was lightly defended and distant from the main Japanese bases at the northern and southern ends of Bougainville.[5]
The Japanese commander on Bougainville, Lieutenant General Harukichi Hyakutake, initially believed that the landing at Empress Augusta Bay was a diversion, and would be followed by a direct assault on the south of the island.[6] However, he conducted several small and unsuccessful attacks against the beachhead in early November after being ordered to do so by the Eighth Area Army using units from his 17th Army and forces dispatched directly from Rabaul.[7] The United States forces subsequently expanded their beachhead, and defeated the Japanese forces in the area in a series of battles in November and December. While most of the Japanese units involved in these engagements were destroyed, the total number of casualties inflicted on the 17th Army was not crippling; the Americans captured 25 prisoners and a small amount of equipment and estimated that over 2,458 Japanese had been killed.[8]
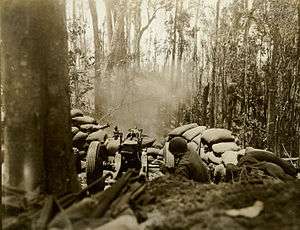
After pushing the Japanese back, the American forces began work on building defense lines to protect the airfield complex in late November. These defenses were completed by 15 December and comprised trenches, foxholes and fortified emplacements for machine guns and artillery. Barbed wire was strung along the 22,500-yard (20,600 m)-long perimeter, and fields of fire were cleared 100 yards (91 m) ahead of all positions. All trails leading to the area were blocked and land mines were placed on other routes which might be used by the Japanese. Artillery guns and mortars were emplaced in positions where they could support any part of the defensive perimeter, and fire plans were developed to allow for rapid bombardments of all possible approach routes. Several searchlights were also deployed to illuminate the front lines. The US Army's official history of operations on Bougainville describes the American defenses as "formidable".[9]
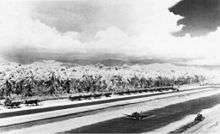
The construction of several airfields within the perimeter at Empress Augusta Bay began shortly after the landing. This work was conducted by eight United States Navy Seebee battalions and a brigade of engineers from New Zealand. An airfield capable of supporting fighters opened at Cape Torokina on 9 December, and a squadron of Marine fighters began operating from it the next day.[10] Two airfields capable of accommodating large numbers of light and medium bombers were completed subsequently: Piva Uncle on 30 December and Piva Yoke on 9 January 1944.[11] These were the closest Allied airfields to Rabaul, and were used to greatly intensify the air campaign against the Japanese positions there.[12] The Japanese air units stationed at Rabaul were worn down by frequent Allied air raids during early 1944, and the Japanese high command decided to withdraw them following a major attack on the key base at Truk in mid-February. This gave the Allies complete air superiority over the region.[13]
Prelude
Preparations

In late December 1943 Hyakutake and the other senior Japanese officers on Bougainville concluded that the Allies did not intend to advance from their perimeter at Empress Augusta Bay or land elsewhere on the island, and began planning a counterattack. These plans were based around a mistaken assessment that there were only 30,000 Allied personnel on the island, of whom only 20,000 were combat troops with the remainder aircraft ground crews; the American combat strength was actually over 60,000.[6][14] As a result of its experiences in the Guadalcanal Campaign during 1942 and 1943, the 17th Army planned a major attack against the perimeter rather than a series of offensives.[15] During a visit to Bougainville on 21 January 1944, General Hitoshi Imamura, the commander of the Eighth Area Army, directed that the offensive should be launched in early March.[16]
Preparations for the counterattack were made during the first months of 1944. As the bulk of the 17th Army was stationed in northern and southern Bougainville, engineers needed to develop roads and bridges to allow the troops to move to the hills inland from the American perimeter. All of the units selected for the offensive had departed their bases by mid-February, and advanced along the eastern and western coasts of the island. Barges also moved artillery and other equipment to a point east of Cape Torokina; the guns and supplies were then carried overland into the hills.[17] Only two weeks' worth of rations were assembled, however.[18]
The Allied forces on Bougainville detected the Japanese buildup. Information on the movement of the 17th Army was gained from many sources, including signals intelligence, patrols conducted by US Army troops into the interior of the island, aerial and naval patrols as well as the interrogation of Japanese prisoners. In addition, Japanese troops were also detected around the outpost, which was held by the 1st Fiji Battalion at Ibu to the north of the perimeter. In response, Allied aircraft attacked bridges and areas in which Japanese troops were believed to be located.[17] United States Navy PT boats and Landing Craft Infantry gunboats supported by PBY Catalina aircraft also patrolled the coast of Bougainville and attacked Japanese barges, but were unable to stop the movement of supplies and equipment by sea. In addition, American warships and aircraft periodically bombarded the main Japanese bases on Bougainville.[19]
Several small clashes were fought between Allied and Japanese forces during February. The Fijian force at Ibu was reinforced to a strength of about 400 personnel on 3 February, but was withdrawn to the perimeter in the middle of the month after a larger body of Japanese troops surrounded the outpost and began to attack the US Army units which were protecting its supply lines. All of the Fijian troops, along with 200 civilians who had chosen to evacuate with the battalion, reached the coast on 19 February.[20] Other American patrols and positions to the north and north-east of the perimeter were also attacked, and the Allies concluded that the Japanese force was being concentrated in this area. Papers taken from the bodies of Japanese soldiers killed in this fighting also allowed the Allies to build up an accurate appreciation of the Japanese plan of attack as well as the order of battle of the forces involved. Intelligence information detailing the Japanese plans was then distributed to American soldiers holding the perimeter through various means, including notices posted on unit bulletin boards.[17]
Opposing forces
The Japanese force was drawn primarily from Lieutenant General Masatane Kanda's 6th Division,[21] although there were also elements of the 17th Division.[18] These troops were divided into three separate groups which were named for their commander, an artillery group and a reserve force. Major General Iwasa Shun commanded the Iwasa Unit, which comprised the 23rd Infantry Regiment, the 2nd Battalion of the 13th Infantry Regiment, two batteries of artillery as well as engineers and other support troops. The Magata Unit was commanded by Colonel Magata Isaoshi and was made up of the 45th Infantry Regiment along with supporting artillery, mortars and engineers. Colonel Muda Toyoharei led the Muda Unit, which comprised the 1st and 3rd Battalions of the 13th Infantry Regiment and some engineers. The 17th Army Artillery Group was commanded by Colonel Saito and was equipped with four 15 cm howitzers, two 10 cm howitzers, eighteen 7 cm infantry guns and an unconfirmed number of 7.5 cm mountain guns; an American post-battle account stated that the group had 168 of these weapons. In addition, the 17th Army reserve comprised part of the 1st and 3rd Battalions of the 53rd Infantry Regiment as well as elements of the 81st Infantry Regiment.[5][18] According to Miller, the total number of men in the attacking force was either 15,400 or 19,000,[22] although Shindo states that only 9,548 were directly committed to the fighting.[3] The Japanese did not have any air support, as it had diverted to make up for losses on Truk.[3][23]
The US Army XIV Corps, under the command of Major General Oscar Griswold, had taken over responsibility for the Torokina perimeter from the Marines in mid-December 1943.[24] They greatly outnumbered the Japanese force, and enjoyed much stronger artillery support. At the time of the attack, the corps had total a strength of 62,000 men,[25] and comprised two divisions and a large number of support units; both of the divisions were veteran units which had seen combat elsewhere in the Solomon Islands. The Americal Division, under Major General John R. Hodge, held the eastern portion of the perimeter, and comprised the 132nd, 164th and 182nd Infantry Regiments. The remainder of the perimeter was defended by Major General Robert S. Beightler's 37th Infantry Division, which was made up of the 129th, 145th and 148th Infantry Regiments. Almost all of the infantry regiments on the perimeter had been assigned additional machine guns, and each regiment received a battery of 75mm pack howitzers on 3 March. The support units available to the corps included the 754th Tank Battalion, 3rd Marine Defense Battalion, 82nd Chemical Battalion (which was equipped with mortars), the 1st Battalion of the 24th Infantry Regiment (an African American unit which was mainly being used as a labor battalion), the 1st Fiji Battalion and several units of engineers. XIV Corps did not have its own corps artillery, but Brigadier General Leo Kreber, the 37th Division's senior artillery officer,[26] was appointed to command all of the artillery units within the perimeter, including the eight battalions which formed part of the infantry divisions (six of these units were equipped with 105mm howitzers and the other two operated short-ranged 155mm howitzers). A provisional corps artillery unit was also formed which comprised two batteries of long-ranged 155mm "Long Tom" guns from the 3rd Defense Battalion and eight batteries of 90mm anti-aircraft guns from the 251st Anti-aircraft Artillery Regiment and the marine defense battalion.[27][28]
The American troops were also supported by air and naval units. At the time of the counterattack, the US Navy force assigned to the island comprised the six destroyers of Destroyer Squadron 22, a squadron of PT boats, a small number of Landing Craft Infantry fitted as gunboats and several armed landing craft. The air units on Bougainville (designated AirSols) had 64 SBD Dauntless dive bombers and 32 TBF Avenger torpedo bombers available for ground support tasks.[29]
Opposing plans
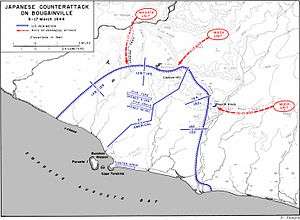
The Japanese offensive plans specified that the three units would make a series of coordinated, but separate, attacks on the American perimeter. The Iwasa Unit would begin the offensive by advancing southeast and capturing Hill 700 on 8 March. It would then rest for two days before advancing against the Piva airfields. The Muda Unit was to launch its attack on 10 March by advancing west and capturing Hills 260 and 309. On 12 March it and a battalion from the Iwasa Unit would capture Hill 608. The Magata Unit would begin its attack on 11 March and move south through low-lying terrain to assault the 129th Infantry Regiment. After defeating this unit, the Magata Unit would join the Iwasa Unit's advance on the airfields. Once these airfields were secured, the three units would advance to Cape Torokina, and capture it by 17 March. Due to their inadequate supply of rations, the Japanese needed to achieve a rapid victory.[18]
The American perimeter was strengthened ahead of the attack. The size of the perimeter had been expanded slightly since late 1944, and was now 23,000 yards (21,000 m) long.[17] The defensive positions along the front line were further developed, and reserve positions were constructed. An outpost to the east of the perimeter on Hill 260 was held as an artillery observation post and to prevent the Japanese from using it for the same purpose. The only weaknesses to the American position were that the number of troops and artillery guns available were smaller than what the US Army would normally use to defend a perimeter of that length, and the Japanese held hills which overlooked almost all of the perimeter.[30]
Battle
The Japanese offensive began with an artillery bombardment on 8 March. At 5:45 am Japanese artillery began firing into the beachhead; the Piva airfields were the main targets of this shelling, and three aircraft were destroyed and 19 damaged. The Americans quickly located the Japanese guns, and their artillery began counter-battery fire. American aircraft also bombed several of the hills outside the perimeter. However, as a result of the bombardment all aircraft based at the Piva airfields other than six TBFs were moved to the nearby island of New Georgia. The next day Japanese artillery targeted the fighter strip at Torokina. Few shells landed on the American front line positions on either day.[31]
Attack on the central perimeter at Hill 700
While the Iwasa Unit arrived at its attack position on 8 March, its assault on the American perimeter was delayed until the next day. Hill 700, in the 37th Division's sector, was held by the 2nd and 3rd Battalions of the US Army's 145th Infantry Regiment. Several small skirmishes were fought between these units and elements of the Japanese 23rd Infantry Regiment on 8 March, and the 37th Division's artillery bombarded areas from where the Japanese could potentially launch an attack on the 2nd Battalion, 145th Infantry.[32] The 23rd Infantry Regiment belatedly began to attack just after midnight on 9 March, but was unable to penetrate far into the American defenses.[33] After daybreak on 9 March, elements of the 1st and 2nd Battalions of the 145th Infantry Regiment counterattacked the Japanese, and regained most of the terrain which had been lost.[34] The Iwasa Unit attacked again at 6:45 am on 10 March, but did not make any progress. At 5:00 pm that day parts of the 1st and 2nd Battalions of the 145th Regiment launched a well coordinated attack, and managed to recapture more of the area lost on 9 March.[35] The remaining men of the Iwasa Unit conducted an offensive against Hill 700 on the night of 10/11 March, but only managed to capture a single pillbox.[35] Further Japanese attacks on the morning of 11 March were unsuccessful.[36]
General Beightler, the commander of the 37th Division, was frustrated by the 145th Infantry's failure to re-establish its original perimeter, and reinforced the regiment on 11 March with the 2nd Battalion, 148th Infantry Regiment. During that day the commander of the 145th Infantry was also relieved of command after Beightler learnt that he was suffering from extreme combat fatigue.[36] Following an artillery bombardment, elements of the 2nd Battalion, 148th Infantry Regiment attacked the Japanese positions during the afternoon and captured some ground.[37] This battalion made further progress against Japanese-held pillboxes the next day, and the original perimeter lines were recaptured. The Iwasa Unit began to withdraw from the area on 13 March. The Japanese had suffered heavy losses during the fighting around Hill 700, and the Americans counted 309 bodies near the area recaptured on 11 and 12 March; two prisoners were also taken. The 37th Division's fatalities amounted to five officers and 73 enlisted men.[38]
Attack on the southern perimeter around Hill 260
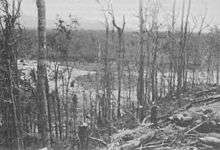
Situated in the Americal Division's sector, Hill 260 was located about 800 yards (730 m) outside the main perimeter line, on the southern approaches to the Torokina perimeter. An hourglass-shaped feature consisting of two rounded hills to the north and south – dubbed "North Knob" and "South Knob" – the position was essentially a saddle, albeit one separated by a very narrow handle. The US forces had established an outpost on the feature which was occupied by a reinforced platoon from G Company of the 182nd Regiment and a party of artillery observers; the total strength of this isolated force on 10 March was about 80 men. A platform had been erected 150 feet (46 m) up a tree for the observers (called "OP tree"), and the heavily forested hill was protected by a network of pillboxes and bunkers, which had been constructed out of sandbags and logs.[39] During the night of 9/10 March small parties from the Muda Unit, having assembled at Peko before moving along the East–West Trail, had infiltrated the 800-yard (730 m) gap between Hill 260 and the main American perimeter while the rest of the Japanese force moved into its jumping off position east of the hill.[38] During the night American artillery also bombarded the approaches to the southern end of the hill.[39]
Japanese forces began their attack on Hill 260 shortly after 6:00 am on 10 March, with the intention of using it to launch follow up attacks on Hills 309 and 608, inside the US perimeter. The initial assault was made by all or part of the 3rd Battalion, 13th Infantry Regiment and succeeded in capturing the area around the OP tree. Upon being informed of the attack, Griswold ordered that Hill 260 be held at all costs; up to this time the Americal Division's headquarters had not planned to hold the position. E and F Companies of the 2nd Battalion, 182nd Infantry Regiment were subsequently dispatched to the hill. Most of F Company reinforced the survivors of G Company on Hill 260, while E Company and a platoon from F Company mounted a counterattack to retake the lost ground.[40] While the American infantrymen regained some ground, they suffered heavy casualties from Japanese fire and exhaustion before the attack was broken off in the evening of 10 March.[41] The Japanese attacked E Company early in the morning of 11 March, but were beaten back. G Company (less its platoon in defensive positions) attempted to relieve E Company later that day, but also came under attack. B Company of the 182nd Infantry Regiment was moved forward to assist the other two companies in breaking contact with the Japanese forces and retiring to the main perimeter on Hill 260 on the North Knob, and this was successfully achieved during the morning.[42]
The assistant US divisional commander, Brigadier General William A. McCulloch, arrived in the afternoon to begin directing the battle on Hill 206, and afterwards reinforcements in the form of flamethrower teams from the 132nd Infantry Regiment also arrived. In the afternoon American forces attempted to regain the South Knob. While this effort was initially successful and led to the extraction of several American soldiers who had been isolated on the position, by late afternoon the US units had been forced to withdraw to the North Knob. The fighting on Hill 206 died down in the evening of 11 March as neither the Japanese nor US forces attempted any offensive action, although Muda took the opportunity to concentrate his forces completely in occupation of the South Knob and established several pillboxes overnight.[43]
Japanese indirect fire opened the fighting early the following day, falling across the Americal Division's front. In response, US artillery and mortars fired back, targeting the Muda Unit on the South Knob. Such was the proximity of their position to the US defenders on the North Knob, that the Americans there were forced to take cover from their own artillery. With supplies on the North Knob running low, efforts were made by US troops to bring ammunition, food and water forward; this required soldiers to carry the heavy loads forward under fire; this was an arduous task, and in order to offer some protection to the carrying parties, they moved forward with protection parties offering covering fire. By midday, a sufficient quantity of supplies had been brought forward for the Americans to launch an attack with one company providing support by fire while another carried out a flanking move to attack the South Knob from the west with flamethrowers and indirect fire support. After initial gains, this attack was held up and eventually the company had to be withdrawn for the night after reinforcements from the 132nd Infantry Regiment failed to reach them before dark. As local US commanders calculated the cost of continuing to hold Hill 206, the Americal Division sought permission to withdraw, but this was refused by the XIV Corps headquarters.[44]
The US forces made further attempts to secure Hill 206 on 13 March, but several attacks were defeated after the American troops crested the South Knob. As casualties mounted, McCulloch resolved to abandon the direct approach, instead deciding that he would seek to wear down the defenders on the South Knob after patrols discovered that the Japanese had no reserves left to reinforce the position. From this it was assessed that their effort in the sector had been spent and regardless of whether they managed to hold the South Knob, they would be unable to exploit the position further. For their own part, the Japanese had also reached a similar conclusion and had begun transferring troops from this sector north to reinforce the Magata Unit around the northern perimeter in an effort to concentrate enough force in order to achieve a break in. Consequently, they had left only a small force on the South Knob. Over the following days this force was subjected to heavy bombardment and flame attacks, which lasted until the Japanese counterattack petered out on the northern perimeter and the Japanese withdrew from the position on 27 March. Casualties in the Hill 206 sector amounted to 98 US servicemen killed, 24 missing, and 581 wounded. A total of 560 Japanese dead were found on top of the South Knob when the US forces reoccupied it on 28 March.[45]
Actions against the northern perimeter around Taylor's and Cox's Creeks
Moving south along the Logging Trail, between 11 and 17 March troops from the Magata Unit attacked the positions occupied by the US 129th Infantry Regiment in the vicinity of Cox's and Taylor's Creeks east of the Numa Numa Trail in the 37th Division's sector.[46] Following the commencement of the Japanese counterattack in the central and southern sectors on 8/9 March, the northern perimeter came under bombardment from Japanese indirect fire and there were several small scale actions between US and Japanese patrols; however, there were initially no major engagements fought in the sector. On 11 March, the main elements of the Magata Unit concentrated around their assembly area on Mount Nampei in preparation for an assault. As they began advancing south-west, the US outposts were withdrawn and heavy barrages of fire were laid down in front of the American positions. By early evening the two forces were engaged in a heavy exchange of fire along the Logging Trail, which lasted until darkness had fallen. Throughout the night, small parties of Japanese troops attempted to infiltrate the American positions, cutting the wire in several places and successfully capturing a number of pillboxes around the junction of Taylor's Creek and the Logging Trail, as well as several more further to the east.[47]
Throughout the following day, the US forces attempted to retake the lost positions in order to restore the integrity of their line. Fighting raged throughout the day into the early afternoon, by which time they had successfully recaptured several of the pillboxes, supported by mortar fire. In the evening, the Americans used indirect fire and searchlights to harass the Japanese, but by early morning, just before dawn, they struck again, and captured another pillbox. As morning progressed, the US commander requested tank support and four tanks from the 754th Tank Battalion were dispatched. In the meantime, minor counterattacks succeeded in regaining part of the line; by mid-morning the tanks joined the fighting and several more positions were retaken by the US troops in several attacks before and after lunch. Having run out of ammunition and running low on fuel, the first group of tanks was withdrawn and replaced with a fresh platoon of tanks with which the attack was resumed in the mid-afternoon. Fighting continued throughout the day until 7:30 pm when the Japanese retired from the position for the evening, having been forced to give up all of their earlier gains by a determined American counterattack.[48]

Although there were minor exchanges of fire and some patrol activity, there was a lull in the battle on 14 March in the northern sector. The following day, three Japanese infantry battalions fell on the US positions before dawn. They made some progress around Cox's Creek, but US forces counterattacked with air support, bazookas and flamethrowers, retaking part of the line. A platoon of M4 Sherman tanks arrived during the afternoon, and at around 3:00 pm they attacked the Japanese with supporting artillery fire and regained more of the perimeter. From there, the battle followed a similar pattern, with a lull in the fighting on 16 March, followed by a renewed effort by the Japanese the next day, with several US positions being overrun.[49]
At this point, the Japanese commanders decided to concentrate their efforts in the northern sector along the frontage held by the 129th Infantry Regiment, and they began moving the Iwasa and Muda Units to link up with the Magata Unit, in order to launch an all-out assault. This movement was not completed until 23 March, and a general attack began after sundown with shelling and skirmishes prior to a series of assaults through the low ground. This proved the final element of the Japanese counterattack. Forewarned by captured plans, the US troops had been expecting the attack. A heavy American artillery barrage fell on the main Japanese assault forces as they formed up, and disrupted their advance with heavy casualties. Nevertheless, the Japanese succeeded in capturing a number of forward positions. In the daylight on 24 March, US troops launched a heavy counterattack as large numbers of reserves were poured in to the sector, supported by seven artillery battalions, halting the Japanese offensive for good. Finally, Hyakutake called an end to the operation. As the attackers withdrew, Fijian troops and US soldiers from Griswold's reserve pursued them on 25 March.[50]
Aftermath
The counterattack drew to a close on 27 March, as Hyakutake gave the order for his forces to cease the attack and withdraw. As they began to move, elements of the Japanese 6th Cavalry Regiment and the 2nd Battalion, 4th South Seas Garrison Unit, acted as a screening force to cover their movement. The next day Hill 260 was retaken by elements of the Americal Division.[51] Meanwhile, the Japanese withdrew, largely in an orderly fashion, moving back to the positions that they had occupied prior to the battle commencing. In the following weeks, the US forces expanded their perimeter further, harassing the Japanese. This operation sought to occupy key terrain and establish outposts and blocking positions along predicted Japanese avenues of advance, and involved the African American troops of the 24th Infantry Regiment and 93rd Infantry Division who were committed to battle to gain experience.[52]
Figures for Japanese casualties during the attack on the American positions on Bougainville differ. The US Army's official history, which was published in 1959, puts Japanese losses at "over 5,000 men killed, more than 3,000 wounded".[2] In contrast, Australian historian Karl James wrote in 2012 that "the Japanese estimated that they lost 3,500 men killed and another 5,500 wounded" and noted that many of the wounded subsequently died from starvation or disease.[1] Japanese historian Hiroyuki Shindo stated in 2016 that of those directly involved in the battle 2,700 were killed; however, he provides total figures of 5,400 dead and 7,100 wounded, which include units other than the 6th Division, involved in fighting around the same time.[3] Several units were disbanded due to these losses, and morale among the surviving Japanese personnel on Bougainville slumped.[53]
In summing up the counterattack, US Army official historian John Miller argues that the Japanese offensive failed due to poor planning and intelligence. The Japanese commanders underestimated the strength of the US defenders, but even if XIV Corps had been as weak as the Japanese believed, the force committed to the attack did not include enough troops or artillery to penetrate the well-prepared defenses. In the event, the defenders greatly outnumbered the Japanese force and had far superior artillery support. Miller argues further that the attack might have achieved a degree of success, at least in terms of inflicting heavy casualties on the US forces, had Hyakutake concentrated his forces early in the attack, rather than cumulatively, in order to achieve a break in the US line, which he might have been able to exploit to penetrate into the rear areas and cause considerable destruction before the US forces regrouped. Nevertheless, this did not happen and ultimately the veteran US troops held their positions despite the onslaught.[54] Miller opines that had the offensive been successful, it would have had a serious affect on the campaign in the Solomons, resulting in a large drain on Allied resources, but would most likely not have altered the wider course of the war.[55]
Samuel Eliot Morison, the official historian of the US Navy in World War II, reached similar conclusions. He judged that while a successful attack on the airfields would have "cut the most important link in the Allied armed chain around Rabaul", the Japanese offensive failed due to the strength of the Allied defenses and the determined resistance put up by the garrison. In his analysis Morison also highlighted the advantages the Allies gained from having air and naval superiority at Bougainville.[56]
After the defeat of the Japanese counterattack and the brief US pursuit that followed in April, the focus of Japanese operations on Bougainville turned largely to subsistence as the incidence of illness began to rise as a result of the severance of the supply line from Rabaul.[3] For their part, the US forces on the island also assumed a largely defensive posture, fortifying their perimeter around Torokina, and apart from limited patrolling, they did not pursue an offensive campaign throughout 1944 preferring to contain the Japanese rather than attempting to destroy them. This situation began to change in late 1944, when the Australian II Corps, under the command of Lieutenant General Stanley Savige, began relieving the US forces,[57] who were transferred to the Philippines. After taking over the US base around Torokina, the Australians subsequently began a three-pronged offensive to secure the island, with heavy fighting taking place from December 1944 around Pearl Ridge until close to the end of the war, with major actions being fought around Slater's Knoll, Tsimba Ridge, Porton Plantation, Ratsua, and along the Hongorai River.[58]
References
Citations
- 1 2 James (2012), p. 155
- 1 2 Miller (1959), p. 377
- 1 2 3 4 5 Shindo (2016), p. 62.
- ↑ "In the Shadows". Australia's War 1939–1945. Department of Veterans' Affairs. Retrieved 9 April 2012.
- 1 2 Rottman (2005), p. 70
- 1 2 Morison (1958), p. 426
- ↑ Rottman (2005), pp. 70–72
- ↑ Shaw and Kane (1963), pp. 280–281
- ↑ Miller (1959), pp. 265–266
- ↑ Miller (1959), p. 269
- ↑ Miller (1959), p. 271
- ↑ Morison (1958), pp. 394–399
- ↑ Morison (1958), pp. 402–403
- ↑ Miller (1959), pp. 351–352
- ↑ Rottman (2005), p. 72
- ↑ Willoughby (1966), p. 246
- 1 2 3 4 Miller (1959), p. 352
- 1 2 3 4 Miller (1959), p. 356
- ↑ Morison (1958), p. 427
- ↑ Gillespie (1952), pp. 278–280
- ↑ Gailey (1991), p. 140
- ↑ Miller (1959), p. 351
- ↑ Miller (1959), p. 357
- ↑ Rentz (1946), p. 90.
- ↑ James (2016), p. 234
- ↑ Gailey (1991), p. 133
- ↑ Miller (1959), pp. 352–355, 357
- ↑ Gillespie (1952), p. 280
- ↑ Morison (1958), p. 428
- ↑ Miller (1959), pp. 354–355
- ↑ Miller (1959), p. 358
- ↑ Miller (1959), p. 359
- ↑ Miller (1959), pp. 359–361
- ↑ Miller (1959), p. 361
- 1 2 Miller (1959), p. 362
- 1 2 Miller (1959), p. 363
- ↑ Miller (1959), pp. 363–364
- 1 2 Miller (1959), p. 364
- 1 2 Miller (1959), p. 365
- ↑ Miller (1959), p. 366
- ↑ Miller (1959), pp. 366–367
- ↑ Miller (1959), p. 367
- ↑ Miller (1959), pp. 367–368
- ↑ Miller (1959), p. 369.
- ↑ Miller (1959), pp. 370–371 & 377
- ↑ Miller (1959), p. 372
- ↑ Miller (1959), p. 373
- ↑ Miller (1959), p. 374
- ↑ Miller (1959), pp. 374–375
- ↑ Miller (1959), pp. 375–378
- ↑ Morison (1958), p. 430
- ↑ Miller (1959), pp. 377–378.
- ↑ James (2012), pp. 155–156
- ↑ Miller (1959), pp. 356–357
- ↑ Miller (1959), p. 378.
- ↑ Morison (1958), pp. 425, 430–431
- ↑ Shindo (2016), p. 63
- ↑ James (2016), pp 232–249.
Works consulted
| Wikimedia Commons has media related to Bougainville counterattack. |
- Coakley, Robert W. (1989). "World War II: The War Against Japan". American Military History. Army Historical Series (Online ed.). Washington, D.C.: United States Army Center of Military History. OCLC 706013347.
- Gailey, Harry A. (1991). Bougainville, 1943–1945: The Forgotten Campaign. Lexington, Kentucky: University Press of Kentucky. ISBN 0-8131-9047-9.
- Gillespie, Oliver A. (1952). The Pacific. Official History of New Zealand in the Second World War. Wellington, New Zealand: War History Branch, Department Of Internal Affairs. OCLC 250593791.
- James, Karl (2012). The Hard Slog: Australians in the Bougainville Campaign, 1944–45. Port Melbourne, Victoria: Cambridge University Press. ISBN 978-1-107-01732-0.
- James, Karl (2016). "More Than Mopping Up: Bougainville". In Dean, Peter J. Australia 1944–45: Victory in the Pacific. Port Melbourne, Victoria: Cambridge University Press. pp. 232–251. ISBN 978-1-107-08346-2.
- Long, Gavin (1963). The Final Campaigns. Australia in the War of 1939–1945. Series 1 – Army. Canberra, Australian Capital Territory: Australian War Memorial. OCLC 570202673.
- Miller, John, Jr. (1959). Cartwheel: The Reduction of Rabaul. United States Army in World War II: The War in the Pacific. Washington, D.C: Office of the Chief of Military History, United States Department of the Army. OCLC 569056928. Retrieved 9 April 2012.
- Morison, Samuel Eliot (2001) [1958]. Breaking the Bismarcks Barrier. History of United States Naval Operations in World War II. Champaign, Illinois: University of Illinois Press. ISBN 0-252-06997-8.
- Rentz, John M. (1946). Bougainville and the Northern Solomons. Washington, D.C.: Historical Branch, Headquarters, United States Marine Corps. OCLC 1313812.
- Rohfleisch, Kramer J. (1950). "Bougainville". In Craven, Wesley Frank; Cate, James Lea. The Pacific: Guadalcanal to Saipan, August 1942 to July 1944. The Army Air Forces in World War II. IV. Washington, D.C.: Office of Air Force History. ISBN 0-912799-03-X. Retrieved 12 December 2011.
- Rottman, Gordon (2005). Japanese Army in World War II: South Pacific and New Guinea, 1942–44. Battle Orders 14. Oxford: Osprey. ISBN 1-84176-870-7.
- Shaw, Henry I.; Kane, Douglas T. (1963). Volume II: Isolation of Rabaul. History of U.S. Marine Corps Operations in World War II. Washington, D.C.: Historical Branch, G-3 Division, Headquarters, U.S. Marine Corps. OCLC 568751111. Retrieved 9 April 2012.
- Shindo, Hiroyuki (2016). "Holding on to the Finish: The Japanese Army in the South and Southwest Pacific, 1944–45". In Dean, Peter J. Australia 1944–45: Victory in the Pacific. Port Melbourne, Victoria: Cambridge University Press. pp. 51–76. ISBN 978-1-107-08346-2.
- Willoughby, Charles A. (editor in chief) (1966). Japanese Operations in the Southwest Pacific Area. Reports of General MacArthur. II. Part I. Washington, D.C.: United States Army Center of Military History. OCLC 187072014. Retrieved 9 April 2012.