Operation Dragoon
| Operation Dragoon | |||||||
|---|---|---|---|---|---|---|---|
| Part of Mediterranean and Middle East Theatre and the European Theatre of World War II | |||||||
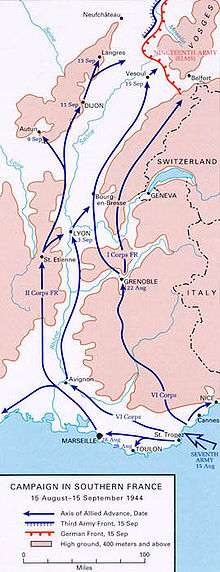
 A map of the operation | |||||||
| |||||||
| Belligerents | |||||||
|
| ||||||
| Commanders and leaders | |||||||
| |||||||
| Units involved | |||||||
|
| |||||||
| Strength | |||||||
|
Initial landing 151,000 men[1] Entire invasion force 576,833 men[2] French Resistance 75,000 men[3] |
Initial landing 85,000–100,000 men[4] Southern France 285,000–300,000 men[4] | ||||||
| Casualties and losses | |||||||
|
~7,750 other casualties Total: ~21,000 |
~21,000 wounded 131,250 captured[6][7][8] Total: ~159,000 | ||||||
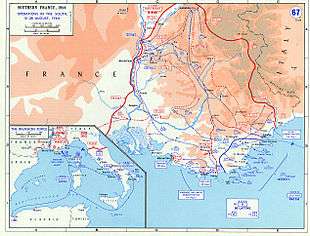
Operation Dragoon (initially Operation Anvil) was the code name for the Allied invasion of Southern France on 15 August 1944. The operation was initially planned to be executed in conjunction with Operation Overlord, the Allied landing in the Normandy, but the lack of available resources led to a cancellation of the second landing. By July 1944 the landing was reconsidered, as the clogged-up ports in Normandy did not have the capacity to adequately supply the Allied forces. Concurrently, the French High Command pushed for a revival of the operation that would include large numbers of French troops. As a result, the operation was finally approved in July to be executed in August.
The goal of the operation was to secure the vital ports on the French Mediterranean coast and increase pressure on the German forces by opening another front. After some preliminary commando operations, the US VI Corps landed on the beaches of the Côte d'Azur under the shield of a large naval task force, followed by several divisions of the French Army B. They were opposed by the scattered forces of the German Army Group G, which had been weakened by the relocation of its divisions to other fronts and the replacement of its soldiers with third-rate Ostlegionen outfitted with obsolete equipment.
Hindered by total Allied air superiority and a large-scale uprising by the French Resistance, the weak German forces were swiftly defeated. The Germans decided to withdraw towards the north through the Rhône valley, to establish a stable defense line at Dijon. Allied mobile units were able to overtake the Germans and partially block their route at the town of Montélimar. The ensuing battle led to a stalemate, with neither side able to achieve a decisive breakthrough, until the Germans were finally able to complete their withdrawal and retreat from the town. While the Germans were retreating, the French managed to capture the important ports of Marseille and Toulon, putting them into operation soon after.
The Germans were not able to hold Dijon and ordered a complete withdrawal from Southern France. Army Group G retreated further north, pursued by Allied forces. The fighting ultimately came to a stop at the Vosges mountains, where Army Group G was finally able to establish a stable defense line. After meeting with the Allied units from Operation Overlord, the Allied forces were in need of reorganizing and, facing stiffened German resistance, the offensive was halted on 14 September. Operation Dragoon was considered a success by the Allies. It enabled them to liberate most of Southern France in a time span of only four weeks, while inflicting heavy casualties on the German forces, although a substantial part of the best German units was able to escape. The captured French ports were put into operation, allowing the Allies to solve their supply problems soon after.
Background
Prelude
During planning stages, the 1942 operation was known as "Anvil", to complement Operation Sledgehammer, at that time the code name for the invasion of Normandy. Subsequently, both plans were renamed, Sledgehammer becoming Operation Overlord, and Anvil becoming Operation Dragoon. The original idea of an invasion of Southern France had come from General George Marshall, the U.S. Army Chief of Staff already in 1942. It was supported at the Tehran Conference in late 1943 by Joseph Stalin, who, in discussions with Franklin D. Roosevelt, advocated for it as an inherent part of Overlord, preferring to have the Allies in the far west instead of an alternative landing in the Balkans as he considered them to be in his zone of influence.[9] Marshall insisted that it be included in the strategic planning, and Roosevelt found it unpalatable to cancel the operation.[10]
Operation Dragoon was controversial from the time it was first proposed. The American military leadership and its British counterparts disagreed on the operation. Winston Churchill argued against it on the grounds that it diverted military resources that were better deployed for Allied operations in Italy; instead, he favored an invasion of the oil-producing regions of the Balkans.[11] Churchill reasoned that by attacking the Balkans, the Western Allies could deny Germany petroleum, forestall the advance of the Red Army of the Soviet Union, and achieve a superior negotiating position in post-war Europe, all at a stroke.[11][12][13]
When first planned, the landings were to take place simultaneously – Overlord in Normandy and Anvil in the south of France. It soon became clear that a dual landing was impossible to conduct with the available forces. The expansion of Overlord from a three- to a five-division front required many additional LSTs, which would have been needed for Anvil. At the same time, another Allied amphibious landing in Italy at Anzio had gone badly. All of these resulted in the postponing of Anvil by the Allies.[11][12][14]
After the landing at Normandy, a revival of Anvil became increasingly attractive to the Allied planners. The Normandy ports had insufficient capacity to handle Allied supply needs and at the same time French generals under Charles de Gaulle pressed for a direct attack on Southern France with participation of French troops. These factors led to a reconsideration of the plan. Despite Churchill's objections, the operation was authorized by the Allied Combined Chiefs of Staff on 14 July and then renamed Dragoon on 1 August. The landing was scheduled for 15 August.[11][12][12][15]
Planning
The chief objectives of Operation Dragoon were the important French ports of Marseille and Toulon, which were considered essential to supply the growing Allied forces in France.[16] The Allied planners were cautious, taking heed of lessons learned from the Anzio and Normandy landings. They chose a location without high ground controlled by the Wehrmacht, conditions that had led to heavy casualties after the initial landings on one of the beaches at Normandy. The choice for the disembarkation site was an area on the Var coast east of Toulon. A preliminary air campaign was planned to isolate the battlefield and cut the Germans off from reinforcement by destroying several key bridges. A large airborne landing was also planned in the center of the landing zone to quickly seize the high ground overlooking the beaches. Parallel to the invasion, several commando units would take control of the islands off the coast.[17]
The Allied plan consisted of a three-division landing of US forces led by Major General Lucian Truscott to secure a bridgehead on the first day. Their flanks were to be protected by French, American, and Canadian commando units. Within twenty-four hours, 50,000–60,000 troops and 6,500 vehicles were to be disembarked. The airborne landings would concentrate in an area near Draguignan and Le Muy, with the aim of taking these towns to prevent German counterattacks against the beaches. The bulk of the American force then had to advance quickly to the north along the Rhône River, to take the towns of Lyon and Dijon and make contact with the Allied forces in Northern France. After the successful initial landing, units of the French Army B were to land, tasked with the taking of the French ports of Toulon and Marseille.[18]
Although the Germans expected another Allied landing in the Mediterranean, the advancing Red Army and the Allied landings in Normandy placed great strains on German resources, so little was done to improve the condition of Army Group G, which was occupying Southern France. Given the advancing Allied forces in northern France, the Germans deemed a realistic defense in the south impossible. Blaskowitz's Army Group G headquarters discussed a general withdrawal from southern France in July and August with the German High Command, but the 20 July plot led to an atmosphere in which any withdrawal was out of the question. Blaskowitz was quite aware that with his scattered forces, any serious Allied landing attempt would be impossible to ward off. He planned a withdrawal in secret, to include demolition of the ports and proceeding in an orderly manner, covered by the 11th Panzer Division. He intended to establish a new defense line centered on Dijon in central France. German intelligence was aware of the impending Allied landing, and on 13 August Blaskowitz ordered the 11th Panzer Division to move east of the Rhône River, where the landing was expected.[19][20]
Opposing forces
The Western Naval Task Force was formed under the command of Vice Admiral Henry Kent Hewitt to carry the U.S. 6th Army Group, also known as the Southern Group or Dragoon Force, onto the shore. The 6th Army Group was formed in Corsica and activated on 1 August, to consolidate the French and American forces slated to invade southern France. Admiral Hewitt's naval support for the operation included the American battleships Nevada, Texas, Arkansas, the British battleship Ramillies and the French battleship Lorraine, with twenty cruisers for gunfire support and naval aircraft from nine escort carriers assembled as Task Force 88.[21]
The main ground force earmarked for the operation was the US Seventh Army, commanded by Alexander Patch. The army's VI Corps, commanded by Major General Lucian Truscott, would carry out the initial landing and was to be followed by the French Army B under command of Général Jean de Lattre de Tassigny.[22] Accompanying the operation was a fully mobilized separate detachment called "Task Force Butler", consisting of the bulk of the Allied tanks, tank destroyers, and mechanized infantry. In addition, the French Resistance played a major role in fighting. With the Allied advance in France the Resistance increasingly organized itself and evolved from a guerilla fighting force to a semi-organized army called French Forces of the Interior. The FFI would tie-down numerous German troops by sabotaging bridges and communication lines, seizing important traffic hubs and directly attacking isolated German forces. They were aided by Allied special forces from the Office of Strategic Services (OSS) who would the supply the Allies with vital intelligence information.[23]
The Allied ground and naval forces were aided by a large aerial fleet of 3470 planes. The majority of them were stationed on Corsica and Sardinia. The tactical bombers and fighters had to support the landings directly, while the strategic element had to bomb German targets deep into France. The strategic bombing started well before the landing and targeted airports, traffic hubs, railroads, coastal defenses, and communication lines.[24]
Opposing the Allies was the German Army Group G (Heeresgruppe G). Although nominally an army group, Army Group G had at the time of the invasion only one army under its command: the 19th Army, under the command of Friedrich Wiese. As southern France had never been important to German planning, their forces there had been stripped of nearly all their valuable units and equipment over the course of the war. Due the Allied threat in the Normandy Army Group G's units were continuously sent north until the Dragoon landings. The remaining 11 divisions were understrength and only one panzer division was left, the 11th Panzer Division.[20] In early August the 11th Panzer Division had only two tank battalions left and one of those was sent to the Normandy shortly before the landing.[25]
The troops were positioned thinly along the French coast, with an average of 90 km (56 mi) per division. Generally, the troops of the German divisions were only second and third rate. This meant that over the course of the war, the divisions were thinned out and soldiers were replaced with wounded old veterans as well as Volksdeutsche from Poland and Czechoslovakia. Numerous units were also replaced by Ostlegionen and Ostbataillone. These units were volunteers from Eastern Europe, mainly the Soviet Union, and had a generally low fighting morale. The equipment of those troops was in poor shape, consisting of old weapons from various nations, with French, Polish, Soviet, Italian, and Czech guns, artillery, and mortars. Four of the German divisions were designated as "static", which meant that they were stripped of all of their mobile capabilities and unable to move from their position. The only potent unit inside Army Group G was the 11th Panzer Division, which was commanded by Wend von Wietersheim.[20][26]
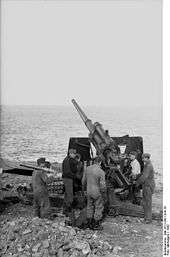
The German chain of command was overly complex, with parallel chains for the occupation forces, the land forces, the Luftwaffe, and the Kriegsmarine. The Luftwaffe, with 200 aircraft, and the Kriegsmarine, with 45 small ships, would play a negligible role in the operation.[20][27] The German defense was aided by extensive coastal artillery placements which had been constructed in the years before the landing. After the Fall of France the Vichy French regime greatly improved the coastal defenses to appease the Germans. Along the coast about 75 coastal guns of heavy and medium caliber were placed. Toulon was protected by a complex of heavy 340 millimetres (13 in) gun artillery batteries in mounted turrets. After their military take-over in November 1942, the Germans improved the coastal defense further by repairing damaged and outdated turrets as well as moving in additional guns. This included the 340 millimetres (13 in) guns taken from the dismantled French battleship Provence.[28]
The operation
Preliminary operations
To ensure the success of Dragoon and support the initial landings, preliminary commando operations had to be carried out. The first target was the Hyères Islands, specifically Port-Cros and Levant. The guns of the German garrisons on both islands could reach the proposed Allied landing area and the sea lanes that the troops would follow. The First Special Service Force, a joint U.S.-Canadian special forces unit trained in amphibious assault and mountaineering and consisting of three regiments, received the order to take the islands as part of Operation Sitka.[29][30]
The landings on Port-Cros and Levant started simultaneously on 14 August. On Levant, the 2nd and 3rd Regiments of the First Special Service Force faced sporadic resistance that became more intense when the German garrison forces came together in the area of the port. The men of the First Special Service Force gained the upper hand and discovered that the "coastal defense battery" the Allied naval forces were worried about was actually several well-camouflaged dummy weapons.[29][30]
On Port-Cros the 1st Regiment drove the German garrison to the western side of the island to an old fort. Fighting continued through 16 August. When darkness fell, enemy guns on the French mainland at Cap Benat shelled Port-Cros. The Royal Navy battleship HMS Ramillies took aim at the fort where the Germans were barricaded. The German garrison surrendered on the morning of 17 August. With both islands in Allied hands, the men of the First Special Service Force transferred to the mainland where they were attached to the First Airborne Task Force.[29][30]
Meanwhile, at Cap Nègre to the west of the main invasion, a large group of French commandos destroyed German artillery emplacements as part of Operation Romeo. Their main effort was supported by diversionary flank landings by other commando teams. While the main mission succeeded, 67 French commandos were taken prisoner after they ran into a minefield. In addition to the commando operations, another operation was carried out, named Operation Span. This was a deception plan, aimed to confuse the German defenders with fake landings and paratroopers, to disperse them from the actual landing zones.[29][30]
Main invasion force landings
The preceding bombing missions, together with resistance sabotage acts, hit the Germans heavily, interrupting railroads, damaging bridges, and disrupting the communication network. The landing started on the morning of 15 August.[22] Ships of the Western Naval Task Force approached under cover of darkness and were in position at dawn. The first of 1,300 Allied bombers from Italy, Sardinia, and Corsica began aerial bombardment shortly before 0600. Bombing was nearly continuous until 0730 when battleships and cruisers launched spotting aircraft and began firing on specific targets detected by aerial surveillance. Naval gunfire ceased as the landing craft headed ashore at 0800. The relatively steep beach gradients with small tidal range discouraged Axis placement of underwater obstacles, but landing beaches had been defensively mined. LCIs leading the first wave of landing craft fired rockets to explode land mines on the beaches to be used by following troops.[21]
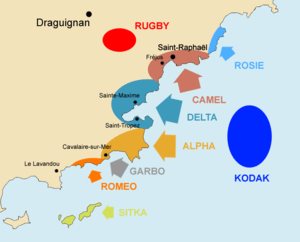
The main landing force consisted of three divisions of the VI Corps. The 3rd Infantry Division landed on the left at Alpha Beach (Cavalaire-sur-Mer), the 45th Infantry Division landed in the centre at Delta Beach (Le Muy, Saint-Tropez), and the 36th Infantry Division landed on the right at Camel Beach (Saint-Raphaël).[31]

The landings were overwhelmingly successful. On Delta and Alpha beaches, German resistance was low. The Osttruppen surrendered quickly, and the biggest threat to the Allies were the mines. A single German gun as well as a mortar position were silenced by destroyer fire. The Allied units in this sector were able to secure a bridgehead and quickly linked up with the paratroopers, capturing Saint-Tropez as well Le Muy.[31] The most serious fighting was on Camel Beach near the town of Saint-Raphaël. This beach was secured by several well-emplaced coastal guns as well as flak batteries. Through heavy German fire the Allies attempted to land at the shore. However, at sector Red of the Camel Beach landing zone the Allies were not able to succeed. A bombing run of 90 Allied B-24 bombers was called in against a German strongpoint here. Even with the assistance of naval fire, the Allies were not able to bring the landing ships close to the shore. They decided to avoid Camel Red and land only at the sectors of Camel Blue and Camel Green, which was successful.[31]
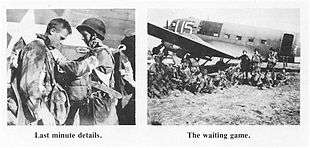
The Allied casualties at the landings were very light, with only 95 killed and 385 wounded. 40 of those casualties were caused by a rocket-boosted Henschel Hs 293 guided gliding bomb launched from a Do-217 bomber aircraft by a rare appearance of the bomber wing KG 100, which sank the tank landing ship USS LST-282.[31] In conjunction with the sea landing, airborne and glider landings (Mission Albatross followed by Mission Dove, Mission Bluebird, and Mission Canary) around the area of Le Muy were carried out. They were as successful as the beach landings, with only 104 dead, 24 of which were caused by glider accidents and 18 by parachute accidents.[29][30]
German counterattacks
French sabotage by the FFI, together with the Allied bombing, severed German communication lines, causing initial confusion among the troops. German field commanders were not able to communicate with Army Group G's headquarters. Despite the hampered communications, German commanders acted independently to put measures in effect to counter the Allied invasion. Directly facing the brunt of the Allied landings was the German LXII Corps at Draguignan, commanded by Ferdinand Neuling. Allied paratroopers interrupted his communication lines and trapped his headquarters in the city. He therefore ordered the nearby 148th Infantry Division to counterattack against the beaches at Le Muy, just before the Allied paratroopers cut him off completely. Wiese, as commander of the 19th Army, was also unable to contact Blaskowitz's Army Group G headquarters, but implemented a plan to push the Allied forces in the Le Muy – Saint-Raphaël region back into the sea unilaterally. With almost no mobile reserves to react against the beach landings, he ordered the commander of the 189th Infantry Division, Richard von Schwerin, to establish an ad-hoc battle group (Kampfgruppe) from all nearby units to counterattack the Allied bridgeheads in this area. While von Schwerin assembled all the men he could find, the 148th Infantry Division near Draguignan encountered heavy resistance from the FFI, which had been reinforced by British paratroopers, upsetting the plan for a swift counterattack toward the beaches.[32][33]
While the Germans were unable to mount a counterattack against the Allied beachheads on 15 August, by the morning of 16 August von Schwerin had finally assembled a force about the size of four infantry battalions. With this force he launched a two-pronged assault towards Le Muy and the Allied bridgehead, as well as toward Draguignan to relieve the LXII Corps headquarters there. By that time, the Allies had already landed a significant number of troops, vehicles, and tanks. The Allied mobile forces of the 45th Division went out against the German forces themselves. The division surrounded the town of Les Arcs, recently reoccupied by von Schwerin's troops, and attempted to isolate the German forces there. After heavy fighting throughout the day, von Schwerin ordered his troops to retreat under cover of night. At the same time, heavy fighting occurred at Saint-Raphaël. Mobile units of the 148th Infantry Division finally had arrived there and encountered the US 3rd Division, which was trying to take Saint-Raphaël. This attack, however, was fruitless. By 17 August the German counter-attacks had been largely defeated, Saint-Raphaël was secured together with a large bridgehead along the coastline, and mobile forces had linked up with the airborne troops in Le Muy.[33][34] French troops had been pouring ashore since 16 August, passing to the left of the American troops with the objective of Toulon and Marseille.[33]
By the night of 16/17 August, Army Group G headquarters realized that it could not drive the Allies back into the sea. Simultaneously in northern France, the encirclement of the Falaise pocket threatened the loss of large numbers of German forces. Given the precarious situation, Hitler moved away from his "no step backwards" agenda and agreed to an OKW plan for the complete withdrawal of Army Groups G and B. The OKW plan was for all German forces (except the stationary fortress troops) in southern France to move north to link up with Army Group B to form a new defensive line from Sens through Dijon to the Swiss frontier. Two German divisions (the 148th and 157th) were to retreat into the French-Italian Alps. The Allies were privy to the German plan through Ultra interception.[33][35][36]
German withdrawal
The Germans started the withdrawal, while the motorized Allied forces broke out from their bridgeheads and pursued the German units from behind. The rapid Allied advance posed a major threat for the Germans, who could not retreat fast enough. The Germans tried to establish a defense line at the Rhône to shield the withdrawal of several valuable units there. The US 45th and 3rd Divisions were pressing to the north-west with uncontested speed, undermining Wiese's plan for a new defense line. Barjols and Brignoles were taken by the two American divisions on 19 August, which also were about to envelop Toulon as well as Marseille from the north, cutting off the German units there.[37][38]
In the northeast the German problems loomed as large. Taskforce Butler – the Allied mechanized component of the landings – was pushing north of Draguignan. On 18 August Neuling's surrounded LXII Corps headquarters attempted a unsuccessful breakout and was finally captured with the rest of the city after some fighting. The German troops in this area were exhausted and demoralized from the fighting against the FFI, so Taskforce Butler was also able advance at high speed. Digne was liberated on 18 August. At Grenoble, the 157th Reserve Infantry Division faced the Allied advance, and its commander decided to retreat on 21 August toward the Alps. This decision would prove to be fatal for the Germans, as it left a large gap in the eastern flank of the retreating Army Group G. Blaskowitz now decided to sacrifice the 242nd Infantry Division in Toulon, as well as the 244th Infantry Division in Marseille, to buy time for the rest of Army Group G to retreat through the Rhône Valley, while the 11th Panzer Division and the 198th Infantry Division would shield the retreat in several defense lines.[37][38]
Liberation of Marseille and Toulon
Meanwhile, the disembarked French units started to head for Marseille and Toulon. The initial plan was to capture the ports in succession, but the unexpected Allied advance allowed the French commander de Lattre de Tassigny to attack both ports almost simultaneously. He split his forces into two units, with Joseph de Goislard de Monsabert tasked to take Toulon from the east while Edgard de Larminat drove north to encircle the city at the flanks. The Germans had a significant force stationed in both cities, but they lacked the time to prepare for a determined defense. After heavy fighting around Hyères, which temporarily stopped the advance, French forces approached Toulon on 19 August. At the same time, Monsabert swung around the city, enveloped it, and cut off the highway between Toulon and Marseille. On 21 August, the French pressed into Toulon, and heavy fighting ensued. The heavy German resistance led to an argument between Larminat and de Tassigny, after which de Tassigny took over direct command of the operation, dismissing Larminat. By 26 August the remaining German units had surrendered. The battle for Toulon cost the French 2,700 casualties, but they captured all remaining German forces who lost their entire garrison of 18,000 men.[38][39]
At the same time, Monsabert's attempt to liberate Marseille commenced. At first, a German force at Aubagne was defeated before French troops attacked the city directly. Unlike Toulon, the German commander at Marseille did not evacuate the civilian population, which became increasingly hostile. The resulting fighting with FFI troops further weakened the German units, which were exhausted from partisan fighting. The Wehrmacht was not able to defend on a broad front and soon crumbled into numerous isolated strongpoints. On 27 August most of the city was liberated, with only a few small strongpoints remaining, and on 28 August German troops issued the official surrender. The battle caused 1,825 French casualties, but 11,000 German troops were captured.[40] In both harbours, German engineers had demolished port facilities to deny their use to the Allies.[38][41]
Battle at Montélimar
While Marseille and Toulon were liberated, the German retreat continued. The 11th Panzer Division started several feint attacks toward Aix-en-Provence to discourage any further Allied advance. By doing so, LXXXV Corps as well as the IV Luftwaffe Field Corps were able to successfully retreat from the Allied advance at the Rhône. The Allies were unsure about the German intentions, and Truscott decided to try to trap the Germans with a right flank movement whilst pursuing the Germans with his three divisions from VI Corps. However, the remaining uncertainty at the Allied headquarters led to indecisiveness, and the Allies missed several opportunities to cut off the retreating German forces of the LXXXV Corps.[42]
Through the decryption of German radio communications, the Allied headquarters became aware of the German withdrawal plan. They recognized the open German flank to the east of the Rhône at Grenoble due the retreat of the 157th Infantry Division towards the Alps. To seize this opportunity, Taskforce Butler was ordered to advance in this direction, paralleling the German evacuation effort and ultimately cutting them off further north. While doing so, it fought some scattered German resistance, and finally, after turning left, found itself near Montélimar, a small city on the east bank of the Rhône River. This town lay directly on the German escape route. Following Taskforce Butler was the 36th Infantry Division. Together, they were tasked on 20 August to block the German force at Montélimar as well as continue the northward advance to Grenoble, while VI Corps was pursuing the Germans from behind. However, after this speedy advance, the forward Allied forces suffered now from a serious lack of fuel and supplies, which made this task difficult.[38][43][44]
On 21 August, Taskforce Butler occupied the hills north of the town of Montélimar, according to revised orders from Truscott, as he considered it too weak to block the entire German force marching north. From this position, Taskforce Butler fired on the evacuating German troops, while waiting for further reinforcements. Troops from the FFI supported the Americans, harassing German troops through the entire battle. The sudden appearance of this new threat shocked Wiese and the German command. As a first countermeasure, Wietersheim's 11th Panzer Division was called in. The first of its units to arrive, together with several ad-hoc Luftwaffe battle groups, were tasked to deal with this new threat. This hastily assembled force mounted an attack against Puy the same day, and the Germans were able to isolate Taskforce Butler from supplies. This success was, however, short-lived, and the Germans were pushed back soon after.[45][46]
The next day, the first units of the 36th Division arrived, reinforcing Taskforce Butler. However, the Allied troops were still short of supplies and lacked enough men to directly attack the German escape route. During the next few days, more Allied men and supplies trickled in. At the same time, the US 45th Division took over positions at Grenoble, leaving the 36th Division free to fully commit its forces at Montélimar. Taskforce Butler was officially dissolved on 23 August, and John E. Dahlquist, commander of the now fully arrived 36th Infantry Division, assumed direct control of its units. For the rest of the day only small skirmishes occurred between German and Allied forces. Meanwhile, the Germans also struggled to bring the 11th Panzer Division through the chaos of the evacuation into position in the town. By 24 August a substantial amount of the 11th Panzer Division had finally reached the battle area.[46][47]
With his newly reorganised units, Dahlquist attempted a direct attack against Montélimar, which failed against the newly arrived German tank units. The subsequent German counter-attack gained some ground against the hills occupied by the Allies. Its aim was to push the Americans from the hills north of Montélimar and to force the American artillery to move back out of range.[44] After the fighting the Germans captured a copy of Dahlquist's operational plans, giving them a better picture of the Allied forces. As a result, Wiese planned a major attack for 25 August by the 11th Panzer Division as well as the 198th Infantry Division, together with some ad-hoc Luftwaffe battlegroups. This attack was, however, also a big failure. The Allies struck back, retook the hills north of Montélimar, and were able to establish a temporary roadblock on the German escape route. Again, this Allied success also did not last long, as another ad-hoc attack led by Wietersheim reopened the passage at midnight.[46][48]
After the repeated German counterattacks prevented any lasting roadblock Truscott finally allowed reinforcements from the 45th Division to support Dahlquist at Montélimar, as he felt the successful operations further south at the French ports allowed him to refocus to the north. At the same time, the Germans also reinforced their fighting force. Over the next days a stalemate emerged, with the Allies unable to block the retreat route and the Germans unable to clear the area of the Allied forces. Both sides became increasingly frustrated during the fighting, with attack, counterattack, and spoiling attacks, which made it hard for the 36th Division to launch a decisive offensive.[49][50] Whilst the 36th Division had surrounded the 19th Army, they themselves were almost surrounded, too, during the chaotic fighting, with only a thin supply route to the east open, resulting in their having to fight to the front and the rear.[51] As the 36th Division was seemingly making no progress, an angry Truscott arrived at Dahlquist's headquarters on 26 August to relieve him of command. However, on seeing the heavy terrain and shattered forces, he refrained and left the headquarters again. Finally, during 26–28 August, the majority of the German forces were able to escape, leaving behind 4,000 burnt-out vehicles and 1,500 dead horses.[52] On 29 August the Allies captured Montélimar, and the final German troops trying to break out surrendered. The Germans suffered 2,100 battle casualties plus 8,000 POWs, while the Americans had 1,575 casualties.[46][50] Total POW losses of the 19th Army now amounted to 57,000.[52]
Final German retreat
The VI Corps, together with units from the French II Corps at its flank, pursued and tried to cut off the German forces on their way toward the town of Dijon, while the Germans planned to prevent another Montélimar with a defensive shield by the 11th Panzer Division. The Allied 45th and 3rd Divisions, as well as the 11th Panzer Division, were racing north to fulfill their objectives. In the meantime, the Germans tried to continue with the evacuation through Lyon. Behind their flight, the Germans destroyed bridges, hoping this would slow down the Allied advance. However, the 45th Division was able to bypass the German forces, taking the town of Meximieux on 1 September. This again posed a threat to the German evacuation. After some initial skirmishes, the 11th Panzer Division launched a heavy attack into the city, causing 215 American casualties and destroying a number of tanks and vehicles.[53][54][55]
At the same time, the main German units retreated through Lyon. On 2 September the 36th Infantry Division arrived at Lyon to find the Maquis fighting the Milice with much of the factory areas on fire. The next day, Lyon was liberated and 2,000 Germans were captured, but the rest had already continued their retreat north. Lyon celebrated for two days with the Americans.[56] The Allies made a last-ditch attempt to cut off the Germans with an offensive towards Bourg-en-Bresse by the 45th Division and the 117th Cavalry Squadron from the original Taskforce Butler. However, the 45th Division was not able to overcome the German defenses near the town. The 117th Cavalry Squadron had more success, bypassing Bourg-en-Bresse and taking Montreval and Marboz north of Bourg-en-Bresse instead. By 3 September Montreval was secure, but the squadron soon found itself trapped by units from the 11th Panzer Division, which surrounded the town. As a result, the squadron was almost annihilated, and the German escape route was again open. The American units then retired to Marboz.[53][54]
Over the next two weeks more skirmishes occurred and the Allies were not able to cut off a major portion of the German forces, but the Germans were also not able to maintain any stable defense line as planned. On 10 September forward units of the VI Corps were able to establish contact with units from Patton's Third Army. Truscott hoped to be able to push through the Belfort Gap, but on 14 September he received orders from the Allied High Command to halt the offensive. Army Group G was finally able to establish a stable defense line at the Vosges mountains, thwarting further Allied advances. This, combined with the Allied need to reorganise their command structure as the forces from northern and southern France have now linked up, forced the Allies to stop their pursuit of the Germans, ending the offensive here.[54][55]
During their fighting retreat up the Rhône, the Germans also withdrew their remaining forces from their garrisons in south-western France. These divisions raced north along the Atlantic coast and then swung towards the east at the Loire to link up with the rest of Army Group G at Burgundy. While they did not have to fight the Western Allies as much as the Germans had done at the Rhône, they still had to advance through French partisan-dominated terrain. About 88,000 men moved north, leaving 20,000 in south-western France behind. During the retreat, about 19,000 men were captured by the Allies and 60,000 men reached Army Group G's line, where they were integrated into the defense of the Vosges mountains.[57]
War crimes
French resistance against the Nazi German occupation and the Vichy French puppet government increased drastically in the weeks leading up to the Dragoon landings. In order to fight the uprising, German units committed numerous atrocities and war crimes against French fighters, as well as civilians, in retaliatory acts. On 9 June, after an attack on the German garrison at Tulle, the 2nd SS Panzer Division hanged about 99 civilians while moving towards Northern France during the Tulle massacre. The next day, that division murdered 642 civilians in Oradour-sur-Glane during the Oradour-sur-Glane massacre and then proceeded to plunder and burn the town. German units also worked together with French collaborators to subdue partisans, for example against the partisan base at the Vercors massif, but with little lasting result.[58]
Atrocities continued during the German retreat from Southern France as German soldiers plundered and burned down towns. French civilians were brought before ad-hoc military courts and sentenced to death because of alleged partisan activities. These atrocities did not help to subdue the French uprising. Instead, the German reprisals had the opposite effect and encouraged the French population to engage in partisan fighting.[59]
Aftermath

Operation Dragoon was considered a success by the Allied forces. It enabled them to liberate most of Southern France in a time span of only four weeks while inflicting heavy casualties on the German forces. However, the Allies failed to cut off the most valuable units of the retreating Army Group G, which retreated over a distance of 800 kilometres (500 miles) in good order, into the Vosges mountains on the German border, with the capability of continuing the fight. The main reason for the failure to capture or destroy Army Group G was the Allied shortage of fuel, which began soon after the landing. The Allies had not anticipated the speed of their own advance and therefore could not adequately provide supplies and logistics to the leading Allied units.[60][61]
A significant benefit of Operation Dragoon was the use of the port facilities in Southern France, especially the large ports at Marseille and Toulon. After Operation Cobra and Operation Dragoon, the Allied advance slowed almost to a halt in September due to a critical lack of supplies. The ports were quickly brought back into service, together with the railroad system in Southern France. Thereafter, large quantities of supplies could be moved north to ease the supply situation. In October, 524,894 tons of supplies were unloaded, which was more than one third of the Allied cargo shipped to the Western front.[61][62]
Operation Dragoon also had political implications. Two days after the landing, the Germans proceeded to dismantle the Vichy France government. Members of the Sicherheitsdienst stormed French government institutions and moved the Vichy French officials, including Philippe Pétain, to Belfort in Eastern France. Later, they were moved to Sigmaringen in Germany, where they acted as a Vichy French government in exile. With the collapse of the Vichy French government, troops of the FFI took over and resumed control of the French political institutions.[63]
Despite these successes, there was criticism of Dragoon by some Allied generals and contemporary commentators such as Bernard Montgomery, Arthur R. Wilson, and Chester Wilmot in the aftermath, mostly because of its geo-strategic implications. It was argued that Dragoon diverted much needed men and material away from the ongoing fighting at the Western front that could have been used, instead, to bolster the Italian front or to hasten the advance towards the Rhine by the Overlord forces. The resulting loss of momentum gave Stalin on the Eastern Front a free hand to pursue his offensive efforts with more determination, giving him the upper hand to win the race towards Berlin and occupy the Balkans. Dragoon therefore had consequences reaching into the Cold War.[64]
See also
Notes
- a A significant number of Canadians also took part, both afloat and in the battles in southern France as members of the bi-national US-Canadian First Special Service Force (also known as The Devil's Brigade).
References
- ↑ Clarke & Smith (1993), p. 92.
- ↑ Tucker-Jones (2010), p. 92.
- ↑ Clarke & Smith (1993), p. 42.
- 1 2 Clarke & Smith (1993), p. 70.
- ↑ Clarke & Smith (1993), p. 195.
- 1 2 Vogel (1983), pp. 604–605.
- ↑ Zaloga (2009), p. 88.
- ↑ Clarke & Smith (1993), p. 197.
- ↑ Tucker-Jones (2010), p. 11.
- ↑ Tucker-Jones (2010), p. 66.
- 1 2 3 4 Yeide (2007), p. 13.
- 1 2 3 4 Zaloga (2009), pp. 6–8.
- ↑ Tucker-Jones (2010), p. 62.
- ↑ Tucker-Jones (2010), pp. 51–55.
- ↑ Tucker-Jones (2010), p. 69.
- ↑ Breuer (1996), p. 46.
- ↑ Zaloga (2009), pp. 34–35.
- ↑ Vogel (1983), pp. 582–584.
- ↑ Zaloga (2009), pp. 32–34.
- 1 2 3 4 Vogel (1983), pp. 588–598.
- 1 2 Potter & Niemitz (1960), pp. 588–598.
- 1 2 Pogue (1986), p. 227.
- ↑ Zaloga (2009), pp. 8, 29.
- ↑ Vogel (1983), pp. 584–586.
- ↑ Clarke & Smith (1993), p. 63.
- ↑ Zaloga (2009), pp. 16–19.
- ↑ Zaloga (2009), pp. 20–22.
- ↑ Tucker-Jones (2010), p. 78.
- 1 2 3 4 5 Zaloga (2009), pp. 36–41.
- 1 2 3 4 5 Vogel (1983), p. 597.
- 1 2 3 4 Zaloga (2009), pp. 41–50.
- ↑ Clarke & Smith (1993), pp. 105–107.
- 1 2 3 4 Vogel (1983), pp. 597–599.
- ↑ Clarke & Smith (1993), pp. 118–125.
- ↑ Zaloga (2009), p. 55.
- ↑ Clarke & Smith (1993), pp. 128; 134–137.
- 1 2 Zaloga (2009), pp. 57–59.
- 1 2 3 4 5 Vogel (1983), pp. 598–601.
- ↑ Clarke & Smith (1993), pp. 137–140.
- ↑ Clarke & Smith (1993), pp. 140–142.
- ↑ Zaloga (2009), pp. 70–71.
- ↑ Clarke & Smith (1993), pp. 142–143.
- ↑ Clarke & Smith (1993), pp. 144–147.
- 1 2 Tucker-Jones (2010), p. 129.
- ↑ Clarke & Smith (1993), pp. 147–149.
- 1 2 3 4 Zaloga (2009), pp. 71–81.
- ↑ Clarke & Smith (1993), pp. 150–154.
- ↑ Clarke & Smith (1993), pp. 154–160.
- ↑ Tucker-Jones (2010), pp. 129-130.
- 1 2 Clarke & Smith (1993), pp. 160–165.
- ↑ Tucker-Jones (2010), p. 130.
- 1 2 Tucker-Jones (2010), p. 132.
- 1 2 Clarke & Smith (1993), pp. 175–180.
- 1 2 3 Zaloga (2009), pp. 85–88.
- 1 2 Vogel (1983), pp. 600–602.
- ↑ Tucker-Jones (2010), p. 133.
- ↑ Vogel (1983), pp. 601–602.
- ↑ Vogel (1983), pp. 589, 593.
- ↑ Vogel (1983), pp. 589, 603–604.
- ↑ Tucker-Jones (2010), p. 175.
- 1 2 Vogel (1983), pp. 602–605.
- ↑ Zaloga (2009), p. 71.
- ↑ Vogel (1983), p. 605.
- ↑ Tucker-Jones (2010), pp. 175–180.
Bibliography
- Breuer, William (1996). Operation Dragoon: The Allied Invasion of the South of France. Presidio Press. ISBN 978-0-89141-601-2.
- Clarke, Jeffrey J.; Smith, Robert Ross (1993). Riviera To The Rhine. United States Army in World War II: European Theater of Operations. Washington DC: Center of Military History, United States Army. ISBN 978-0-16-025966-1.
- Flanagan, E. M., Jr. (2002). Airborne: A Combat History of American Airborne Forces. The Random House Publishing Group. ISBN 978-0-89141-688-3.
- Potter, E.B.; Nimitz, Chester W. (1960). Sea Power. Englewood Cliffs, NJ: Prentice-Hall. ISBN 978-0-13-796870-1.
- Pogue, C. (1986). The Supreme Command. United States Army in World War II: European Theater of Operations. Washington, DC: Center of Military History, United States Army. ISBN 978-0-16-001916-6.
- Tucker-Jones, Anthony (2010). Operation Dragoon: The Liberation of Southern France 1944. Pen and Sword. ISBN 978-1-84884-140-6.
- Vogel, Detlef (1983). "Deutsche und Alliierte Kriegsführung im Westen [German and Allied warfare in the West]". In Boog, Horst; Krebs, Gerhard; Vogel, Detlef. Das Deutsche Reich in der Defensive [The German Reich on the Defense: The Strategic Air War in Europe and the War in the West and East Asia 1943–1944/5]. Germany and the Second World War (in German). VII. Militärgeschichtliches Forschungsamt. Deutsche Verlags-Anstalt. pp. 419–642. ISBN 978-3-421-05507-1.
- Yeide, Harry (2007). First to the Rhine: The 6th Army Group In World War II. Zenith Press. ISBN 978-0-7603-3146-0.
- Zaloga, Steven J. (2009). Operation Dragoon 1944: France's other D-Day. Osprey. ISBN 978-1-84603-367-4.
Further reading
- Leighton, Richard M. (2000) [1960]. "Chapter 10: Overlord Versus the Mediterranean at the Cairo-Tehran Conferences". In Greenfield, Kent Roberts. Command Decisions. Washington, DC: United States Army Center of Military History. OCLC 909793361. CMH Pub 70-7. Retrieved 26 October 2016.
External links
| Wikimedia Commons has media related to Operation Dragoon. |
- US Army Campaigns of World War II – Southern France at the United States Army Center of Military History
- The short film The Big Picture – Command Decision: The Invasion of Southern France (1963) is available for free download at the Internet Archive
- Short Film The Unknown Soldier: Operation Dragoon
- Short Film The Unknown Soldier: The Children of the Resistance
- Contemporary US documentary Allied Invasion of Southern France – Operation Dragoon, the Other D-Day