Last battle of the battleship Bismarck
| ||||||||||||||||||||||||||||||

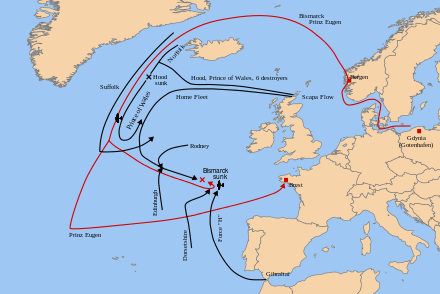
The last battle of the German battleship Bismarck took place in the Atlantic Ocean approximately 300 nmi (350 mi; 560 km) west of Brest, France, on 26–27 May 1941. Although it was a decisive action between capital ships, it has no generally accepted name.
On 24 May, before the final action, Bismarck's fuel tanks were damaged and several machinery compartments, including a boiler room, were flooded in the Battle of the Denmark Strait. Her intention was to reach the port of Brest for repair.[3] Late in the day Bismarck briefly turned on her pursuers (Prince of Wales and the heavy cruisers Norfolk and Suffolk) to cover the escape of her companion, the heavy cruiser Prinz Eugen to continue further into the Atlantic. Early on 25 May the British forces lost contact with Bismarck, which headed ESE towards France while the British searched NE, presuming she was returning to Norway. She was rediscovered in the late morning of 26 May by a Catalina flying boat from No. 209 Squadron RAF and subsequently shadowed by aircraft from Force H steaming north from Gibraltar.
The final action consisted of four main phases. The first phase late on the 26th consisted of air strikes by torpedo bombers from the British aircraft carrier Ark Royal, which disabled Bismarck's steering gear, jamming her rudders in a turning position and preventing her escape. The second phase was the shadowing and harassment of Bismarck during the night of 26/27 May by British destroyers, with no serious damage to any ship. The third phase on the morning of 27 May was an attack by the British battleships King George V and Rodney supported by cruisers. After about 100 minutes of fighting, Bismarck was sunk by the combined effects of shellfire, torpedo hits and deliberate scuttling.[4] On the British side, Rodney was lightly damaged by near-misses and by the blast effects of her own guns.[5] British warships rescued 111 survivors from Bismarck[6] before being obliged to withdraw because of an apparent U-boat sighting, leaving several hundred men to their fate. In the final phase the withdrawing British ships were attacked on 27 May by aircraft of the Luftwaffe, resulting in the loss of the destroyer HMS Mashona, and German ships and U-boats arrived later at the scene of the sinking and saved five more survivors.
Origins
Bismarck's second sea battle was made unavoidable by the decisions of the Fleet Commander (Günther Lütjens), taken well before the encounter with Hood and Prince of Wales.
Even before the breakout into the North Atlantic, Lütjens had decided against conducting an underway refuelling in the Greenland Sea with Weissenburg,[7] one of the pre-positioned German tankers, before his ships entered the Denmark Strait. And when, as a result of the battle with Hood and Prince of Wales, Bismarck lost access to several thousand tons of fuel in her forecastle due to a shell hit from Prince of Wales (aft of the forecastle, in her anchor locker), Lütjens had to order his ships to slow down to conserve fuel. The decrease in speed made Force H’s airborne torpedo attacks inevitable, and those attacks led directly to the final encounter with the Home Fleet.
Determined to avenge the sinking of the "Pride of the Navy" HMS Hood in the Battle of the Denmark Strait, the British committed every possible unit to hunting down Bismarck. The old Revenge-class battleship HMS Ramillies was detached from convoy duty southeast of Greenland and ordered to set a course to intercept Bismarck if she should attempt to raid the sea lanes off North America.
Prince of Wales and the cruisers Norfolk and Suffolk were still at sea in the area and tailing the German ships. A British force, the battleship King George V, the carrier Victorious and their escorts, had set sail from Scapa Flow before the loss of the Hood. The battleship Rodney was detached from escort duties on 24 May.
During the early evening of 24 May, an attack was made by a small group of Swordfish biplane torpedo bombers of 825 Naval Air Squadron under the command of Eugene Esmonde from the aircraft carrier HMS Victorious. One hit was scored, but caused only superficial damage to Bismarck's armoured belt.
For some time, Bismarck remained under long-distance observation by the British. At about 03:00 on 25 May, she took advantage of her opponents' zig-zagging to double back on her own wake; Bismarck made a nearly 270° turn to starboard, and as a result her pursuers lost sight of the battleship, thus enabling her to head for German naval bases in France unnoticed. Contact was lost for four hours; however, perhaps in awe of British radar capabilities, it appears that the Germans did not realize their good fortune. For reasons that are still unclear, Admiral Günther Lütjens transmitted a 30-minute radio message to HQ, which was intercepted, thereby giving the British time to work out roughly where he was heading. However, a plotting error made onboard King George V, now in pursuit of the Germans, incorrectly calculated Bismarck's position and caused the chase to veer too far to the north. Bismarck was therefore able to make good time on 25/26 May in her unhindered passage towards France and protective air cover and destroyer escort. By now, however, fuel was becoming a major concern to both sides.
The British had a stroke of luck on 26 May. In mid-morning a Coastal Command Catalina reconnaissance aircraft from 209 Squadron RAF, which had flown over the Atlantic from its base on Lough Erne in Northern Ireland across the Donegal Corridor, a small corridor secretly provided by the Irish government,[8] piloted by US Navy observer Ensign Leonard B. Smith, USNR,[9] spotted Bismarck (via a trailing oil slick from the ship's damaged fuel tank) and reported her position to the Admiralty. From then on, the German ship's position was known to the British, although the enemy would have to be slowed significantly if heavy units hoped to engage it out of range of German aircraft protection. All British hopes were now pinned on Force H, whose main units were the aircraft carrier HMS Ark Royal, the battlecruiser HMS Renown and the light cruiser HMS Sheffield. This battle group, commanded by Admiral James Somerville, had been diverted north from Gibraltar.
Night of 26/27 May

At dusk that evening, and in atrocious weather conditions, Swordfish from Ark Royal launched an attack. The first wave mistakenly targeted Sheffield which had been detached from Force H under orders to close and shadow Bismarck. Although precious time was lost by this incident, it proved beneficial to the British in that the magnetic detonators on the torpedoes used against Sheffield were seen to be defective and for the following attack on Bismarck were replaced by those designed to explode on contact. Despite the lateness of the day, it was decided to try again. The attack commenced in near darkness at around 21:00 but once again the Swordfish torpedo bombers found Bismarck with their ASV II radars.[10] A hit by a single torpedo from a Swordfish flown by John Moffat jammed Bismarck's rudder and steering gear 12° to port.[11] This resulted in her being, initially, able to steam only in a large circle. Repair efforts by the crew to free the rudder failed.[12] Bismarck attempted to steer by alternating the power of her three propeller shafts, which, in the prevailing force 8 wind and sea state, resulted in the ship being forced to sail towards King George V and Rodney, two British battleships that had been pursuing Bismarck from the west.[13] At 23:40 on 26 May, Admiral Lütjens delivered to Group West, the German command base, the signal "Ship unmanoeuvrable. We will fight to the last shell. Long live the Führer."[14]
Throughout that night, Bismarck was the target of intermittent torpedo attacks by the Tribal-class destroyers HMS Cossack, Sikh, Maori and Zulu, and the Polish destroyer ORP Piorun. Neither side scored a hit, but the constant worrying tactics of the British helped wear down the morale of the Germans and deepened the fatigue of an already exhausted crew.
The sinking of Bismarck
The morning of Tuesday 27 May 1941 brought a heavy grey sky, a rising sea and a tearing wind from the northwest. Because of this northwesterly gale, Admiral Tovey concluded an attack on Bismarck from windward was undesirable. He decided to approach on a northwesterly bearing. Provided the enemy continued steering northward, he would deploy to the south on an opposite course at a range of approximately 15,000 yd (14,000 m). Bismarck was sighted bearing 118° at a distance of 25,000 yd (23,000 m).[15]

Rodney and King George V drew closer to Bismarck in line abreast, their enemy well illuminated by the morning sun in the background. Rodney steered to the east so that her gunfire would work the length of Bismarck, while King George V took the side. They opened fire at 08:47. Bismarck returned fire, but her inability to steer and her list to port severely affected her shooting accuracy. Her low speed of 11 kn (13 mph; 20 km/h) also made her an easy target and she was soon hit several times by the large guns of the British battleships, with the heavy cruisers Norfolk and Dorsetshire adding their firepower later, after Bismarck's heavy guns had all been put out of action. One 16-inch (406 mm) salvo from Rodney destroyed the forward control post, killing most of the senior officers, while other salvoes destroyed all four gun turrets. Within 30 minutes, Bismarck's guns had all been silenced, and the ship was even lower in the water. Rodney now closed to point-blank range (approximately 3 km (1.9 mi)) to fire into the superstructure while King George V fired from further out; so her fire would strike Bismarck from a more vertical angle and be more likely to penetrate the decks.
Bismarck continued to fly its ensign. The battleship's upper works were almost completely destroyed and although her engines were still functioning, she was slowly settling by the stern from uncontrolled flooding with a 20 degree list to port. She no longer had any functioning guns, so First Officer Hans Oels ordered the men below decks to abandon ship; he instructed the engine-room crews to open the ship's watertight doors and prepare scuttling charges.[16][17] Gerhard Junack, the chief engineering officer, primed the charges and ordered the crew to abandon the ship.[4] Junack and his comrades heard the demolition charges detonate as they made their way up through the various levels.[18] Most of the crew went into the water, but few sailors from the lower engine spaces got out alive.
With no sign of surrender, despite the unequal struggle, the British were loath to leave Bismarck. Their fuel and shell supplies were low – a demonstration of how difficult it was for a battleship to sink a similar unit even in an unbalanced engagement. However, when it became obvious that their enemy could not reach port, Rodney, King George V and the destroyers were sent home. Norfolk had used her last torpedoes; therefore, Dorsetshire launched three torpedoes at comparatively short range, at least one of which impacted on the superstructure as Bismarck was already largely underwater. Bismarck went under the waves at 10:39 that morning.
_image_03_Bismarck.JPG)
Dorsetshire and Maori attempted to rescue survivors, but a U-boat alarm caused them to leave the scene after having rescued only 110 Bismarck sailors, abandoning the majority of Bismarck's 2,200-man crew to the mercy of the water. The next morning, U-74, dispatched to try to rescue Bismarck’s logbook (and which heard sinking noises from a distance), picked up three survivors and the German weather ship Sachsenwald picked up two survivors.
Aftermath
After the sinking, Admiral John Tovey said, "The Bismarck had put up a most gallant fight against impossible odds worthy of the old days of the Imperial German Navy, and she went down with her colours flying."
The Board of the Admiralty issued a message of thanks to those involved:
Their Lordships congratulate C.-in-C., Home Fleet, and all concerned in the unrelenting pursuit and successful destruction of the enemy's most powerful warship. The loss of H.M.S. Hood and her company, which is so deeply regretted, has thus been avenged and the Atlantic made more secure for our trade and that of our allies.From the information at present available to Their Lordships there can be no doubt that had it not been for the gallantry, skill, and devotion to duty of the Fleet Air Arm in both Victorious and Ark Royal, our object might not have been achieved.[19]
Unaware of the fate of the ship, Group West, the German command base, continued to issue signals to Bismarck for some hours, until Reuters reported news from Britain that the ship had been sunk. In Britain, the House of Commons was informed of the sinking early that afternoon.[20]
After the battle, the British warships returned to the United Kingdom with 111 Bismarck survivors. One died later of his wounds. After a period of interrogation and processing, the survivors spent the rest of the war as prisoners. No British ship was sunk during this action, but the destroyer HMS Mashona was sunk by the Luftwaffe during the subsequent withdrawal the following day.
Timing of the sinking was fortunate for the United Kingdom government. Publicity concerning Bismarck distracted public attention from the heavy losses suffered by the Mediterranean fleet during the Battle of Crete, where cruisers HMS Calcutta, HMS Fiji, HMS Gloucester, and six destroyers were sunk; and damage to the aircraft carrier HMS Formidable, battleships HMS Barham and HMS Warspite, and cruisers HMS Ajax, HMS Orion, HMAS Perth and HMS Dido, reduced the effective eastern Mediterranean strength of the Royal Navy to two battleships and three cruisers to oppose the four battleships and eleven cruisers of the Italian Navy.[21]
Order of Battle
Axis
- German battleship Bismarck
Allied
- The British battleships King George V and Rodney.
- The British aircraft carrier Ark Royal
- The British heavy cruisers Norfolk and Dorsetshire.
- The British light cruiser Sheffield.
- The British destroyers Cossack, Sikh, Zulu, Maori, Mashona, Tartar
- The Polish destroyer ORP Piorun
Neutral
- Spanish heavy cruiser Canarias (attempted to rescue some survivors from Bismarck)
See also
- Operation Rheinübung, the intended mission of Bismarck and Prinz Eugen
- Sink the Bismarck!, a 1960 film based on C. S. Forester's book The Last Nine Days of the Bismarck
- "Sink the Bismarck", a 1960 song by Johnny Horton inspired by the film of the same name.
- Computer Bismarck, a 1980 computer game that simulates the battle.
- Unsinkable Sam, a ship's cat on board Bismarck who survived the sinking and was adopted by the Royal Navy.
Notes
- ↑ Grove, Battle Summary 5, paragraph 26: Bismarck fired 6 38 cm salvos at HMS Sheffield and 38 cm splinters caused 5 casualties.
- ↑ Bismarck’s complement as Fleet Flagship was 2220 (2092 + 128 Fleet staff) (Chesnau, p.224). For Operation Rheinubung she embarked over 100 supernumeraries, including merchant seamen to act as prize crews, cadets in training, and a film unit (Kennedy, p.33). The number of these supernumeraries, and hence the exact number of casualties, is unknown.
- ↑ Cameron, pp. 6-10.
- 1 2 Gaack & Carr, pp. 80–81
- ↑ Kennedy, pp. 206, 283.
- ↑ One of these survivors died of his injuries, while the remainder became prisoners of war.
- ↑ Zetterling & Tamelander, pp. 121–122
- ↑ BBC – WW2 People's War – World War Memories of an Ulster Childhood
- ↑ 4 November 2009, Bismarck: British/American Cooperation and the Destruction of the German Battleship, Naval History and Heritage Command
- ↑ Brown, p.34
- ↑ "Bismarck's· Final· Battle· -· Part· 2". navweaps.com. Retrieved 26 July 2016.
- ↑ Garzke & Dulin, p. 235
- ↑ Garzke & Dulin, pp. 235-236
- ↑ Jackson 2002, p. 91.
- ↑ Barnett, 311.
- ↑ Bercuson & Herwig, pp. 292-294
- ↑ Cameron, p.51: "...Late in the final engagement, theBismark was defeated, sinking as the result of uncontrollable progressive flooding, and virtually defenseless. The Executive Officer, CDR Hans Oels, ordered the scuttling of the ship − “Measure V [V = ‘Versunken’]” − and the charges were detonated shortly after 1020."
- ↑ Zetterling & Tamelander, p. 281
- ↑ "Congratulations to the Fleet". The Times (48938). 29 May 1941. p. 4. Retrieved 19 October 2010.
- ↑ "WAR SITUATION.".
- ↑ Pack, S. W. C. The Battle for Crete (1973) ISBN 0-87021-810-7 p.91
References
- Bercuson, David J. and Holger H. Herwig. The Destruction of the Bismarck. Woodstock and New York: The Overlook Press, 2001. ISBN 1-58567-192-4.
- Brown, J. D. (1968). Carrier Operations in World War II. Shepperton, UK: Ian Allen. ISBN 978-0-7110-0040-7.
- Cameron J., Dulin R., Garzke W., Jurens W., Smith K.,The Wreck of DKM Bismarck A Marine Forensics Analysis
- Chesnau, Roger (Ed.) Conway's All the World's Fighting Ships, 1922–1946. Conway Maritime Press, 1980. ISBN 0-85177-146-7
- Dewar, A.D. Admiralty report BR 1736: The Chase and Sinking of the “Bismarck”. Naval Staff History (Second World War) Battle Summary No. 5, March 1950. Reproduced in facsimile in Grove, Eric (ed.), German Capital Ships and Raiders in World War II. Volume I: From “Graf Spee” to “Bismarck”, 1939–1941. Frank Cass Publishers 2002. ISBN 0-7146-5208-3
- Jackson, Robert (2002). The Bismarck. London: Weapons of War. ISBN 978-1-86227-173-9.
- Garzke, William; John Dulin (1990). Battleships: Axis and Neutral Battleships in World War II. Annapolis: Naval Institute Press. ISBN 978-0-87021-101-0.
- Kennedy, Ludovic. Pursuit: The sinking of the Bismarck. William Collins Sons & Co Ltd 1974. ISBN 0-00-211739-8
- Müllenheim-Rechberg, Burkard von. Battleship Bismarck: A Survivor’s Story. Triad/Granada, 1982. ISBN 0-583-13560-9.
- Schofield, B.B. Loss of the Bismarck. Ian Allan Ltd 1972. ISBN 0-7110-0265-7
- Tovey, Sir John C. SINKING OF THE GERMAN BATTLESHIP BISMARCK ON 27™ MAY, 1941.
- Zetterling, Niklas; Tamelander, Michael (2009). Bismarck: The Final Days of Germany's Greatest Battleship. Drexel Hill: Casemate.