2/10th Battalion (Australia)
| 2/10th Battalion | |
|---|---|
|
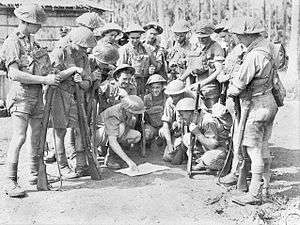
Soldiers from the 2/10th prepare for a patrol, Milne Bay, September 1942 | |
| Active | 1939–45 |
| Country | Australia |
| Branch | Australian Army |
| Type | Infantry |
| Size | ~800–900 men[Note 1] |
| Part of | 18th Brigade, 7th Division |
| Colours | Purple over Light blue |
| Engagements | |
| Commanders | |
| Notable commander | Thomas Daly |
| Insignia | |
| Unit Colour Patch |
|
The 2/10th Battalion ("The Adelaide Rifles") was an infantry battalion of the Australian Army that was raised for overseas service as part of the all volunteer Second Australian Imperial Force (2nd AIF) during World War II. Formed in October 1939, it was the first 2nd AIF unit raised from the state of South Australia during the war; after completing a period of training in Australia, the battalion embarked for overseas. Initially, it had been intended that the 2/10th and its parent brigade – the 18th Brigade – would be sent to the Middle East to join the other brigades of the 6th Division, but instead the 18th Brigade was sent to the United Kingdom, to help strengthen the garrison there after France capitulated in mid-1940. Reassigned to the 9th Division, the 2/10th remained in the United Kingdom undertaking defensive duties until late 1940 when it finally arrived in the Middle East, where the 18th Brigade became part of the 7th Division.
The battalion's first experience of combat came during an attack against the Italian garrison at Giarabub in March 1941. This was followed by defensive actions during the Siege of Tobruk later in the year before the 2/10th joined the Allied garrison in Syria. In early 1942, following Japan's entry into the war, the 2/10th was withdrawn to Australia and in August 1942, at the height of the Japanese advance in the Pacific, the battalion was committed to the fighting around Milne Bay, suffering heavy casualties in their debut in the Pacific. Further fighting came during the Battle of Buna–Gona before the 2/10th was brought back to Australia for reorganisation in March 1943. In August 1943, they returned to New Guinea, first undertaking jungle training near Port Moresby and then, in December 1943, moving inland into the Finisterre Mountains where they later fought the Battle for Shaggy Ridge. After being withdrawn to Australia in mid-1944, the battalion did not take part in further fighting until the final months of the war when they were committed to the fighting on Balikpapan in July 1945. At the conclusion of hostilities, the 2/10th Battalion was disbanded in December 1945.
History
Formation and training in Australia
The 2/10th Battalion[Note 2] was established at the Wayville Showgrounds, in Adelaide, on 13 October 1939,[3] as part of the all volunteer Second Australian Imperial Force (2nd AIF), which was raised in Australia shortly after the outbreak of the war for overseas service. Organised into four rifle companies, designated 'A' through to 'D', and a headquarters company,[4] the 2/10th was the first 2nd AIF unit raised from the state of South Australia during the war,[Note 3] and was colloquially known as "The Adelaide Rifles".[6] The colours chosen for the battalion's Unit Colour Patch (UCP) were the same as those of the 10th Battalion, a unit which had served during World War I before being raised as a Militia formation in 1921. These colours were purple over light blue, in a horizontal rectangular shape, although a border of gray was added to the UCP to distinguish the battalion from its Militia counterpart.[7]
Along with the 2/9th, 2/11th and 2/12th Battalions, the 2/10th was under the command of the 18th Brigade, which was recruited from the less populous states of Queensland, Western Australia, South Australia and Tasmania, and was initially allocated to the 6th Division, the first of the 2nd AIF's four infantry divisions.[3] Under the command of Lieutenant Colonel Arthur Verrier – a World War I veteran who had served in the 10th and 50th Battalions[8] – after the battalion's recruits had concentrated at Wayville, the 2/10th carried out initial training in the Adelaide Hills to the city's east at Woodside Camp, before moving to New South Wales on the east coast of Australia where further training was completed at Greta Camp and then Ingleburn. In early May 1940, the battalion was ready to deploy overseas,[3] and embarked on the transport ship Mauretania, which departed Sydney on 5 May 1940, bound for the Middle East.[9]
Garrison duties in United Kingdom
On 10 May 1940, after the 2/10th had departed Australia, the Germans launched a lightning assault across France and the Low Countries, which rapidly led to the capitulation of France and the evacuation of the British Expeditionary Force. Amidst concerns about a possible invasion of the United Kingdom, the Australian government decided to divert some of its troops from the Middle East. As a consequence, as the 18th Brigade was sailing towards the Middle East it was redirected to the United Kingdom. On 18 June 1940, the Mauretania docked at the port of Gourock, in Scotland. The brigade was subsequently reallocated to the 9th Division and the Australians were transported to the south of England, eventually establishing themselves around Lopcombe Corner, on Salisbury Plain, in Wiltshire.[3] While there, a number of the battalion's personnel married local girls.[10]
Amidst the backdrop of the Battle of Britain, while stationed on Salisbury Plain the battalion carried out garrison duties and undertook training to enable them to rapidly respond in the event that an invasion took place. They received a large amount of new equipment during this time to improve their mobility, including new Universal carriers, weapons and lightweight personal load carrying equipment.[11] They also experienced German air attacks for the first time, and on 8 July 1940, the battalion incurred its first casualty when one of its members was wounded in an air raid.[3] In early October, the 2/10th undertook a large-scale exercise near Tidworth, and then in the middle of the month, as winter set in they were moved to Colchester, where they replaced the tents they had been living in with the stone buildings and Nissen huts of Hyderabad Barracks.[12] The battalion's stay there was short-lived, though, for the following month, after the threat of invasion had passed, the order arrived for the Australians to embark for the Middle East.[3][13] The 2/10th subsequently entrained at Colchester in mid-November and moved north to Scotland where, on 17 November, they boarded the Straithaird.[14]
Fighting in the Middle East
Having made the journey to Egypt travelling via South Africa and the Red Sea due to the threat of attack that was present in the Mediterranean, the battalion arrived just before New Years.[15] The 18th Brigade was again reassigned in February 1941, this time to the 7th Division, with whom they would see out the remainder of the war; at the same time, the brigade was converted from a four-battalion structure to three, and the 2/11th was transferred to help form the 19th Brigade.[16] On 21 March 1941, the battalion undertook its first ground action of the war, when one of its companies – 'D' Company – supported the 2/9th Battalion in their attack on the Italian held fort at Giarabub. The battalion's first major action as a complete unit did not come until April 1941, though, when it undertook defensive actions during the Siege of Tobruk. During the Battle of the Salient, fought in early May, the 2/10th took over a position on the northern flank of the perimeter, relieving the 2/48th Battalion, coming under heavy air attack during the handover.[17]
After the initial German and Italian assault, on the evening of 3/4 May the 18th Brigade counter-attacked to retake positions lost; the 2/10th was given a supporting role, tasked with carrying out raids deep into the opposing forces' territory while the 2/9th and 2/12th Battalions attacked the shoulders of the salient. In the fighting that followed, the 2/10th's casualties were six missing and 15 wounded, but they inflicted heavy casualties upon their enemy before withdrawing back to the "Blue Line".[18] After the fighting in early May, the 2/10th was withdrawn to Pilastrino for a brief respite and placed in reserve,[19] but by the middle of May, they had returned to the salient, and on 16 May advanced the line over 1,000 yards (910 m).[20] The 2/10th carried out further raids in "no man's land" as the siege continued,[21] but in August the battalion was withdrawn to Palestine for training. In September 1941, the 2/10th were sent to Syria where they were assigned to the Allied garrison that had occupied the country following the conclusion of the Syria–Lebanon campaign and the defeat of the Vichy French forces there,[3] in order to defend against a possible German attack from the Caucasus towards the strategically important Middle Eastern oilfields. During this time, the 2/10th Battalion was stationed near Aleppo, where the battalion manned outposts near the Syrian–Turkish border across a frontage that was several hundred miles long.[22][23]
New Guinea campaigns
The 2/10th remained in Syria until January 1942 when, after having endured a freezing cold winter that included snow,[24] it was transported back to Palestine in preparation for a return to Australia.[3] Following Japan's entry into the war the previous December, and in light of Allied reverses in the Pacific, the Australian government had requested the return of some of its forces in order to bolster the defence of Australia due to concerns about a possible invasion.[25] The 2/10th subsequently embarked on the Dutch passenger ship, Nieuw Amsterdam,[26] bound for Australia in early February 1942. Stopping over in Bombay, the battalion was transferred to the transport Nevassa on which they continued the journey to Adelaide where they arrived in late March,[3][27] after which a period of reorganisation and training followed around Kilcoy in Queensland, before the battalion was committed to its next campaign: New Guinea. Following Japanese landings on the north coast of New Guinea in July, Australian forces in the area had been fighting a desperate holding action, which had seen them being pushed inexorably towards Port Moresby. By early August 1942, the situation for the Australians was critical.[28]

On 5 August, the 2/10th embarked on the Dutch transport Both.[29] A week later, on 12 August, the 2/10th, along with the other two infantry battalions of the 18th Brigade, landed at Milne Bay, in Papua where they reinforced the militiamen from the 7th Brigade who were defending the area; a fortnight later the Japanese landed a force at Milne Bay in an attempt to secure the airfields that the Australians had built there.[30] In the ensuing Battle of Milne Bay, the Australians eventually won a significant victory, but the 2/10th suffered heavily, losing 43 killed and 26 wounded.[31] In October, the 2/10th was flown to Wanigela, near the Papuan coast, where they were tasked with carrying out patrols and defending the beach against a possible Japanese landing, and helping to construct an airfield. The battalion's next major action came in late December 1942 during the Battle of Buna–Gona, after being transported by sea to the beachhead front, arriving just south of Cape Endaiadere.[32] Heavily engaged around the disused Buna airstrip where the Japanese had constructed several bunkers,[33] in a fortnight of fighting, the battalion suffered over 300 casualties, including 112 killed. Another attack was made around Sanananda in mid-January 1943, before the 2/10th was withdrawn from the fighting, flying to Port Moresby in February and then embarking upon the transport The Willis Van Devander on 10 March to return to Australia,[3] landing in Cairns on 12 March.[34]
After establishing itself around Ravenshoe, Queensland, the next three months was a period of flux for the battalion, with many men taking leave or being discharged due to tropical diseases or injuries from the previous campaign. The battalion was brought up to strength with a large draft of volunteers from the 11th Motor Regiment, a motorised Militia light horse unit consisting largely of Queenslanders and New South Welshmen.[35] A period of rest and reorganisation followed during which the units of the 2nd AIF were converted to the Jungle Division establishment.[36] After this, large scale divisional manoeuvres took place in mid-July, after which the battalion received orders to sail for overseas again. Embarking upon the transport Canberra from Townsville, they arrived in Port Moresby in early August.[37] After a period in which the 18th Brigade was held back in reserve at Port Moresby to defend the approaches to Lae,[38] in December 1943 the 2/10th was sent into the Finisterre Mountains, where they joined the rest of the 7th Division whose campaign through the Markham and Ramu Valleys had culminated in heavy fighting around Shaggy Ridge during the first months of 1944.[39] This proved to be the most significant action for the 2/10th and in May 1944 they withdrawn to Australia,[3] being transported home on the Duntroon.[40]
Borneo and disbandment
A period of leave followed, after which the battalion reconstituted in July 1944 and went into camp at around Samsonvale, near Brisbane. In August, they took part in a march through Brisbane, before travelling north to Cairns in September, from where they moved to Kairi, near Tolga.[41] A large number of reinforcements arrived at this time, as the battalion was severely undermanned due to transfers or discharges from injuries or illnesses.[42] After this, the 2/10th began a long period of training. As a result of indecision about the employment of Australian troops in the latter part of the war, they spent over a year waiting for their final campaign. This came in the final months of the war when they were committed to the fighting on Borneo. Staging out of Morotai Island, early on the morning of 1 July 1945 they came ashore at Balikpapan as part of Operation Oboe Two.[43] After landing they fought to wrest control of the high ground to the west of the beachhead – dubbed "Parramatta Ridge"[44] by the Australians – prior to fighting around the town of Balikpapan itself. On 6 July they were withdrawn from the fighting, and placed in brigade reserve; the fighting for Parramatta cost the 2/10th fifteen killed and 41 wounded.[45]
Although the battalion undertook a series of local patrols after this, the fighting around Parramatta constituted the last of the 2/10th's major actions of the war. After the hostilities ended in mid-August following Japan's surrender, the battalion's personnel were slowly repatriated back to Australia in drafts for demobilisation and discharge. Some chose to remain in the Army, with a group of about 70 being transferred to other units for subsequent service in the 34th Brigade, which had been formed to undertake occupation duties in Japan as part of the British Commonwealth Occupation Force.[46] The battalion was finally disbanded on 29 December 1945 while still at Balikpapan; upon disbandment there were only 42 members of the battalion left for the 2/10th's final parade, during which the battalion flag was entrusted to the Militia 10th Battalion,[47] which had served briefly in a garrison role in Australia during the war and which was subsequently re-raised in South Australia after the war.[48][49]
Throughout the course of the war, a total of 3,008 men served with the 2/10th Battalion[50] of whom 315 were killed or died on active service, and 525 wounded.[3][Note 4] Members of the battalion received the following decorations: two Distinguished Service Orders, one Member of the Order of the British Empire, seven Military Crosses, six Distinguished Conduct Medals, 14 Military Medals and 51 Mentions in Despatches.[3]
Battle honours
The 2/10th was awarded the following battle honours:
- North Africa, Defence of Tobruk, The Salient 1941, South-West Pacific 1942–1945, Buna–Gona, Cape Endaiadere–Sinemi Creek, Sanananda–Cape Killerton, Milne Bay, and Liberation of Australian New Guinea.[3]
These honours were subsequently entrusted to the 10th Battalion in 1961, and through this link are maintained by the Royal South Australia Regiment.[52]
Commanding officers
The following officers commanded the 2/10th during World War II:[3]
- Lieutenant Colonel Arthur Verrier (1939–41);[8]
- Lieutenant Colonel Lionel Bruer (1941–42);[53]
- Lieutenant Colonel James Dobbs (1942–43);[54]
- Lieutenant Colonel Charles Geard (1943–44);[55]
- Lieutenant Colonel Thomas Daly (1945).[56]
Notes
- Footnotes
- ↑ By the start of World War II, the authorised strength of an Australian infantry battalion was 910 men all ranks, however, later in the war it fell to 803.[1]
- ↑ The numerical designation of 2nd AIF units was prefixed by "2/", which was used to set them apart from Militia units with corresponding numerical designations.[2]
- ↑ A number of the battalion's initial volunteers were also recruited from Broken Hill, in outback New South Wales.[5]
- ↑ Allchin provides slightly different figures: 304 dead from all causes including 230 killed in action and 522 wounded.[51]
- Citations
- ↑ Palazzo 2004, p. 94.
- ↑ Long 1952, p. 51.
- 1 2 3 4 5 6 7 8 9 10 11 12 13 14 15 "2/10th Battalion". Second World War, 1939–1945 units. Australian War Memorial. Retrieved 6 September 2014.
- ↑ Allchin 1958, p. 39.
- ↑ Allchin 1958, p. 3.
- ↑ Allchin 1958, cover.
- ↑ Long 1952, pp. 321–323.
- 1 2 "SX1445 Lieutenant Colonel Arthur Drummond Verrier". People. Australian War Memorial. Retrieved 6 September 2014.
- ↑ Allchin 1958, pp. 40–41.
- ↑ Allchin 1958, p. 80.
- ↑ Allchin 1958, p. 72.
- ↑ Allchin 1958, p. 87.
- ↑ Johnston 2005, pp. 4–6.
- ↑ Allchin 1958, p. 95.
- ↑ Allchin 1958, p. 103.
- ↑ Johnston 2005, pp. 2–3.
- ↑ Wilmot 1993, pp. 142 & 146.
- ↑ Wilmot 1993, pp. 149–151.
- ↑ Maughan 1966, p. 236.
- ↑ Wilmot 1993, pp. 184–185.
- ↑ Wilmot 1993, p. 227.
- ↑ Allchin 1958, p. 224.
- ↑ Johnston 2005, p. 71.
- ↑ Allchin 1958, p. 227.
- ↑ Keogh 1965, p. 85.
- ↑ Allchin 1958, p. 230.
- ↑ Allchin 1958, pp. 231–234.
- ↑ Keogh 1965, pp. 183–185.
- ↑ Allchin 1958, p. 243.
- ↑ Keogh 1965, pp. 186–191.
- ↑ Allchin 1958, p. 263.
- ↑ Allchin 1958, p. 282.
- ↑ Allchin 1958, p. 283.
- ↑ Allchin 1958, pp. 338–339.
- ↑ Allchin 1958, pp. 339–340.
- ↑ Johnston 2005, p. 165.
- ↑ Allchin 1958, p. 341.
- ↑ Bradley 2004, p. 179.
- ↑ Keogh 1965, p. 352.
- ↑ Allchin 1958, p. 352.
- ↑ Allchin 1958, p. 353–356.
- ↑ Allchin 1958, p. 353.
- ↑ Allchin 1958, p. 371.
- ↑ Allchin 1958, p. 373.
- ↑ Allchin 1958, pp. 385–386.
- ↑ Allchin 1958, pp. 389–390.
- ↑ Allchin 1958, p. 294.
- ↑ Rayner 1995, pp. 352 & 360.
- ↑ Festberg 1972, p. 69.
- ↑ Johnston 2005, p. 248.
- ↑ Allchin 1958, p. 417.
- ↑ Festberg 1972, pp. 31 & 69.
- ↑ "SX1432 Lieutenant Colonel Lionel Gregory Bruer". People. Australian War Memorial. Retrieved 6 September 2014.
- ↑ "SX2929 Lieutenant Colonel James Gordon Dobbs". People. Australian War Memorial. Retrieved 6 September 2014.
- ↑ "TX2013 Major Charles John Geard". People. Australian War Memorial. Retrieved 6 September 2014.
- ↑ "45 (SX1436) (SP 15209) / Lieutenant General Thomas Joseph Daly". People. Australian War Memorial. Retrieved 6 September 2014.
References
- Allchin, Frank (1958). Purple and Blue: The History of the 2/10th Battalion, A.I.F. (The Adelaide Rifles) 1939–1945. Adelaide, South Australia: The Griffin Press. OCLC 216184863.
- Bradley, Phillip (2004). On Shaggy Ridge—The Australian Seventh Division in the Ramu Valley: From Kaiapit to the Finisterres. South Melbourne, Victoria: Oxford University Press. ISBN 0-19-555100-1.
- Festberg, Alfred (1972). The Lineage of the Australian Army. Melbourne, Victoria: Allara Publishing. ISBN 978-0-85887-024-6.
- Johnston, Mark (2005). The Silent 7th: An Illustrated History of the 7th Australian Division 1940–46. Crows Nest, New South Wales: Allen & Unwin. ISBN 1-74114-191-5.
- Keogh, Eustace (1965). South West Pacific 1941–45. Melbourne, Victoria: Grayflower Publications. OCLC 7185705.
- Long, Gavin (1952). To Benghazi. Australia in the War of 1939–1945. Series 1 – Army. I (1st ed.). Canberra, Australian Capital Territory: Australian War Memorial. OCLC 18400892. Retrieved 22 December 2015.
- Maughan, Barton (1966). Tobruk and El Alamein. Australia in the War of 1939–1945. Series 1 – Army, Volume III (1st ed.). Australian Capital Territory: Australian War Memorial. OCLC 60439166.
- Palazzo, Albert (2004). "Organising for Jungle Warfare". In Dennis, Peter; Grey, Jeffrey. The Foundations of Victory: The Pacific War 1943–1944. Canberra, Australian Capital Territory: Army History Unit. pp. 86–102. ISBN 978-0-646-43590-9.
- Rayner, Robert (1995). The Army and the Defence of Darwin Fortress. Plumpton, New South Wales: Rudder Press. ISBN 0-646-25058-2.
- Wilmot, Chester (1993) [1944]. Tobruk 1941. Ringwood, New South Wales: Penguin Books Australia. ISBN 0-14-017584-9.