British B-class submarine
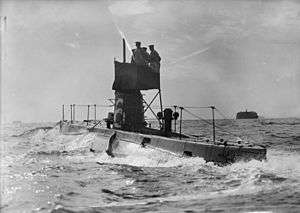 B6 in the Solent; note the compass binnacle mounted on the quarterdeck. A canvas screen has been rigged on her small conning tower platform. | |
| Class overview | |
|---|---|
| Builders: | Vickers |
| Operators: |
|
| Preceded by: | A-class |
| Succeeded by: | C-class |
| Cost: | £47,000 |
| Built: | 1904–1906 |
| In service: | 1905–18 |
| In commission: | 1905–18 |
| Completed: | 11 |
| Lost: | 2 |
| Scrapped: | 9 |
| General characteristics | |
| Type: | Submarine |
| Displacement: |
|
| Length: | 142 ft 2.5 in (43.3 m) |
| Beam: | 12 ft 7 in (3.8 m) |
| Draught: | 11 ft 2 in (3.4 m) |
| Installed power: | |
| Propulsion: |
|
| Speed: |
|
| Range: | 1,000 nmi (1,900 km; 1,200 mi) at 8.7 kn (16.1 km/h; 10.0 mph) on the surface |
| Test depth: | 100 feet (30.5 m) |
| Complement: | 15 |
| Armament: | 2 × 18 in (450 mm) bow torpedo tubes |
The B class was a class of 11 submarines, built by Vickers in Barrow-in-Furness for the Royal Navy, and launched in 1904–06. One boat was sunk by a collision in 1912, but the remainder served in World War I. Three boats protected the transfer of the British Expeditionary Force to France in 1914, but were soon relegated to local defence and training duties. Six submarines were in the Mediterranean when the war began and were quickly sent to the Dardanelles to prevent a breakout by the German battlecruiser SMS Goeben and the light cruiser SMS Breslau into the Eastern Mediterranean. B11 ventured into the Dardanelles in December 1914 and sank the elderly Turkish ironclad Mesudiye.
The arrival of more modern submarines to blockade the Dardanelles made the B-class boats redundant and they were mostly withdrawn to Malta in 1915. They were transferred to Venice after Italy entered the war, where B10 became the first submarine to be sunk by air attack in 1916. The B-class submarines were transferred back to Malta in late 1916 as they were no longer deemed suitable for combat. In mid-1917 they were converted to surface patrol boats and sent to patrol the Otranto Barrage. They proved to be unreliable and were soon sent back to Malta where they were finally paid off. Only B3 was still in commission when the war ended and that was only because it was being used for experimental work and serving as a target to train anti-submarine forces. All surviving boats were sold for scrap in 1919–21.
Design and description
The B-class boats were similar in design to the preceding A class and intended for coastal patrol work. The boats had a petrol engine for surface propulsion and batteries for underwater propulsion. The design was intended to overcome the limitations of speed, endurance and seakeeping that affected the boats of the A class, and the boats were substantially larger than the earlier class. The B-class submarines were 142 feet 2.5 inches (43.3 m) long overall. They had a beam of 12 feet 7 inches (3.8 m) and a draught of 11 feet 2 inches (3.4 m). They displaced 287 long tons (292 t) on the surface and 316 long tons (321 t) submerged. The boats were over 40 feet (12.2 m) longer, slightly wider, and displaced more than 120 long tons (120 t) more than the older boats. Their additional size increased their buoyancy and made them far less liable to unexpectedly plunge beneath the surface in bad weather. The addition of a deck casing above the hull also improved their seakeeping abilities.[1]
Diving planes were initially only fitted at the stern, but additional planes were mounted on the conning tower during construction of B1, B2, and B3; B4 was not fitted with them and it is uncertain if the remaining boats received them during construction. These greatly improved the boats' depth-keeping, surfacing and diving abilities compared to the A-class boats. These were later exchanged for bow planes; the last boat to receive them was B6, which did not get hers until January 1916. The B-class submarines lacked any internal bulkheads which exposed the crew to the petrol engine's exhaust fumes. In fact mice were used to detect any concentrations of carbon monoxide inside the hull.[2] Ventilation was provided for the batteries, but none for the crew's living area. No accommodations were provided for the crew and they were forced to improvise while at sea.[3] In recognition of this issue, the crew's endurance was only expected to be four days during the summer and three days during the winter.[4]
The submarines' hulls were tested to a nominal depth of 100 feet (30.5 m) by filling the hull with water and subjecting it to a pressure of 35 psi (241 kPa; 2 kgf/cm2), but the maximum operational depth was considered to be 50 feet (15.2 m). Nonetheless several boats safely dived to 95 feet (29.0 m) during World War I. It took about three minutes to dive the boat due to the shape of the boat and that it could dive out of control if water was pumped into the ballast tanks too quickly.[5] Submerged endurance was officially considered to be 10 hours, but several boats were submerged for 16 hours during the war.[4]
Propulsion
The B-class submarines had a single 16-cylinder petrol engine that had a designed output of 600 horsepower (450 kW) and drove a single propeller. This engine was developed by Vickers from the 450-horsepower (340 kW) Wolseley engine used in the A class. Submerged the submarine used an electric motor powered by 159 battery cells at a working voltage of only 100 volts. This originally lasted only three hours and 45 minutes at full speed, but this time was continually increased over the career of the boats as more powerful batteries were fitted.[5]
On the surface the petrol engine gave a top speed of 12 knots (22 km/h; 14 mph) while the maximum speed submerged was 6.5 knots (12.0 km/h; 7.5 mph). This was about the same speed surfaced as the older submarines, but the B-class boats were about 1 knot (1.9 km/h; 1.2 mph) slower underwater. They carried a maximum of 15.5 long tons (15.7 t) of petrol that provided a range of 740 nautical miles (1,370 km; 850 mi) at a speed of 8.7 knots (16.1 km/h; 10.0 mph).[6]
Armament
The B-class boats were armed with a pair of 18-inch (457 mm) torpedo tubes side-by-side in the bow and angled slightly downwards. Space was provided for a pair of reloads, but the addition of extra equipment over the years meant that they could only be carried if an equivalent weight of fuel was discarded.[7] By the start of World War I the boats could carry the 18-inch Mark VIII torpedo which had two speed and range settings. At 35 knots (65 km/h; 40 mph) the torpedo had a range of 2,500 yards (2,300 m), but a range of 4,000 yards (3,700 m) at 29 knots (54 km/h; 33 mph). It had a warhead that consisted of 320 pounds (150 kg) of TNT.[8]
History
Each submarine was built by Vickers at their Barrow-in-Furness shipyard. B1 was originally ordered as A14 in the 1903–04 Naval Programme, but it was cancelled and reordered as the first boat of the new class. The remaining 10 boats were ordered as part of the 1904–05 Programme.[5]
| Ship | Launched | Completed | Fate |
|---|---|---|---|
| B1 | 25 October 1904 | 16 April 1905 | Sold for scrap 25 August 1921 |
| B2 | 19 August 1905 | 9 December 1906 | Sunk after collision with SS Amerika 10 April 1911 |
| B3 | 31 October 1905 | 19 January 1906 | Sold for scrap 20 December 1919 |
| B4 | 14 November 1905 | 28 January 1906 | Sold for scrap 1 April 1919 |
| B5 | 14 November 1905 | 25 February 1906 | Sold for scrap 25 August 1921 |
| B6 | 30 November 1905 | 3 March 1906 | Sold for scrap 1919 |
| B7 | 30 November 1905 | 27 March 1906 | Sold for scrap 31 October 1919 |
| B8 | 23 January 1906 | 10 April 1906 | Sold for scrap 1919 |
| B9 | 26 January 1906 | 28 April 1906 | Sold for scrap 1919 |
| B10 | 28 March 1906 | 31 May 1906 | Sunk 9 August 1916 by aircraft; later raised and sold |
| B11 | 24 February 1906 | 11 July 1906 | Sold for scrap 1919 |
In mid-1912 most of the B-class submarines were transferred to the Mediterranean. B6, B7, and B8 were sent to Gibraltar while B9, B10 and B11 sailed for Malta. B1, B2, B3, B4, and B5 remained in the United Kingdom, the latter four assigned to the 3rd Submarine Flotilla. During exercises in October 1912 off Dover with the 6th and 7th Torpedo Boat Flotillas B2 was rammed amidships by the German passenger liner SS Amerika on 4 October 1912. Cut nearly in half, she sank almost immediately and only one man was rescued by the submarine C16.[9]
World War I
Home waters
By the beginning of World War I, B3, B4, and B5 were at Dover and were deployed on a line between Calais and the Goodwin Sands to protect the passage of the British Expeditionary Force to France. Each submarine would sail from Dover before dawn to be secured at the buoy marking their billet at dawn, the idea being that they would be able to slip from the buoy when they spotted an enemy ship and manoeuvre to attack. That this was not a good tactic was proved when B3 narrowly avoided a torpedo from a German U-boat on the morning of 2 October. Nonetheless the scheme was successful and the BEF crossed to France without loss.[9]
B1 remained at Portsmouth for local defence and training duties through 1916 before being paid off. B3 and B4 were transferred to Ardrossan by the end of 1915 to relieve two even more obsolescent A-class boats on local defence duties in the Firth of Clyde. B3 was transferred to Leith during mid-1916 where she was fitted with an experimental hull-mounted directional hydrophone system and later sent to Rosyth in 1917 where she was used as either a target to train anti-submarine forces or experimental work for the rest of the war. B4 was paid off before the end of 1916. B5 moved to Portsmouth during 1915 where she too was paid off before the end of 1916.[10][11]
Mediterranean waters
The three Malta-based boats were sent to the Dardanelles in mid-September 1914 to prevent a sortie by the German battlecruiser SMS Goeben and the light cruiser SMS Breslau into the Eastern Mediterranean. The entrance to the Dardanelles was patrolled from dawn to dusk by these boats as well as four French submarines which arrived later. Neither the British nor the French submarines had enough battery power or underwater speed to combat the south-flowing currents in the Dardanelles to reach the Sea of Marmara, but B11 was selected for a sortie that would attempt to penetrate as far as the town of Chanak, halfway up the Dardanelles, because she had the newest, and thus most powerful, batteries. Special guards were fitted over the forward diving planes to make sure that any mooring wires of mines would not get entangled and dragged down to the boat.[12]
On 13 December 1914, B11, commanded by Lieutenant Norman Douglas Holbrook, entered the Dardanelles during in the early morning. Shortly after departure one of the guards broke and began banging against the hull, making a lot of noise and vibration. Lieutenant Holbrook ordered the boat to the surface in an attempt to cut the guard loose even though the boat was in full view of the Turkish guns defending the entrance. They succeeded before dawn revealed their presence to the Turks and proceeded up the Dardanelles at a depth of 80 feet (24.4 m) to avoid the Turkish minefields. Two and a half hours later B11 came to periscope depth and Holbrook spotted the elderly Turkish ironclad Mesudiye. He fired one torpedo that struck the ship, which settled by the stern and then capsized. Before sinking, Mesudiye spotted B11 and fired on her periscope which revealed her position to the shore batteries. Attempting to leave the area, B11 briefly grounded herself, breaking the surface, but was able to get herself off. B11's compass became fogged and prevented the submarine from navigating at depth; instead Holbrook had to con the boat at periscope depth which meant he had to go through the minefields, not below them. Nevertheless, the boat made it back safely; Holbrook was awarded the Victoria Cross, his First Lieutenant, the Distinguished Service Order and every enlisted man the Distinguished Service Medal.[13]
B6 and B8 arrived from Gibraltar in mid-February 1915 as did B7 a month later. Other, more modern submarines followed, and several attempts were made to reach the Sea of Marmara. The British submarine E15 ran aground in April during one of these attempts and had to be abandoned. B6 was sent to destroy her with torpedoes to prevent the Turks from salvaging her. One of the torpedoes hit a barge alongside and the other torpedo missed. After running out of fuel it drifted down the Dardanelles and was recovered by the destroyer Scorpion which returned it to B6. B11 attempted again the following day, but was thwarted by fog.[14]
The B-class boats were deemed redundant once more capable submarines arrived in early 1915 and most returned to Malta. B6 and B11, however, were sent to Alexandria where they conducted patrols along the Libyan coast to prevent arms deliveries to rebellious tribesmen. During one incident on 16 August 1915 a party of Arabs and officers in European uniforms were spotted displaying a flag of truce. The two submarines anchored and Lieutenant Holbrook was rowed ashore to talk to them. They opened fire, killing one man and wounding three, including Holbrook. The submarines were soon withdrawn from this task as they were totally unsuitable for this duty, lacking any deck armament at all.[15]
Adriatic waters
In September 1915, after the Italian declaration of war on the Central Powers, the transfer of the B-class boats to the Adriatic was suggested by the Admiralty. Originally they were to be based at Brindisi, but this was changed to Venice as there were already 14 British and French submarines based at Brindisi. B4, B7, and B9 were the first to arrive, but B4 collided en route with the Italian tug escorting them and required immediate docking upon her arrival. B9 made the first patrol on 18 October and a total of 81 patrols were made by the B-class submarines before they ceased in October 1916. Nothing of note was directly accomplished by the submarines, but they fulfilled the ultimate goal of keeping the Austro-Hungarians from attacking the Italian coast.[16]
B11, now commanded by Lieutenant Gravener, encountered an Austro-Hungarian seaplane on 11 November that had been forced down by engine trouble. B11 attempted to engage the seaplane with the one Maxim gun she had aboard, but it jammed almost immediately and Gravener attempted to ram the aircraft. The Austrians managed to restart their engine, however, and flew off, easily avoiding Gravener's ramming attempt. On 17 January B11 encountered another seaplane with engine trouble. This time the Austrians were unable to repair their engine and were captured. B9 was spotted by an Austrian seaplane on 29 March and eventually forced to dive after both sides failed to damage each other with machine gun fire. B7 had a narrow escape off the Austrian naval base at Pola three months later when she was damaged by another seaplane that jammed her diving planes in the "hard to rise" position which meant she could not submerge until they were repaired. Both B8 and B11 were missed by torpedoes fired by Austrian submarines in early 1916. On one patrol the gear teeth of B11's steering mechanism were stripped which made the rudder loose and the boat unsteerable. Relieving tackles were rigged, despite the heavy seas, but they parted under the strain after 15 minutes. Slowly the boat began to drift towards the enemy coast, but a northwesterly breeze sprang up before dawn and the seas moderated which allowed her to make about 3 knots (5.6 km/h; 3.5 mph) by going astern. By this time she was overdue and the Italians began to search for her. She was towed back to Venice by an Italian destroyer that found her about mid-morning.[17]
B10 became the first submarine sunk by air attack when she was sunk on 9 August 1916 after a near-miss during an Austrian air raid. The bomb blew a hole about 6 feet (1.8 m) in diameter in her pressure hull. She was re-floated, but a fire gutted her while she was under repair and she was sold for scrap.[18]
The B-class boats had reached the limits of their usefulness and the survivors were withdrawn to Malta on 30 October where they were paid off pending a decision on their fate. In August 1917 the boats were converted at Malta to surface patrol boats with a raised wheelhouse, given a 3-inch (76 mm) 12-pounder gun and renamed S6 to S9, and S11. They were assigned to patrol the Otranto Barrage, but their age and small size worked against them and they were soon paid off at Malta where they were sold after the war.[18]
Notes
- ↑ Akermann, pp. 120, 123–24
- ↑ Wilson, pp. 40, 44
- ↑ Wilson, p. 44
- 1 2 Akermann, p. 124
- 1 2 3 Wilson, p. 40
- ↑ Akermann, pp. 120, 123
- ↑ Wilson, p. 43
- ↑ "British Torpedoes Pre-World War II". Navweaps.com. 12 January 2009. Retrieved 26 June 2010.
- 1 2 Wilson, pp. 74–75
- ↑ Akermann, p. 125
- ↑ Wilson, p. 75
- ↑ Wilson, pp. 75–76
- ↑ Wilson, p. 76
- ↑ Wilson, pp. 76–77
- ↑ Wilson, p. 77
- ↑ Wilson, pp. 77–78
- ↑ Wilson, pp. 78–79
- 1 2 Wilson, p. 79
References
- Akermann, Paul (2002). Encyclopaedia of British Submarines 1901–1955 (reprint of the 1989 ed.). Penzance, Cornwall: Periscope Publishing. ISBN 1-904381-05-7.
- Colledge, J. J.; Warlow, Ben (2006) [1969]. Ships of the Royal Navy: The Complete Record of all Fighting Ships of the Royal Navy (Rev. ed.). London: Chatham Publishing. ISBN 978-1-86176-281-8. OCLC 67375475.
- Gardiner, Robert & Gray, Randal, eds. (1984). Conway's All the World's Fighting Ships: 1906–1921. Annapolis, Maryland: Naval Institute Press. ISBN 0-85177-245-5.
- Harrison, A. N. (January 1979). "The Development of HM Submarines From Holland No. 1 (1901) to Porpoise (1930) (BR3043)". Submariners Association: Barrow in Furness Branch. Archived from the original on 19 May 2015. Retrieved 19 August 2015.
- Wilson, Michael (1981). "The British 'B' Class Submarine". In Roberts, John. Warship Volume V. London: Conway Maritime Press. pp. 38–44, 74–79. ISBN 0-85177-244-7.
External links
| Wikimedia Commons has media related to British B class submarines. |