Operation Sonnenblume
| ||||||||||||||||||||||||||||||||||||

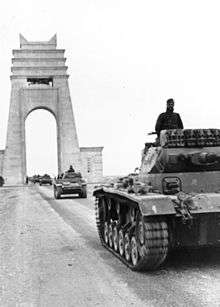
Operation Sonnenblume (Unternehmen Sonnenblume/Operation Sunflower) was the name given to the dispatch of German troops to North Africa in February 1941, during the Second World War. German troops reinforced the remaining Italian forces in Libya, after the Italian 10th Army was destroyed by British attacks during Operation Compass(9 December 1940 – 9 February 1941). The first units departed Naples for Africa and arrived on 11 February. On 14 February, the first units of the 5th Light Afrika Division (later renamed the 21st Panzer Division), Aufklärungsbataillon 3 (Reconnaissance Battalion 3) and Panzerjägerabteilung 39 (Tank Hunter Detachment 39) arrived in Tripoli, Libya and were sent immediately to the front line at Sirte.
Generalleutnant Erwin Rommel took command of the new Deutsches Afrikakorps (DAK; the term Afrika Korps became a generic title for German forces in North Africa, in the English-speaking world). Rommel arrived in Libya on 12 February, with orders to defend Tripoli and Tripolitania, albeit using aggressive tactics. General Italo Gariboldi replaced Maresciallo d'Italia Rodolfo Graziani as the Governor-General of Libya on 25 March and Generale d'Armata Mario Roatta, Commander in Chief of the Regio Esercito (Italian Army), ordered Graziani to place Italian motorised units in Libya under German command. The first German troops reached Sirte on 15 February, advanced to Nofilia on 18 February and on 24 February, a raiding party ambushed a British patrol near El Agheila. On 24 March, El Agheila was captured and Brega was attacked on 31 March. The understrength 3rd Armoured Brigade failed to counter-attack and began a retreat towards Benghazi the next day.
Once the 3rd Armoured Brigade moved, its worn-out and under-maintained tanks began to break down as predicted and the brigade failed to prevent Axis flanking moves in the desert south of the Cyrenacian bulge, which left the Australian infantry in Benghazi no option but to retreat up the Via Balbia. Rommel split his forces into small columns and harried the British retreat to the extent that the Axis fuel and water shortage made possible. He managed to surround and capture a considerable force at Mechili, which led to the British retreat continuing to Tobruk and then to the Libyan–Egyptian frontier. Axis forces failed to capture Tobruk before the defenders had time to prepare its defence, and Rommel then had to divide the Axis forces between Tobruk and the frontier.
Sonnenblume succeeded because of the ability of the Germans to mount an offensive, which was underestimated by General Archbald Wavell, the Commander in Chief Middle East, the War Office and Winston Churchill and the capability, audacity and potential of Rommel to transform the situation. This oversight occurred despite copious intelligence reports from Ultra and MI 14 (British Military Intelligence). In 1949, Wavell wrote that he had taken an unwarranted risk in Cyrenaica, having formed expectations of the Axis based on fighting the Italian army: "I had certainly not budgeted for Rommel after my experience of the Italians. I should have been more prudent...." Many experienced British units had been transferred to Greece and other units had been sent to Egypt to refit. Some of the commanders in Cyrcom appointed by Wavell proved incompetent and he also failed properly to study the terrain between Benghazi and El Agheila, relying on maps found to be inaccurate when he later arrived to see the ground for himself.
Background
Italian invasion of Egypt
Operazione E was an Italian invasion of Egypt, to seize the Suez Canal against British, Commonwealth and Free French forces, which began the Western Desert Campaign (1940–1943). After numerous delays, the aim of the offensive was reduced to an advance by the 10th Army (Marshal Rodolfo Graziani) into Egypt, as far as Sidi Barrani and attacks on any British forces in the area. The 10th Army advanced about 65 miles (105 km) into Egypt but only made contact with the British screening force from the 7th Armoured Division and did not engage the main force around Mersa Matruh. On 16 September, the 10th Army halted and took up defensive positions around the port of Sidi Barrani, intending to build fortified camps, while waiting for engineers to extend the Litoranea Balbo (Via Balbia) with the Via della Vittoria. Graziani intended to use the road to accumulate supplies for an advance on Mersa Matruh, about 80 miles (130 km) further east, where the remainder of the 7th Armoured Division and the 4th Indian Division were based.[1]
Operation Compass

The British Western Desert Force (WDF, Lieutenant-General Sir Richard O'Connor), attacked the 10th Army in western Egypt and Cyrenaica, the eastern province of Libya from December 1940 to February 1941. The WDF with about 30,000 men, advanced from Mersa Matruh in Egypt on a five-day raid against the positions of the 10th Army, which had about 150,000 men in fortified posts around Sidi Barrani and further west, over the border in Cyrenaica. The 10th Army was swiftly defeated, Sidi Barrani and Sollum were re-captured and the British continued the operation, attacking through Cyrenaica to capture Bardia, Tobruk and Derna. The British then pursued the 10th Army along the Via Balbia around the Jebel Akhdar (Green Mountain) towards the western province of Tripolitania. Combe Force an ad hoc flying column was sent through the desert south of the jebel and intercepted the last organised units the 10th Army at the Battle of Beda Fomm and the WDF then chased the remnants of the 10th Army to El Agheila on the Gulf of Sirte. The British took 138,000 Italian and Libyan prisoners, hundreds of tanks, over 1,000 guns and aircraft for a loss of 1,900 men killed and wounded.[2]
The British were unable to continue Operation Compass beyond El Agheila, due to the difficulty in supplying the WDF over such a great distance and because the vehicles of the front-line units were in an advanced state of mechanical decrepitude. In February 1941, the British War Cabinet decided to hold Cyrenaica with the minimum of forces and send the remainder to Greece. The most experienced, best trained and equipped units of the WDF, were diverted to the Greek Campaign in Operation Lustre in March and April 1941.[3] In Cyrenaica, the 6th Australian Division was up to strength but the vehicles of the 7th Armoured Division were worn out. The 2nd New Zealand Division had two brigades available and the 6th Infantry Division in Egypt had no artillery and was training for operations in the Dodecanese Islands. The 7th Australian Division (Major-General John Lavarack) and the 9th Australian Division were poorly-equipped and still training, a Polish Brigade Group was short of equipment and two armoured regiments had been detached from the 2nd Armoured Division to the 7th Armoured Division and had also been worn out in the later stages of Operation Compass. The rest of the division had two cruiser tank regiments whose tanks had worn-out tracks and two light tank regiments; the divisional commander had died suddenly and been replaced by Major-General Michael Gambier-Parry.[4]
Siege of Giarabub
The Siege of Giarabub (now Jaghbub), took place in the aftermath of the defeat of the 10th Army. The fortified Italian position at the Al Jaghbub Oasis was besieged by parts of the 6th Australian Division. The 6th Australian Divisional Cavalry Regiment began the siege in December 1940 and isolated the oasis, leaving the Italian garrison dependent for supplies on the Regia Aeronautica. Air transport proved insufficient and hunger prompted many of the locally recruited troops to desert. After being reinforced by the 2/9th Australian Battalion and a battery of the 4th Royal Horse Artillery, the Australians attacked on 17 March 1941 and forced the Italian garrison to surrender on 21 March.[5][6]
Terrain

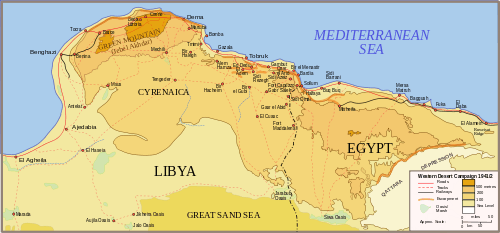
The war was fought primarily in the Western Desert, which was about 240 miles (390 km) wide, from Mersa Matruh in Egypt to Gazala on the Libyan coast, along Via Balbia, the only paved road. The Sand Sea 150 miles (240 km) inland marked the southern limit of the desert at its widest at Giarabub and Siwa; in British parlance, Western Desert came to also mean eastern Cyrenaica. From the coast, extending south lies a raised, flat plain of stony desert about 500 feet (150 m) above sea level, about 120–190 miles (200–300 km) from north to south, as far as the Sand Sea.[7] Scorpions, vipers and flies populated the region, which was inhabited by a small number of Bedouin nomads.[8]
Bedouin tracks like the Trigh el Abd and Trigh Capuzzo, linked wells and the easier traversed ground; navigation was by sun, star, compass and "desert sense", good perception of the environment gained by experience. (When Italian troops advanced into Egypt in September 1940, the Maletti Group got lost leaving Sidi Omar, disappeared and had to be found by aircraft.) In spring and summer, the days are miserably hot and nights are very cold.[9] The Sirocco (Gibleh or Ghibli), a hot desert wind, blows clouds of fine sand, which reduce visibility to a few yards and coats eyes, lungs, machinery, food and equipment; motor vehicles and aircraft need special oil filters and the barren ground means that supplies for military operations have to be transported from outside.[10] German engines tended to overheat and tank engine life fell from 1,400–1,600 miles (2,300–2,600 km) to 300–900 miles (480–1,450 km), made worse by the lack of standard spare parts for German and Italian types of motor.[11]
Supply
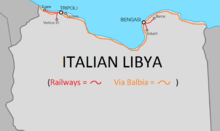
The normal sea route for Italian supplies to Libya went west round Sicily, then close to the coast to the port of Tripoli, to avoid interference from British aircraft, ships and submarines based at Malta; a third of the Italian merchant marine had been interned after Italy declared war and the diversion increased the voyage to about 600 miles (970 km). On land, supplies had to be carried huge distances by road or in small consignments by coaster.[12] After the Italian defeat in Operation Compass, Tripoli was the last remaining Axis port, with a maximum unloading capacity of four troopships or five cargo ships at once, enough for the delivery of about 46,000 tonnes (45,000 long tons) of freight per month. The distance from Tripoli to Benghazi was 405 miles (652 km) along the Via Balbia, which was only half-way to Alexandria.[13]
The road could flood, was vulnerable to attacks by the Desert Air Force (DAF) and using desert tracks increased vehicle wear. A German motorised division needed 350 long tons (360 t) per day and moving the supplies 300 miles (480 km) took 1,170 2-long-ton (2.0 t) lorries.[13][lower-alpha 1] With seven Axis divisions, air and naval units, 70,000 long tons (71,000 t) of supplies per month were needed. (The Vichy French agreed to the use of Bizerta in Tunisia but no supplies moved through the port until late 1942.) From February to May 1941, a surplus of 45,000 long tons (46,000 t) was delivered from Italy. British attacks from Malta had some affect but in May, the worst month for shipping losses, 91 percent of the supplies arrived. Lack of transport in Libya left German supplies stranded in Tripoli, while the Italians had only 7,000 lorries for deliveries to 225,000 men. A record amount of supplies arrived in June but at the front, shortages worsened.[14]
Prelude
German intervention
German involvement in the western Mediterranean began with the arrival in Italy during June 1940, of General der Deutschen Luftwaffe beim Oberkommando der Königlich Italienischen Luftwaffe (Italuft), General Maximilian von Pohl), a liaison organisation to handle intelligence matters. Luftwaffe air units arrived in Italy in October, to carry Italian troops to Albania and then on 15 November, Luftflotte 2 (Generalfeldmarschall Albert Kesselring) transferred from Germany and Fliegerkorps X (General der Flieger Hans Geisler) moved from Norway to Sicily. By January 1941, Fliegerkorps X had 120 long-range bombers, 150 dive bombers, 40 twin-engined fighters and 20 reconnaissance aircraft. The Fliegerkorps took over Luftwaffe operations in southern Italy, Sicily, part of Sardinia and later took over in North Africa, with orders to secure the sea route from Italy to North Africa by neutralising Malta. Attacks were to be made on British supply routes to Egypt and Axis forces in North Africa were to be supported by the Fliegerführer Afrika (General Stefan Fröhlich). The first sorties of the Fliegerkorps were flown on 7 January, against a British convoy and escorts off the Algerian coast.[15]
On 24 October 1940, after an investigation of the possibility of military operations in North Africa, General Wilhelm Ritter von Thoma reported to Adolf Hitler, that supply difficulties determined what could be achieved, given the North African climate, terrain and British control of the Mediterranean. The minimum necessary force to capture Egypt was four divisions, which was also the maximum force which could be supplied from Italy but Hitler refused to consider sending more than one armoured division. On 12 November, Hitler ordered in Directive 18, that a panzer division be prepared to move to North Africa and even this was cancelled after the Italian advance into Egypt in Operazione E. After the magnitude of the Italian defeat during Operation Compass was realised, Hitler issued Directive 22 on 11 January 1941, ordering the dispatch of a Sperrverband (blocking detachment) Unternehmen Sonnenblume (Operation Sunflower), to begin. On 3 February, Hitler agreed to send another panzer division to join the 5th Light Afrika Division (Generalmajor Johann von Ravenstein); the first German troops reached Libya on 14 February and the first tanks on 20 February. A panzer corps of two divisions had been recommended by General Hans von Funck after a visit to Libya in January and by General Enno von Rintelen, the senior military attaché in Rome but Hitler agreed only to send another panzer regiment; the other elements of the 15th Panzer Division (Oberst Maximilian von Herff) began to arrive in late April.[16]
Deutsches Afrikakorps
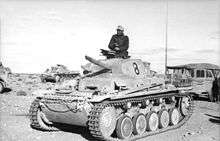
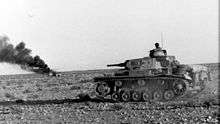
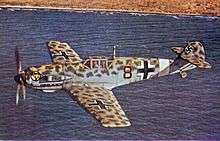
On 19 February, the Afrika Korps (DAK), was formed as the Sperrverband (barrier detachment) to defend Tripolitania.[17][18][lower-alpha 2] After the Battle of France (10 May – 25 June 1940), the Heer (German army) began to increase the amount of armour on tanks, by bolting extra armour plates to tanks and most of those in Panzer Regiment 5 and Panzer Regiment 8 were of the modified type. The tanks were also adapted for desert conditions, with better engine cooling achieved by increasing the speed of the radiator fan and by cutting holes in the hatch covers of the engine compartment.[19] Panzer Regiment 5 of the 5th Light Afrika Division arrived in North Africa aboard two convoys from 8–10 March 1941.[20]
The regiment had 155 tanks, three kleiner Panzerbefehlswagen (small command vehicles) and four Panzerbefehlswagen (command vehicles).[21][lower-alpha 3] Another 25 Panzer I Ausf A to reinforce the regiment arrived in Tripoli on 10 May.[21] The tanks in Panzer Regiment 5 were still painted dark grey (RAL 7021 dunkelgrau) and carried the 3rd Panzer Division emblem of an inverted Y with two strikes.[23] On 18 January, Panzer Regiment 8 with 146 tanks, part of the 10th Panzer Division was transferred to the new 15th Panzer Division, which had been created from the 33rd Infantry Division. Panzer Regiment 8 was shipped to Libya in three convoys from 25 April – 6 May 1941 and by 28 May, had completed its assembly in North Africa.[24]
Axis command
After General Giuseppe Tellera was killed on 7 February at the Battle of Beda Fomm, General Italo Gariboldi took over command of the remnants of the 10th Army and on 25 March, replaced Graziani as the Governor-General of Libya. Generalmajor Erwin Rommel was promoted to Generalleutnant and appointed to command the DAK and arrived in Libya on 12 February. Rommel had been ordered in January by the Commander in Chief of the German army, Generalfeldmarschall Walther von Brauchitsch, to defend Tripoli and Tripolitania, albeit using aggressive tactics. The Commander in Chief of the Regio Esercito, Generale d'Armata Mario Roatta, ordered Gariboldi to put all Italian motorised units under German command and Rommel sent forward the XX Corps with the 27th Infantry Division Brescia (Brescia Division), 17th Infantry Division Pavia (Pavia Division) and the last 60 tanks of the 132nd Armoured Division Ariete (Ariete Division). The German high command had no intention of obtaining complete victory in Africa and on a visit to Berlin, even after the limited advance from Tripoli, 270 miles (430 km) along the Gulf of Sirte to Sirte and then another 92 miles (148 km) on to Nofilia on 19 March, Rommel was told not to expect reinforcements.[25]
Cyrcom
The 9th Australian Division and the 2nd Armoured Division (minus a brigade group sent to Greece), were left to garrison Cyrenaica under Cyrenaica Command (Cyrcom, Lieutenant-General Henry Maitland Wilson), despite the inadequacy of the force if the Germans sent troops to Libya. Command in Egypt was taken over by Lieutenant-General Richard O'Connor and the XIII Corps HQ was replaced by the HQ of the 1st Australian Corps (Lieutenant-General Thomas Blamey). It was believed by General Archibald Wavell the Commander-in-Chief Middle East and GHQ in Egypt, that the Germans could not be ready until May, by when the 2nd Armoured Division tanks would have been overhauled and two more divisions and support troops, particularly artillery, would be ready, along with the 9th Australian Division. The 2nd Armoured Division had a reconnaissance regiment and the 3rd Armoured Brigade had an understrength light tank regiment and one equipped with captured Fiat M13/40 tanks. The cruiser regiment arrived in late March, after many break downs en route, which brought the division up to an understrength armoured brigade.[26][lower-alpha 4] Two brigades of the 9th Australian Division were swapped with two from the 7th Australian Division, which were less well trained and were short of equipment and transport.[27]
Attempts by the British to re-open Benghazi were frustrated by lack of transport, poor weather and from early February, Luftwaffe bombing and mining of the harbour. The attacks led the British to abandon attempts to use it to receive supplies and to evacuate the Italian stores and equipment captured during Operation Compass. Lack of transport made it impossible to supply a garrison west of El Agheila, which was the most favourable position for a defensive line and restricted the 2nd Armoured Division to movement between supply dumps, reducing its limited mobility further. In February, Lieutenant-General Philip Neame took over Cyrcom and predicted that many of the tanks would break down as soon as they moved. (Neame also discovered that he had to rely on the local telephone system staffed by Italian operators.)[28] Neame wanted a proper armoured division, two infantry divisions and adequate air support to hold the area but was told by Wavell that there was little to be sent and nothing before April. In early March, the 9th Australian Division began to relieve the 6th Australian Division at Mersa Brega for Operation Lustre, which demonstrated the difficulty of tactical moves with insufficient transport. On 20 March, the Australians were withdrawn north of Benghazi to Tocra, near Er Regima for ease of supply and the 2nd Armoured Division took over.[29]

There were no easily defended positions between El Agheila and Benghazi, the terrain being open and good tank country. Neame was ordered to conserve the tank units as far as possible, yet inflict losses on the Axis forces if they attacked, fight a delaying action as far as Benghazi if pressed and abandon the port if necessary. There was no prospect of reinforcement before May so the high ground of the escarpment nearby and the defiles to the north near Er Regima and Barce in the Jebel Akhdar, were to be held for as long as possible. The 2nd Armoured Division would move inland south of the Jebel to Antelat and operate against the flank and rear of the Axis forces, when they moved up the Via Balbia or cut across the desert towards Mechili and Tobruk. The tanks would have to use depots at Msus, Tecnis, Martuba, Mechili, Timimi, El Magrun and Benghazi as a substitute for lorry-borne supply. The 3rd Indian Motor Brigade (Brigadier E. W. D. Vaughan) arrived at Martuba in late March, with all its transport but no tanks, artillery, anti-tank guns and only half its wireless sets, to be ready to move towards Derna, Barce or Mechili if the Axis attacked.[30]
Battle
24 March – 2 April

On 24 March, Rommel advanced with the new Afrikakorps towards the positions of the British 3rd Armoured Brigade, south-east of Mersa Brega, where the 2nd Support Group held an 8-mile (13 km) front; the Australians were 150 miles (240 km) to the north, minus a brigade left at Tobruk, deficient in much equipment and out of contact with the 2nd Armoured Division. British air reconnaissance had observed German troops west of El Agheila on 25 February and by 5 March, it was expected that the German commander would consolidate the defence of Tripolitania, try to recapture Cyrenaica and then invade Egypt. The Germans were expected to use Sirte and Nofilia as bases but before April; Rommel was identified on 8 March but local intelligence was hard to find. The mileage restrictions necessary to maintain the few troops and vehicles near the front and the danger from fast German Schwerer Panzerspähwagen (eight-wheeler armoured cars), inhibited British reconnaissance units, whose armoured cars were slower and had inferior armament.[31]
On 1 April, Rommel sent two columns to capture Mersa Brega, with Panzer Regiment 5, Machine-Gun Battalion 8, Reconnaissance Unit 3 and anti-tank guns and artillery moving along the Via Balbia as Machine-Gun Battalion 2 and some anti-tank guns made an outflanking move through the desert to the south. The British withdrew from Mersa Brega, followed up by the Germans as the Ariete Division and the Brescia Division advanced from Tripoli. The 5th Light Afrika Division was ordered on to Agedabia and the harbour of Zuetina, despite Italian objections. Air reconnaissance on 3 April, revealed that the British were still retiring and Rommel ordered a probe around the southern flank by an Italian detachment and several German platoons were sent under Lieutenant-Colonel Gerhard von Schwerin towards Maaten el Grara, from where they were to observe the ground towards Msus, south-east of Benghazi and Ben Gania further south. Reconnaissance Unit 3 was ordered to reconnoitre towards Soluch and Ghemines; during the evening Rommel ordered them on to Benghazi.[32]
3–5 April
On 3 April, Gambier-Parry had received a report that a large enemy armoured force was advancing on Msus (now Zawiyat Masus in the Fati Municipality), site of the main divisional supply dump. The 3rd Armoured Brigade (Brigadier R. G. W. Rimington) moved there and found that the petrol had been destroyed to prevent capture. The tank brigade had already been reduced by losses and breakdowns to 12 cruiser tanks, 20 light tanks and 20 Italian tanks. Neame received conflicting reports about the positions of the British and Axis forces and on 5 April, reports that a large Axis force was advancing on El Abiar, led him to order the 9th Australian Division back to Wadi Cuff north-east of Benghazi and the elements of the 2nd Armoured Division to guard the desert flank and retire on Mechili. Conflicting reports led Neame to countermand these orders, which caused the Australians much confusion. On 6 April, British air reconnaissance reported that there were Axis columns in the desert and the 3rd Indian Motor Brigade repulsed an attack at Mechili, which led to O'Connor at the Cyrcom headquarters (Neame had left to visit Gambier-Parry), to order a general withdrawal.[33]
The headquarters of the 2nd Armoured Division and the 2nd Support Group were ordered back to Mechili followed by the 3rd Armoured Brigade. Rimington decided that the armoured brigade lacked the fuel to reach Mechili and ordered a move to Maraura, where a small amount of petrol was found. Rimington planned to move to Derna via Giovanni Berta, to obtain more fuel and was captured with his deputy when he motored ahead. The brigade continued on and crowded the Australians, who were by-passing Derna, as they withdrew to Gazala. The Australians had collected every vehicle that could move and withdrawn at 5:00 p.m., behind extensive demolitions, covered by the 1st Battalion King's Royal Rifle Corps (1st KRRC), a motor battalion recently arrived from Egypt. (The 2/13th Australian Battalion was rushed to Martuba to block the track from Mechili and the first units of the division reached Tmimi by 4:30 a.m. on 7 April, where the 26th Australian Brigade held the town, until the division and stragglers from other units passed through.)[34]
The 5th Light Afrika Division, between Agedabia and Zuetina, reported that it needed four days to refuel but Rommel ordered that every supply vehicle be unloaded and along with spare fighting vehicles, sent back 40 miles (64 km) west of El Agheila, to collect fuel within 24 hours, while the rest of the division waited. Despite more objections from Gariboldi, Rommel decided that the advance must go faster if the British were to be trapped. On the night of 3/4 April, Reconnaissance Unit 3 entered Benghazi and that morning Rommel ordered it to continue to Mechili, as soon as the Brescia Division arrived. As units reached Benghazi, Rommel formed them into columns, Group Schwerin was sent to Tmimi and Group Fabris, composed of motorcyclists and the Ariete divisional artillery, to Mechili followed by the rest of the Ariete Division. General Streich, the 5th Light Afrika Division commander, was ordered on to Tobruk with Machine-Gun Battalion 8, part of Panzer Regiment 5 and an anti-tank company. Lieutenant-Colonel Olbrich, the Panzer Regiment 5 commander, was sent with Machine-Gun Battalion 2, artillery and an armoured battalion of the Ariete Division, via Msus to Mechili or on to Tmimi and Major-General Heinrich Kirchheim, who was in the area by coincidence, was "shanghaied" and ordered to advance with two columns along the Via Balbia and through the Jebel Akhdar with the Brescia Division.[35]
By late on 4 April, Group Schwerin was out of fuel and stranded near Ben Gania, with the Italian contingents trailing behind and Group Streich had got only as far as Maaten el Grara; next day a party from Group Streich reached Tengeder with the rest straggling behind for 20–30 miles (32–48 km). Reconnaissance Unit 3 was stopped by the 2nd Support Group artillery west of Charruba and Group Olbrich reached Antelat, with a machine-gun unit having pressed on to the east of Sceleidima; Group Kirchheim had a column at Driana and the other at Er Regima. Air reconnaissance on 5 April, showed that the British were still retreating and Rommel ordered the Axis columns to meet at Mechili. Group Fabris and the Ariete Division were stalled between Ben Gania and Tengeder, south of Mechili and in the evening Rommel detached Machine-gun Battalion 8 (Lieutenant-Colonel Gustav Ponath) from Group Streich and led it to Mechili, where the advanced units of Group Schwerin arrived early on 6 April. Ponath was sent on towards Derna with a small party, by which time Group Kirchheim had one column near Maddalena and the other east of El Abiar. Reconnaissance Unit 3 had hardly moved and Group Olbrich had run out of fuel again. Ponath reached the coast road and advanced on the airfield south of Derna early on 7 April.[36]
6–8 April
Kirchheim sent the non-mechanised parts of the Pavia Division (General Pietro Zaglio) and the Brescia Division along the Via Balbia and the mechanised and motorised units through the Jebel Akhdar. On 6 April, the Ariete Division reached Mechili and at noon, Ponath re-assembled his group near Derna airfield and cut one of the British withdrawal routes. The 5th Royal Tank Regiment (5th RTR, Lieutenant-Colonel H. D. Drew), repulsed two determined attacks and then counter-attacked with the last four British tanks. The rest of the British disengaged before the tanks were knocked out and the road was left open for stragglers in Derna. Neame had ordered Cyrcom headquarters to move back to Tmimi, west of Tobruk, where the Chief of Staff, Brigadier John Harding arrived early on 7 April, to find no sign of Neame or O'Connor. Harding ordered Cyrcom to move into Tobruk and reported his fears to Wavell in Egypt. During the withdrawal, Neame, O'Connor and Brigadier Combe had left Maraua at 8:00 p.m. and taken a desert track at Giovanni Berta but then took a wrong turning north towards Derna, instead of east to Tmimi and ran into Group Ponath near Martuba.[34]
Rommel had intended to attack Mechili on 7 April but the Axis forces were scattered, short of fuel and tired. Group Fabris moved forward during the morning but the Ariete Division and Group Streich took all day to arrive, having been attacked by the RAF; A Squadron of the LRDP had appeared from the south, to harass Axis movements. By nightfall on 7 April, the 9th Australian Division (less the 24th Australian Infantry Brigade) with the 2nd Support Group had blocked the Via Balbia at Acroma, about 15 miles (24 km) west of Tobruk, where the 18th and 24th Australian Infantry brigades were preparing the defences. (The 18th Australian Infantry Brigade had arrived from Egypt by sea, after the dispatch of the 7th Australian Division to Greece had been cancelled.) A small force held El Adem, south of Tobruk to observe the approaches from the south and south-west and at Mechili, Gambier-Parry had the 2nd Armoured Division headquarters soft-skinned vehicles and a cruiser tank, most of the 3rd Indian Motor Brigade, M Battery 1st Royal Horse Artillery, part of the 3rd Australian Anti-tank Regiment and elements of other units.[37]
The Germans tried twice to bluff Gambier-Parry into surrender but he had received orders from Cyrcom to break out and retreat to El Adem and decided to attack at dawn, to gain a measure of surprise. On 8 April, A Squadron of the 18th Cavalry broke through and then turned to attack Italian artillery, as some Indian troops of the 11th Prince Albert Victor's Own Cavalry (Frontier Force) got away. Most of the garrison was pinned down but during a second attempt at 8:00 a.m., small parties of the 2nd Royal Lancers escaped. The garrison had fired most of its small-arms ammunition at the vision slits of the German tanks, which had hung back in fear of mines and when Italian infantry attacked, had little ammunition left. Gambier-Parry and 2,700–3,000 British, Indian and Australian troops surrendered to Major-General Pietro Zaglio, commander of the Pavia Division.[38]
Tobruk

By 8 April, the most advanced German units had arrived at Derna but some units which had cut across the chord of the jebel, ran out of water and fuel at Tengeder. Prittwitz, the commander of the 15th Panzer Division was sent ahead with a column of reconnaissance, anti-tank, machine-gun and artillery units, to block the eastern exit from Tobruk, as the 5th Light Afrika Division moved from the south-west and the Brescia Division advanced from the west.[39] Rommel hoped to pursue Cyrcom across Egypt and take Alexandria but overstretched supply lines, opposition from OKW and the British defence of Tobruk made this impossible.[40]
On 10 April, Rommel made the Suez Canal the objective of the DAK and ordered that a break-out from Tobruk was to be prevented. Next day the port was invested but the rush ended with the 5th Light Afrika Division on the east side, Group Prittwitz to the south (Prittwitz having been killed) and the Brescia Division to the west. Reconnaissance Unit 3 went on to Bardia and a composite force was sent on to Sollum to try to reach Mersa Matruh but was prevented by the British Mobile Force (Brigadier William Gott) on the frontier, which conducted a delaying action around Sollum and Capuzzo.[39] Tobruk was defended by a force of about 25,000 British and Australian troops, well stocked with supplies and linked to Egypt by the Navy. The garrison had armoured cars and captured Italian tanks, which could raid Axis supply convoys as they passed Tobruk for the frontier and made impossible an Axis invasion of Egypt.[41]
Aftermath
Analysis
In 1956, I. S. O. Playfair, the British official historian wrote that British assumptions about the time needed for an Axis counter-offensive were not unrealistic but were confounded by the boldness of Rommel and the fact that the 3rd Armoured Brigade was a brigade in name only, no tanks were available for the re-equipping of the brigade or the two in the 7th Armoured Division back in Egypt. When the DAK attacked there was no armoured force capable of counter-attacking or cutting Axis communications. By the time the British had retreated into the Jebel Akhdar, the infantry lacked mobility, the tanks of the 3rd Armoured Brigade had fallen to pieces and the only reserve was a motor brigade without tanks, artillery and anti-tank guns. For as long as the Axis forces had the fuel to manoeuvre, the British had no defence against outflanking attacks to the south. The retreat to Tobruk succeeded but the first Italo-German offensive had been an operational success and a "triumph for Rommel".[42]
The Luftwaffe and Regia Aeronautica had little influence operations, despite the disadvantages faced by the DAF during the retreat. The Fliegerführer Afrika was not under army authority and chose the objectives of the air forces. Many strafing attacks were made on parties of British troops and vehicles but these were not concentrated on bottlenecks, despite the few routes of retreat round the Cyrenaican bulge and south of the Jebel Akhdar. The DAF had been depleted to provide squadrons for Greece and had only two fighter and one bomber squadron until 8 April when another bomber squadron arrived. The fighter squadrons had to resort to wasteful standing patrols over important areas and were able occasionally to give cover to traffic jams but were unable to prevent air attacks on two petrol convoys, which were destroyed. The British lacked the aircraft to keep air superiority and the Axis air forces made no consistent attempt to seize it, leading to the influence of both sides being sporadic.[43]
Supply constraints had made it impossible for the Axis to advance much beyond the frontier wire on the Libyan–Egyptian border by mid-April. As long as the port of Tobruk was held by the British, the Axis position on the border was unstable, as the Italo-Germans were distracted by the siege, while the British could rebuild their strength in Egypt. The British Mobile Force columns based at Halfaya, Sofafi, Buq Buq and Sidi Barrani began to harass the Germans in the area around Capuzzo and Sollum and after an ambush near Sidi Azeiz, the local German commander sent an alarmist report to Rommel, leading to an attack by Group Herff from 25–26 April, that pushed the British back to Buq Buq and Sofafi but the April attacks on Tobruk were costly failures.[42]
Cooper wrote in 1978, that Tobruk had been invested on 11 April, after a twelve-day advance. German tanks had proved superior to their British counterparts but the Axis could not maintain a force further east than Sollum, without Tobruk. German forces probed the Tobruk defences from 11–12 April, attacked from 13–14 April and again from 16–17 April. On 2 May, Rommel accepted that the Axis force was not sufficient to capture Tobruk. Preparations would have to be made to repel a British counter-attack from Egypt, the chronic lack of fuel determining movement more than tactics. The Italian supreme command wanted a pause before advancing into Egypt, as did Hitler, who also considered the capture of Tobruk to be essential and Rommel demanded more aircraft to carry ammunition, fuel and water forward. General Friedrich Paulus, a deputy Chief of the General Staff, was sent to Africa to report on the situation.[44][45] The British received through Ultra a decrypt of the Paulus report but the "considerable intelligence coup" was mishandled, encouraging the premature attack of Operation Brevity.[46]
In 1993, Raugh wrote that the diversion of so many British units to Greece was the main reason for the success of Sonnenblume, along with the transfer of units to Egypt to refit, the appointment by Wavell of incompetent commanders and his failure properly to study the terrain. The potential of the Germans to mount an offensive was underestimated and the capability, audacity and potential of Rommel to transform the situation was overlooked by Wavell, the War Office and Winston Churchill, despite copious intelligence reports from Ultra and MI 14 (British Military Intelligence). In 1949, Wavell wrote that he had taken an unwarranted risk in Cyrenaica, having formed expectations of the Axis based on the experience of fighting the Italian army; "I had certainly not budgeted for Rommel after my experience of the Italians. I should have been more prudent...."[47]
Casualties
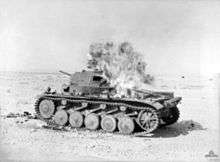
The British lost 1,760 men when much of the 3rd Indian Motor Brigade was forced to surrender at Mechili on 8 April.[48] Lieutenant-generals Neame and O'Connor, Gambier-Parry the 2nd Armoured Division commander, Brigadier R. Rimington and Lieutenant-Colonel J. F. B. Combe were captured.[49] From 24 March – 14 May, the 3rd Armoured Brigade lost most of its tanks to mechanical breakdown, fuel shortage and demolitions to prevent them being captured. About twenty tanks had been returned earlier to Tobruk for repairs and another three unserviceable tanks were salvaged during the retreat; 103–107 German tanks were knocked out but many were recovered later and repaired.[50]
Subsequent operations
Siege of Tobruk
From 11–12 April, the 5th Panzer Regiment probed the defences of the 20th Australian Brigade near the El Adem road and was repulsed by artillery-fire; German infantry who reached the anti-tank ditch were forced back by Australian infantry. The Germans were surprised, having assumed that the shipping at Tobruk was there to evacuate the garrison and planned a night attack by the 5th Light Afrika Division for the night of 13/14 April. Groups of Axis vehicles were attacked by 45 and 55 squadrons RAF, which rearmed at the airfields inside the perimeter. The attack began with an attempt to get over the anti-tank ditch west of the El Adem road, in the 2/17th Australian Battalion sector, that was repulsed by the Australians. Another attempt was made later and by dawn a small bridgehead had been established, where Panzer Regiment 5 drove through and turned northwards, ready to divide into one column for the harbour and one to move west, to cut off the garrison but was repulsed.[51] The Italians had been slow to provide blueprints for the port fortifications and after three weeks, Rommel suspended the attacks and resumed the siege.[52] Italian infantry divisions took up positions about the fortress, while the bulk of the DAK maintained a mobile position south and east of the port, keeping the frontier in easy reach.[53]
Operation Brevity
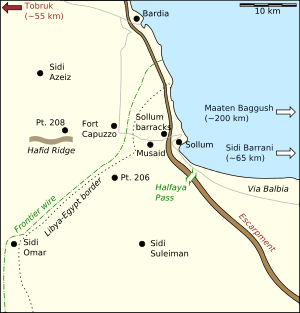
Operation Brevity (15–16 May), was a limited British offensive, planned as a rapid blow against the weak Axis front-line forces around Sollum, Fort Capuzzo and Bardia on the Egyptian–Libyan frontier. The British had received an Ultra intercept of the report compiled by Paulus, which dwelt on the exhaustion and the dire supply situation facing the Axis at Tobruk and the frontier, which encouraged a premature attempt to inflict losses on the Axis frontier garrisons and to capture jumping-off places for a later attack towards Tobruk. The garrison of Tobruk, 100 miles (160 km) to the west, had resisted Axis attacks and its Australian and British troops could still endanger the Axis supply line from Tripoli, which led Rommel to give priority to the siege, leaving the front line thinly held. On 15 May, Gott attacked with a mixed infantry and armoured force in three columns.[54]
Halfaya Pass was taken against determined Italian opposition and in Libya, the British captured Fort Capuzzo but German counter-attacks regained the fort during the afternoon, inflicting a costly defeat on the defenders. The operation had begun well and had thrown the Axis commanders into confusion but most of its early gains were lost to counter-attacks and with German reinforcements arriving from Tobruk, the operation was called off. Gott became concerned that his forces risked being caught in the open by German tanks and conducted a staged withdrawal to the Halfaya Pass on 16 May. From 26–27 May, German troops recaptured the pass in Operation Skorpion.[54] The British resumed preparations for Operation Battleaxe which began on 15 June.[55]
See also
Orders of battle
| Deutsches Afrikakorps | |
|---|---|
| |
| Cyrenaica Command | British Troops Egypt | |
|---|---|
|
GHQ Middle East Forces[lower-alpha 8] Libya
Egypt
| |
Notes
- ↑ The Axis advance of 388 miles (624 km) from Benghazi to Sollum in Egypt during Operation Sonnenblume, increased the road distance from Tripoli to 1,100 miles (1,800 km). Coastal shipping could only carry 15,000 long tons (15,000 t) and Benghazi was within range of the DAF. Tobruk could take about 1,500 long tons (1,500 t) of supplies per day but the Axis lack of shipping made its capture irrelevant.[13]
- ↑ The term "Afrika Korps" is pseudo-German taken from part of the German title, which was written as one word. Deutsches Afrikakorps the initial formation, which was part of the command structure of the Axis forces in North Africa.
- ↑ While the tanks were being loaded onto Italian ships in the port of Naples, the Leverkusen caught fire and sank, with the loss of thirteen tanks. Ten replacement Panzer III, a mixture of Ausf (type) F and G models, were requisitioned from Panzer Regiment 6 and three new Panzer IV Ausf E were shipped to Libya from 10–14 April and reached the regiment on 29 April.[22]
- ↑ Most of the British tanks were worn out and the Italian tanks were slow and unreliable. The Support Group (equivalent to am infantry brigade) had only a motor battalion, a 25-pounder field regiment, an anti-tank battery and a machine-gun company, the division was short of transport and its workshops were understaffed and lacked spare parts.[27]
- ↑ All data taken from Pitt, 2001 unless specified.[56]
- ↑ Data on Panzer Regiment 5 taken from Jentz 1998.[24]
- ↑ Data on Panzer Regiment 8 taken from Jentz 1998.[24]
- ↑ All data in this section taken from Playfair 2004 [1956].[57]
Footnotes
- ↑ Playfair et al. 1954, pp. 297–212.
- ↑ Playfair et al. 1954, pp. 257–298, 351–365.
- ↑ Playfair et al. 1954, pp. 351–365.
- ↑ Playfair et al. 2004, pp. 1–2.
- ↑ Richardson 2010, pp. 1–30.
- ↑ Long 1961, pp. 287–304.
- ↑ Luck 1989, p. 92.
- ↑ Playfair et al. 1954, p. 116.
- ↑ Playfair et al. 1954, pp. 115, 116.
- ↑ Lewin 1998, p. 149.
- ↑ Creveld 1977, p. 183.
- ↑ Cooper 1978, pp. 361–362.
- 1 2 3 Creveld 1977, pp. 182–187.
- ↑ Creveld 1977, pp. 185–187.
- ↑ Air 2001, pp. 126–129.
- ↑ Cooper 1978, pp. 354–355.
- ↑ Wilmot 1993, p. 65.
- ↑ Bauer 2000, p. 121.
- ↑ Jentz 1998, pp. 24–38.
- ↑ Jentz 1998, p. 214.
- 1 2 Jentz 1998, p. 37.
- ↑ Jentz 1998, p. 215.
- ↑ Jentz 1998, p. 36.
- 1 2 3 4 5 Jentz 1998, pp. 37–38.
- ↑ Cooper 1978, p. 355.
- ↑ Playfair et al. 2004, pp. 2–3.
- 1 2 Playfair et al. 2004, pp. 2–4.
- ↑ French 2001, p. 226.
- ↑ Playfair et al. 2004, pp. 4–6.
- ↑ Playfair et al. 2004, pp. 6–8.
- ↑ Playfair et al. 2004, pp. 9–11.
- ↑ Playfair et al. 2004, pp. 25–26.
- ↑ Playfair et al. 2004, p. 28.
- 1 2 Playfair et al. 2004, p. 29.
- ↑ Playfair et al. 2004, pp. 26–27.
- ↑ Playfair et al. 2004, p. 27.
- ↑ Playfair et al. 2004, pp. 30–34.
- ↑ Playfair et al. 2004, p. 30.
- 1 2 Playfair et al. 2004, pp. 35–36.
- ↑ Playfair et al. 2004, pp. 29–35.
- ↑ Hoffman 2004, p. 35.
- 1 2 Playfair et al. 2004, pp. 30–36.
- ↑ Playfair et al. 2004, p. 31.
- ↑ Cooper 1978, pp. 373–374.
- ↑ Playfair et al. 2004, pp. 37, 41.
- ↑ Raugh 1993, pp. 206–207.
- ↑ Raugh 1993, pp. 204–205.
- ↑ Pitt 2001, p. 271.
- ↑ Carver 2002, p. 21.
- ↑ Shales 2015, App C.
- ↑ Playfair et al. 2004, pp. 37–38.
- ↑ Lewin 1998, pp. 39, 42.
- ↑ Playfair et al. 2004, pp. 35–43, 153–159.
- 1 2 Playfair et al. 2004, pp. 159–163.
- ↑ Raugh 1993, pp. 234–239.
- 1 2 Pitt 2001, p. 321.
- ↑ Playfair et al. 2004, pp. 365–366.
References
- Bauer, E. (2000) [1979]. Young, Peter, ed. The History of World War II (Orbis: London, rev. ed.). New York: Galahad Books. ISBN 1-85605-552-3.
- Carver, M. (2002) [1986]. Dilemmas of the Desert War: The Libyan Campaign 1940–1942 (Spellmount ed.). Staplehurst: Batsford. ISBN 1-86227-153-4.
- Cooper, Matthew (1978). The German Army 1933–1945: Its Political and Military Failure. Briarcliff Manor, NY: Stein and Day. ISBN 0-8128-2468-7.
- Creveld, M. van (1977). Supplying War: Logistics from Wallenstein to Patton. Cambridge: Cambridge University Press. ISBN 0-521-29793-1.
- French, David (2001) [2000]. Raising Churchill's Army: The British Army and the War against Germany 1919–1945. Oxford: Oxford University Press. ISBN 0-19-924630-0.
- Hoffman, K. (2004). Erwin Rommel. London: Brassey's. ISBN 1-85753-374-7.
- Jentz, T. L. (1998). Tank Combat In North Africa: The Opening Rounds, Operations Sonnenblume, Brevity, Skorpion and Battleaxe, February 1941 – June 1941. Atglen, PN: Schiffer. ISBN 0-7643-0226-4.
- Lewin, R. (1998) [1968]. Rommel As Military Commander. New York: B&N Books. ISBN 978-0-7607-0861-3.
- Long, Gavin (1961). "12, The Capture of Giarabub" (PDF). To Benghazi. Australia in the War of 1939–1945 Series 1 – Army. I. Canberra: Australian War Memorial. pp. 287–304. OCLC 3134176. Retrieved 20 October 2015.
- Luck, Hans von (1989). Panzer Commander: The Memoirs of Colonel Hans von Luck. New York: Dell (Random House). ISBN 0-440-20802-5.
- Pitt, B. (2001) [1980]. The Crucible of War: Wavell's Command. I (Cassell ed.). London: Jonathan Cape. ISBN 0-304-35950-5.
- Playfair, Major-General I. S. O.; with Stitt RN, Commander G. M. S.; Molony, Brigadier C. J. C. & Toomer, Air Vice-Marshal S. E. (1954). Butler, J. R. M., ed. The Mediterranean and Middle East: The Early Successes Against Italy (to May 1941). History of the Second World War, United Kingdom Military Series. I. HMSO. ISBN 1-84574-065-3.
- Playfair, Major-General I. S. O.; with Flynn RN, Captain F. C.; Molony, Brigadier C. J. C. & Toomer, Air Vice-Marshal S. E. (2004) [1st. pub. HMSO 1956]. Butler, J. R. M., ed. The Mediterranean and Middle East: The Germans Come to the Help of their Ally (1941). History of the Second World War, United Kingdom Military Series. II. Naval & Military Press. ISBN 1-84574-066-1.
- Raugh, H. E. (1993). Wavell in the Middle East, 1939–1941: A Study in Generalship. London: Brassey's. ISBN 0-08-040983-0.
- Richardson, Tom (2010). The Siege of Giarabub December 1940 – March 1941 (PDF). SVSS Paper. no ISBN. Canberra: Australian War Memorial. Retrieved 23 February 2015.
- Shales, J. (2015). A Detailed Fighting Account of the 2nd Armoured Division, 9th Australian Division, 3rd Indian Motor Brigade, 7th Support Group and 22nd Guards Brigade in Combat with the Afrikakorps and Units of the Ariete, Brescia, Bologna, Pavia and Trento Divisions: February – May 1941. Infantry, Artillery and Tank Combat in Libya and Egypt. I. Rainham, Kent: Armour. ISBN 0-99317-320-9.
- The Rise and Fall of the German Air Force. Public Record Office War Histories. Air 41/10 (repr. ed.). Richmond, Surrey: Air Ministry. 2001 [1948]. ISBN 1-903365-30-9.
- Wilmot, C. (1993) [1944]. Tobruk 1941 (Penguin ed.). Sydney: Halstead Press. ISBN 978-0-670-07120-3.
Further reading
- Murphy, N. K. (2011). The "Lost" Battle of Mersa el Brega Libyan Desert, 31 March 1941 (PhD). Hull University. OCLC 809549608. Retrieved 28 March 2015.
- Rommel, Erwin; Liddell Hart, B. (1982) [1953]. The Rommel Papers. New York: Da Capo Press. ISBN 0-306-80157-4.
- Schreiber, P. K. (1998). Rommel's Desert War, The Impact of Logistics on Operational Art (PDF) (Report). Newport, RI: Naval War College. OCLC 831666288. Retrieved 20 March 2015.
- Young, Desmond (1950). Rommel, The Desert Fox. New York: Harper & Row. OCLC 48067797.
External links
| Wikimedia Commons has media related to Operation Sonnenblume. |
- Chadwick, Rommel's First Offensive
- Kirkland, Rommel's Desert Campaigns
- Italian tables of organisation
- British tables of organisation