Battle of Singapore
| ||||||||||||||||||||||||||||||||||

The Battle of Singapore, also known as the Fall of Singapore, was fought in the South-East Asian theatre of World War II when the Empire of Japan invaded the British stronghold of Singapore—nicknamed the "Gibraltar of the East". Singapore was the major British military base in South-East Asia and was the keystone of British imperial interwar defence planning for South-East Asia as well as the South-West Pacific. The fighting in Singapore lasted from 8 to 15 February 1942 although this was preceded by two months of British resistance as Japanese forces advanced down the Malaya peninsula.
It resulted in the capture of Singapore by the Japanese and the largest surrender of British-led military personnel in history.[6] About 80,000 British, Indian and Australian troops became prisoners of war, joining 50,000 taken by the Japanese in the earlier Malayan Campaign. The British Prime Minister, Winston Churchill, called the ignominious fall of Singapore to the Japanese the "worst disaster" and "largest capitulation" in British military history.[7]
Background
Outbreak of war
During 1940 and 1941, the Allies had imposed a trade embargo on Japan in response to its continued campaigns in China and its occupation of French Indochina.[8][9] As Japan's oil reserves were rapidly depleted by the ongoing military operations in China as well as industrial consumption, in the latter half of 1941, the Japanese began preparing a military response to secure vital resources if diplomatic efforts to resolve the situation failed. As a part of this process, the Japanese planners determined a broad scheme of manoeuvre that incorporated simultaneous attacks on the British and the United States. This would see landings in Malaya and Hong Kong as part of a general move south to secure Singapore, which was connected to Malaya by the Johor–Singapore Causeway, and then an invasion of the oil-rich area of Borneo and Java in the Dutch East Indies. In addition, strikes would be made against the United States naval fleet at Pearl Harbor, as well as landings in the Philippines, and attacks on Guam, Wake Island and the Gilbert Islands.[10][11] Following these attacks, a period of consolidation was planned, after which the Japanese planners intended to build up the defences of the territory that had been captured by establishing a strong perimeter around it stretching from the India–Burma frontier through to Wake Island, and traversing Malaya, the Dutch East Indies, New Guinea and New Britain, the Bismarck Archipelago, and the Marshall and Gilbert Islands. With this perimeter, it was intended to block Allied attempts to regain the lost territory and defeat their will to fight.[10]
Invasion of Malaya

Part of a series on the |
||||||||||||||||||
|---|---|---|---|---|---|---|---|---|---|---|---|---|---|---|---|---|---|---|
| History of Singapore | ||||||||||||||||||
.svg.png) | ||||||||||||||||||
|
Early history (pre-1819)
|
||||||||||||||||||
|
British colonial era (1819–1942)
|
||||||||||||||||||
|
Japanese Occupation (1942–45)
|
||||||||||||||||||
|
Post-war period (1945–62)
|
||||||||||||||||||
|
Internal self-government (1955–62)
|
||||||||||||||||||
|
Merger with Malaysia (1962–65) |
||||||||||||||||||
|
Republic of Singapore (1965–present)
|
||||||||||||||||||
|
| ||||||||||||||||||
The Japanese 25th Army invaded from Indochina, moving into northern Malaya and Thailand by amphibious assault on 8 December 1941.[12][13] This was virtually simultaneous with the Japanese attack on Pearl Harbor which precipitated the United States entry in to the war. Thailand initially resisted, but soon had to yield. The Japanese then proceeded overland across the Thai–Malayan border to attack Malaya. At this time, the Japanese began bombing strategic sites in Singapore.[14]
The Japanese 25th Army was resisted in northern Malaya by III Corps of the British Indian Army. Although the 25th Army was outnumbered by Allied forces in Malaya and Singapore, Japanese commanders concentrated their forces. The Japanese were superior in close air support, armour, coordination, tactics and experience. While conventional British military thinking characterised the Malayan jungles as "impassable",[15] the Japanese were repeatedly able to use it to their advantage to outflank hastily established defensive lines.[16] Prior to the Battle of Singapore the most resistance was met at the Battle of Muar,[17] which involved the Australian 8th Division and the Indian 45th Brigade.[18]
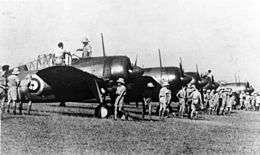
At the start of the campaign, the Allied forces had only 164 first-line aircraft on hand in Malaya and Singapore, and the only fighter was the obsolete Brewster F2A Buffalo. These aircraft were operated by two Royal Australian Air Force (RAAF), two Royal Air Force (RAF), and one Royal New Zealand Air Force (RNZAF) squadron.[19] Major shortcomings included a slow rate of climb and the aircraft's fuel system which required the pilot to hand pump fuel if flying above 6,000 feet (1,800 m).[20] In contrast, the Imperial Japanese Army Air Force was more numerous, and better trained than the second-hand assortment of untrained pilots and inferior allied equipment remaining in Malaya, Borneo and Singapore. Their fighter aircraft were superior to the Allied fighters, which helped the Japanese to gain air supremacy.[21] Although outnumbered and outclassed, the Buffalos were able to provide some resistance, with RAAF pilots alone managing to shoot down at least 20 Japanese aircraft before the few that survived were withdrawn.[20]
Force Z, consisting of the battleship HMS Prince of Wales, the battlecruiser HMS Repulse and four destroyers, sailed north out of Singapore on 8 December to oppose expected Japanese landings along the coast of Malaya. Japanese land based aircraft found and sank the two capital ships on 10 December,[22] leaving the east coast of the Malayan peninsula exposed and allowing the Japanese to continue their amphibious landings. Japanese forces quickly isolated, surrounded, and forced the surrender of Indian units defending the coast. They advanced down the Malayan peninsula overwhelming the defences, despite their numerical inferiority. The Japanese forces also used bicycle infantry and light tanks, allowing swift movement through the jungle. The Allies, however, having thought the terrain made them impractical, had no tanks, and only a few armoured vehicles, which put them at a severe disadvantage.[23]
Although more Allied units—including some from the Australian 8th Division[Note 3]—joined the campaign, the Japanese prevented the Allied forces from regrouping. They also overran cities and advanced toward Singapore. The city was an anchor for the operations of the American-British-Dutch-Australian Command (ABDACOM), the first Allied joint command of the Second World War. Singapore controlled the main shipping channel between the Indian and the Pacific Oceans. An effective ambush was carried out by the 2/30th Battalion on the main road at the Gemenceh River near Gemas on 14 January causing heavy Japanese casualties.[25][Note 4]
At Bakri, from 18 to 22 January, Lieutenant Colonel Charles Anderson's 2/19th Battalion repeatedly fought through Japanese positions before running out of ammunition near Parit Sulong. Anderson's battalion was forced to leave behind about 110 Australian and 40 Indian wounded, these were later massacred by the Japanese. For his leadership, in the fighting withdrawal, Anderson was awarded the Victoria Cross.[27][28] A determined counterattack from Lieutenant-Colonel John Parkin's 5/11th Sikh Regiment in the area of Niyor, near Kluang, on 25 January,[29] and a successful ambush around the Nithsdale Estate by the 2/18th Battalion on 26/27 January,[30] bought valuable time and permitted Brigadier Harold Taylor's Eastforce—based on the 22nd Brigade—to withdraw from eastern Jahore.[31][32]
On 31 January, the last Allied forces left Malaya and Allied engineers blew a hole in the causeway linking Johor and Singapore.[33][34]
Prelude

During the weeks preceding the invasion, the Allied force suffered a number of both subdued and openly disruptive disagreements amongst its senior commanders,[35] as well as pressure from the Australian Prime Minister, John Curtin.[36] Lieutenant-General Arthur Percival, commander of the garrison, had 85,000 soldiers, the equivalent, on paper at least, of just over four divisions. There were at least 70,000 front-line troops in 38 infantry battalions—13 British, six Australian, 17 Indian, two Malayan—and three machine-gun battalions. The newly arrived British 18th Infantry Division—under Major-General Merton Beckwith-Smith—was at full strength, but lacked experience and appropriate training; most of the other units were under strength, a few having been amalgamated due to heavy casualties as a result of the mainland campaign. The local battalions had no experience and in some cases no training.[37]
Percival gave Major-General Gordon Bennett's two brigades from the Australian 8th Division responsibility for the western side of Singapore, including the prime invasion points in the northwest of the island. This was mostly mangrove swamp and jungle, broken by rivers and creeks.[38] In the heart of the "Western Area" was RAF Tengah, Singapore's largest airfield at the time. The Australian 22nd Brigade, under Brigadier Harold Taylor, was assigned a 10 mi (16 km) wide sector in the west, and the 27th Brigade, under Brigadier Duncan Maxwell, had responsibility for a 4,000 yd (3,700 m) zone just west of the Causeway. The infantry positions were reinforced by the recently arrived Australian 2/4th Machine-Gun Battalion.[39] Also under Bennett's command was the 44th Indian Infantry Brigade.[38]
The Indian III Corps under Lieutenant-General Sir Lewis Heath—including the Indian 11th Infantry Division under Major-General B. W. Key with reinforcements from the 8th Indian Brigade,[40] and the British 18th Division—was assigned the north-eastern sector, known as the "Northern Area".[38] This included the naval base at Sembawang. The "Southern Area"—including the main urban areas in the south-east—was commanded by Major-General Frank Keith Simmons. His forces consisted of elements of the 1st Malaya Infantry Brigade and the Straits Settlements Volunteer Force Brigade with the Indian 12th Infantry Brigade in reserve.[41]
From 3 February, the Allies were shelled by Japanese artillery and air attacks on Singapore intensified over the next five days. The artillery and air bombardment strengthened, severely disrupting communications between Allied units and their commanders and affecting preparations for the defence of the island.[42] From aerial reconnaissance, scouts, infiltrators and high ground across the straits, such as at Istana Bukit Serene and the Sultan of Johor's palace, the Japanese commander—General Tomoyuki Yamashita—and his staff gained excellent knowledge of the Allied positions. Yamashita and his officers stationed themselves at Istana Bukit Serene and the Johor state secretariat building—the Sultan Ibrahim Building—to plan for the invasion of Singapore.[43][44] Although advised by his top military personnel that Istana Bukit Serene was an easy target, Yamashita was confident that the British Army would not attack the palace because it belonged to the Sultan of Johor. Yamashita's prediction was correct; despite being observed by Australian artillery, permission to engage the palace was denied by their commanding general, Bennett.[45]

It is a commonly repeated misconception that Singapore's famous large-calibre coastal guns were ineffective against the Japanese because they were designed to face south to defend the harbour against naval attack and could not be turned round to face north. In fact, most of the guns could be turned, and were indeed fired at the invaders. However, the guns—which included one battery of three 15 in (380 mm) weapons and one with two 15 in (380 mm) guns—were supplied mostly with armour-piercing (AP) shells and few high explosive (HE) shells. AP shells were designed to penetrate the hulls of heavily armoured warships and were mostly ineffective against infantry targets.[46][47] Military analysts later estimated that if the guns had been well supplied with HE shells the Japanese attackers would have suffered heavy casualties, but the invasion would not have been prevented by this means alone.[48]
Percival incorrectly guessed that the Japanese would land forces on the north-east side of Singapore, ignoring advice that the north-west was a more likely direction of attack (where the Straits of Johor were the narrowest and a series of river mouths provided cover for the launching of water craft).[49] This was encouraged by the deliberate movement of enemy troops in this sector to deceive the British.[50] As such a large portion of defence equipment and resources had been incorrectly allocated to the north east sector, where the most complete and freshest formation—the British 18th Division—was deployed, while the incomplete Australian 8th Division sector with just two brigades had no serious fixed defensive works or obstacles. To compound matters, Percival had ordered the Australians to defend forward so as to cover the waterway, yet this meant they were immediately fully committed to any fighting, limiting their flexibility, whilst also reducing their defensive depth.[49] The two Australian brigades were subsequently allocated a very wide frontage of over 18 kilometres (11 mi) and were separated by the Kranji River.[51]
Yamashita had just over 30,000 men from three divisions: the Imperial Guards Division under Lieutenant-General Takuma Nishimura, the 5th Division under Lieutenant-General Takuro Matsui and the 18th Division under Lieutenant-General Renya Mutaguchi.[52] Also in support was a light tank brigade.[53] In comparison, following the withdrawal Percival had about 85,000 men at his disposal, although 15,000 were administrative personnel, while large numbers were semi-trained British, Indian and Australian reinforcements that had only recently arrived. Meanwhile, of those forces that had seen action during the previous fighting the majority of units were under-strength and under-equipped.[54]
In the days leading up to the Japanese attack, patrols from the Australian 22nd Brigade were sent across the strait to Johor at night to gather intelligence. Three small patrols were sent on the evening of 6 February; one was spotted and withdrew after its leader was killed and their boat sunk, while two others managed to get ashore. Over the course of a day, they found large concentrations of troops, although they were unable to locate any landing craft.[55] The Australians requested the shelling of these positions to disrupt the Japanese preparations,[56] but the patrol reports were later ignored by Malaya Command as being insignificant,[57] believing that the real assault would come in the north-eastern sector, not the north-west.[58][51]
Battle
Initial Japanese landings

Blowing up the causeway had delayed the Japanese attack for over a week. Prior to the main assault the Australians were subjected to an intense artillery bombardment. Over a period of 15 hours[51] starting at 23:00 on 8 February 1942 Yamashita's heavy guns laid down a barrage of 88,000 shells (200 rounds per tube)[4] along the entire length of the straits, cutting telephone lines and effectively isolating forward units from rear areas.[59] Even at this stage, a counter artillery barrage as a response could have been mounted by the British on the coastline opposite the Australians that would have caused casualties and disruption among the Japanese assault troops.[60] But the bombardment of the Australians was not seen as a prelude to imminent attack—Malaya Command believed that it would last several days and would later switch its focus to the north-east—despite its ferocity exceeding anything the Allies had experienced thus far in the campaign, and consequently no order was passed to the Allied artillery units to begin targeting possible Japanese assembly areas.[61]
Shortly before 20:30 on 8 February, the first wave of Japanese troops from the 5th and 18th Divisions began crossing the Johor Strait. The main weight of the Japanese force, representing a total of about 13,000 men across 16 assault battalions, with five in reserve, was focused on assaulting Taylor's Australian 22nd Brigade, which totalled just three battalions.[62] The assault would be concentrated on the 2/18th and 2/20th Battalions and with each division allocated 150 barges and collapsible boats, the Japanese could move approximately 4,000 men across the strait at any one time. In total, 13,000 Japanese troops landed throughout the first night; they were followed by another 10,000 after first light.[63] Against this the defenders numbered just 3,000 men and lacked any significant reserve.[51]
As the landing craft closed on the Australian positions, machine gunners from the 2/4th Machine Gun Battalion, interspersed amongst the deployed rifle companies, opened fire. Spotlights had been sited by a British unit on the beaches to enable the Australians to clearly see any attacking forces on the water in front of them, but many had been damaged by the earlier bombardment and no order was made to turn the others on.[64] The initial wave was concentrated against the positions occupied by the 2/18th and 2/20th Battalions,[51] around the Buloh River, as well as one company from the 2/19th Battalion. Over the course of an hour heavy fighting took place on the 2/19th Battalion's right flank, until these positions were overrun and the Japanese were able to push their way inland using cover and concealment provided by the darkness and the surrounding vegetation. The resistance put up by the company from the 2/19th pushed the follow-on waves of Japanese craft in to landing around the mouth of Murai River, which resulted in them creating a gap between the 2/19th and 2/18th. From there they launched two concerted attacks against the 2/18th, which were met with heavy fire before they eventually overwhelmed the defending Australians with weight of numbers. Urgent requests for fire support were sent out, and throughout the night the 2/15th Field Regiment fired over 4,800 rounds.[65]
Fierce fighting raged throughout the evening, but due to the terrain and the darkness the Japanese were able to disperse into the undergrowth and in many situations they were able to either surround and destroy pockets of Australian resistance, or bypass them, exploiting gaps in the thinly spread Allied lines due to the many rivers and creeks in the area. By midnight, the two Japanese divisions fired starshells to indicate to their commander that they had secured their initial objectives, and by 01:00 they were well established. Over the course of two hours, the three Australian battalions that had been engaged sought to regroup, moving back east from the coast towards the centre of the island. Despite being in contact this was completed mainly in good order. The 2/20th managed to concentrate three of its four companies around the Namazie Estate, although one was left behind; the 2/18th was only able to concentrate half its strength at Ama Keng, while the 2/19th also moved back three companies, leaving a fourth to defend Tengah airfield. Further fighting followed throughout the early morning of 9 February and the Australians were pushed back further, with the 2/18th being pushed out of Ama Keng and the 2/20th being forced to pull back to Bulim, west of Bukit Panjong. Meanwhile, bypassed elements attempted to breakout and fall back to the Tengah airfield to rejoin their units and in doing so received heavy casualties. Bennett attempted to reinforce the 22nd Brigade by moving the 2/29th Battalion from the 27th Brigade's area to Tengah and before it could be used to recapture Ama Keng, the Japanese launched another attack around the airfield, and the 2/29th was forced to assume a defensive posture.[66] The initial fighting cost the Australians heavily, with one battalion, the 2/20th, alone losing 334 men killed and 214 wounded.[67]
Air war
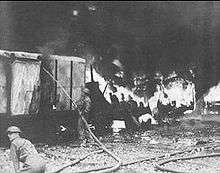
The aerial campaign for Singapore began at the outset of the invasion of Malaya. Early on 8 December 1941, Singapore was bombed for the first time by long-range Japanese aircraft, such as the Mitsubishi G3M2 "Nell" and the Mitsubishi G4M1 "Betty", based in Japanese-occupied Indochina. The bombers struck the city centre as well as the Sembawang Naval Base and the island's northern airfields. After this first raid, throughout the rest of December, there were a number of false alerts and several infrequent and sporadic hit-and-run attacks on outlying military installations such as the Naval Base, but no actual raids on Singapore City. The situation had become so desperate, that one British soldier took to the middle of a road to fire his Vickers machine gun at any aircraft that passed. He could only say: "The bloody bastards will never think of looking for me in the open, and I want to see a bloody plane brought down."[68]
The next recorded raid on the city occurred on the night of 29/30 December, and nightly raids ensued for over a week, only to be accompanied by daylight raids from 12 January 1942 onward.[69] In the days that followed, as the Japanese army drew ever nearer to Singapore Island, the day and night raids increased in frequency and intensity, resulting in thousands of civilian casualties, up to the time of the British surrender.[70]
During the month of December, a total of 51 Hawker Hurricane Mk II fighters were sent to Singapore, with 24 pilots, the nuclei of five squadrons. They arrived on 3 January 1942, by which stage the Brewster Buffalo squadrons had been overwhelmed. No. 232 Squadron RAF was formed and No. 488 Squadron RNZAF, a Buffalo squadron, had converted to Hurricanes. 232 Squadron became operational on 20 January and destroyed three Nakajima Ki-43 "Oscars" that day, for the loss of three Hurricanes. However, like the Buffalos before them, the Hurricanes began to suffer severe losses in intense dogfights.[Note 5][71]
During the period 27–30 January, another 48 Hurricanes arrived on the aircraft carrier HMS Indomitable.[72] Operated by No. 226 Group RAF (four squadrons),[73] they flew from an airfield code-named P1, near Palembang, Sumatra in the Dutch East Indies, while a flight was maintained in Singapore. However, many of the Hurricanes were subsequently destroyed on the ground by air raids.[74] Indeed, the lack of an effective air early warning system throughout the campaign meant that many Allied aircraft were lost in this manner during a series of Japanese attacks against airfields.[75]
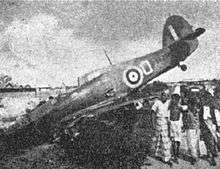
By the time of the invasion, only ten Hawker Hurricane fighters of No. 232 Squadron RAF, based at RAF Kallang, remained to provide air cover to the Allied forces on Singapore. This was because the airfields of Tengah, Seletar and Sembawang were in range of Japanese artillery at Johor Bahru. RAF Kallang was the only operational airstrip left;[76] the surviving squadrons and aircraft had withdrawn by January to reinforce the Dutch East Indies.[77]
On the morning of 9 February, a series of aerial dogfights took place over Sarimbun Beach and other western areas. In the first encounter, the last ten Hurricanes were scrambled from Kallang Airfield to intercept a Japanese formation of about 84 planes, flying from Johor to provide air cover for their invasion force.[77] The Hurricanes shot down six Japanese planes, and damaged 14 others, for the loss of one of their own.[78]
Air battles went on for the rest of the day, and by nightfall it was clear that with the few aircraft Percival had left, Kallang could no longer be used as a base. With his assent, the remaining flyable Hurricanes were withdrawn to Sumatra.[79] A squadron of Hurricane fighters took to the skies on 9 February, but was then withdrawn to the Netherlands East Indies and after that no Allied aircraft were seen again over Singapore;[80] the Japanese had achieved complete air supremacy.[81] That evening, three Fairmile motor launches attacked and sunk several Japanese landing craft in the Johor Strait around its western channel on the evening of 9 February.[80] Later, on the evening of 10 February, General Archibald Wavell, commander of American-British-Dutch-Australian Command, ordered the transfer of all remaining Allied air force personnel to the Dutch East Indies. By this time, Kallang Airfield was so pitted with bomb craters that it was no longer usable.[77]
Second day
Believing that further landings would occur in the northeast, Percival did not reinforce the 22nd Brigade until the morning of 9 February; when he did, the forces dispatched consisted of two half-strength battalions from the 12th Indian Infantry Brigade. These units reached Bennett around midday and shortly afterwards, Percival allocated the composite 6th/15th Indian Infantry Brigade, to reinforce Bennett's force on one hour's notice to move from their position around the Singapore racecourse.[82] Throughout the day, the 44th Indian Infantry Brigade, still holding its position on the coast, began to feel pressure on its exposed flank,[83] and after discussions between Percival and Bennett, it was decided that they would have to be pulled back east in order to maintain the southern part of the Allied line. Bennett decided to form a secondary defensive line, known as the "Kranji-Jurong Switch Line", oriented to the west, and positioned between the two rivers, with its centre around Bulim, east of Tengah Airfield—which subsequently came under Japanese control—and just north of Jurong.[84][83]
To the north, Maxwell's Australian 27th Brigade, had not been engaged during the initial Japanese assaults on the first day. Possessing only two battalions, the 2/26th and 2/30th, following the loss of the 2/29th Battalion to the 22nd Brigade, Maxwell sought to reorganise his force to deal with the threat posed to their western flank.[85] Late on 9 February, the Imperial Guards began assaulting the positions held by the 27th Brigade,[86] concentrating on those held by the 2/26th Battalion. During the initial assault, the Japanese suffered severe casualties from Australian mortars and machine guns, and from burning oil which had been sluiced into the water following the demolition of several oil tanks by the defending Australians.[87] Some of the Guards reached the shore and maintained a tenuous beachhead; nevertheless, at the height of the assault, it is reported that the Guards commander, Nishimura, requested permission to cancel the attack due to the heavy casualties his troops had suffered from the fire. This request was denied by the Japanese commander, Yamashita, who ordered them to press on.[88]
Command and control problems caused further cracks in the Allied defence. Maxwell was aware that the 22nd Brigade was under increasing pressure, but was unable to contact Taylor and was wary of encirclement.[89] As parties of Japanese troops began to infiltrate the brigade's position from the west, exploiting the gap formed by the Kranji River, the 2/26th Battalion was forced to withdraw to a position east of the Bukit Timah Road; this move subsequently precipitated a sympathetic move by the 2/30th away from the causeway.[84] The authority for this withdrawal would later be the subject of debate, with Bennett later stating that he had not given Maxwell authorisation to do so.[89] Regardless, the end result was that the Allies lost control of the beaches adjoining the west side of the causeway. In doing so, the high ground overlooking the causeway was given up, and the left flank of the 11th Indian Division exposed.[90] In addition, it provided the Japanese with a firm foothold, giving them the opportunity to "build up their force unopposed".[80]
Japanese breakthrough
The opening at Kranji made it possible for Imperial Guards armoured units to land there unopposed,[91] after which they were able to begin ferrying across their artillery and armour.[60] After finding his left flank exposed by the 27th Brigade's withdrawal, the commander of the 11th Indian Infantry Division, Key, dispatched his reserve brigade, the 8th, to retake the high ground to the south of the Causeway.[92] Throughout the 10th, further fighting took place around along the Jurong Line, as orders were formulated to establish a secondary defensive line to the west of the Reformatory Road with troops not then employed in the Jurong Line; misinterpretation of these orders resulted in Taylor, the commander of the 22nd Brigade, prematurely withdrawing his troops to the east, where they were joined by a 200-strong ad hoc battalion of Australian reinforcements, known as 'X' Battalion. The Jurong Line eventually collapsed, though, after the 12th Indian Brigade was withdrawn by its commander, Brigadier Archie Paris, to the road junction near Bukit Panjang, after he lost contact with the 27th Brigade on his right; the commander of the 44th Indian Brigade, Ballantine, commanding the extreme left of the line, also misinterpreted the orders in the same manner that Taylor had and withdrew.[93]
On the evening of 10 February, British Prime Minister Winston Churchill, cabled Wavell, saying:
I think you ought to realise the way we view the situation in Singapore. It was reported to Cabinet by the C.I.G.S. [Chief of the Imperial General Staff, General Alan Brooke] that Percival has over 100,000 [sic] men, of whom 33,000 are British and 17,000 Australian. It is doubtful whether the Japanese have as many in the whole Malay Peninsula ... In these circumstances the defenders must greatly outnumber Japanese forces who have crossed the straits, and in a well-contested battle they should destroy them. There must at this stage be no thought of saving the troops or sparing the population. The battle must be fought to the bitter end at all costs. The 18th Division has a chance to make its name in history. Commanders and senior officers should die with their troops. The honour of the British Empire and of the British Army is at stake. I rely on you to show no mercy to weakness in any form. With the Russians fighting as they are and the Americans so stubborn at Luzon, the whole reputation of our country and our race is involved. It is expected that every unit will be brought into close contact with the enemy and fight it out ..[94]
Upon learning of the Jurong Line's collapse, Wavell, in the early afternoon of 10 February, ordered Percival to launch a counterattack to retake it.[95] This order was subsequently passed on to Bennett, who allocated the ad hoc Australian 'X' Battalion to the task. Percival made plans of his own for the counterattack, detailing a three-phased operation that involved the majority of the 22nd Brigade, and he subsequently passed this on to Bennett, who began implementing the plan, but forgot to call 'X' Battalion back. 'X' Battalion, consisting of poorly trained and equipped replacements, subsequently advanced to an assembly area near Bukit Timah.[96] In the early hours of 11 February, the Japanese, who had concentrated significant forces around the Tengah airfield and on the Jurong Road, began further offensive operations: the 5th Division aimed its advance towards Bukit Panjang, while the 18th struck out towards Bukit Timah. There, they fell upon 'X' Battalion which had camped in its assembly area waiting to launch its own attack, and in the ensuing fight two thirds of the battalion was killed or wounded.[97] After brushing aside elements of the 6th/15th Indian Brigade, the Japanese again began attacking the Australian 22nd Brigade around the Reformatory Road.[98]
Later on 11 February, with Japanese supplies running low Yamashita attempted to bluff Percival, calling on him to "give up this meaningless and desperate resistance".[99][100] By this stage, the fighting strength of the 22nd Brigade—which had borne the brunt of the Japanese attacks—had been reduced to a few hundred men, and the Japanese had captured the Bukit Timah area, including the Allies' main food and fuel supply depots.[101] Nevertheless, Wavell subsequently told Percival that the ground forces were to fight on to the end, and that there should not be a general surrender in Singapore.[102][103][104] With the vital water supply of the reservoirs in the centre of the island threatened, the Australian 27th Brigade was later ordered to recapture Bukit Panjang as a preliminary move in retaking Bukit Timah.[105] The effort was beaten back by fierce resistance from Imperial Guards troops and the 27th was subsequently split in half either side of the Bukit Timah Road with elements spread as far as the Pierce Reservoir.[106]
My attack on Singapore was a bluff – a bluff that worked. I had 30,000 men and was outnumbered more than three to one. I knew that if I had to fight for long for Singapore, I would be beaten. That is why the surrender had to be at once. I was very frightened all the time that the British would discover our numerical weakness and lack of supplies and force me into disastrous street fighting.
The next day, as the situation worsened for the Allies, they sought to consolidate their defences and subsequently during the night of 12/13 February the order was given for a 28-mile (45 km) perimeter to be established around Singapore City at the eastern end of the island. This was achieved by moving the defending forces from the beaches along the northern shore and from around Changi, with the British 18th Division being tasked to maintain control of the vital reservoirs and effecting a link up with Simmons' forces Southern Area forces.[108] The withdrawing troops received harassing attacks all the way back.[109] Elsewhere, the 22nd Brigade continued to hold a position west of the Holland Road until late in the evening when it was pulled back to Holland Village.[110]
On 13 February, Japanese engineers re-established the road over the causeway, and more tanks were pushed across.[111] With the Allies still losing ground, senior officers advised Percival to surrender in the interests of minimising civilian casualties. Percival refused, but unsuccessfully sought authority from Wavell for greater discretion as to when resistance might cease.[112][113] Elsewhere, the Japanese captured the water reservoirs that supplied the town, although they did not cut-off the supply.[114] That same day, military police executed Captain Patrick Heenan for espionage.[115] An Air Liaison Officer with the British Indian Army, Heenan had been recruited by Japanese military intelligence, and he had used a radio to assist them in targeting Allied airfields in northern Malaya. He had been arrested on 10 December and court-martialled in January. Heenan was shot at Keppel Harbour, on the southern side of Singapore, and his body was thrown into the sea.[116][117]
The Australians occupied a perimeter of their own to the north-west around Tanglin Barracks, in which they maintained an all round defensive posture as a precaution to Japanese penetration of the larger perimeter elsewhere.[118] To their right, the British 18th Division, the Indian 11th Division and the 2nd Malaya Brigade held the perimeter from the edge of the Farrar Road east to Kallang, while to their left, the 44th Indian Brigade and the 1st Malaya Brigade held the perimeter from Buona Vista to Pasir Panjang.[118] For the most part, there was limited fighting around the perimeter, except around Pasir Panjang Ridge, just 1 mile (1.6 km) from Singapore Harbour, where the 1st Malaya Brigade—which consisted of a Malayan infantry battalion, two British infantry battalions and a force of Royal Engineers[118]—fought a stubborn defensive action during the Battle of Pasir Panjang.[119] The Japanese largely avoided attacking the Australian perimeter at this time, but elsewhere, in the northern area, throughout the day the British 53rd Brigade was pushed back by a Japanese assault up the Thompson Road, and had to re-establish itself to the north of Braddell Road in the evening, joining the 18th Division's other two brigades—the 54th and 55th—in the line. They dug-in and throughout the night fierce fighting raged on the northern front.[120]
The following day, the remaining Allied units fought on. Civilian casualties mounted as one million people[121] crowded into the 3-mile (4.8 km) area still held by the Allies and bombing and artillery fire increased. Civilian authorities began to fear that the water supply would give out. At this time, Percival was advised that large amounts of water were being lost due to damaged pipes and that the water supply was on the verge of collapse.[122][Note 6]
Alexandra Hospital massacre

On 14 February, the Japanese renewed their assault on the western part of the Southern Area's defences, around the same area that the 1st Malayan Brigade had fought desperately to hold the previous day.[123][111] At about 13:00, the Japanese broke through and they advanced towards the Alexandra Barracks Hospital. A British lieutenant—acting as an envoy with a white flag—approached the Japanese forces but was killed with a bayonet.[124] After the Japanese troops entered the hospital, a number of patients—up to 50 in total—including those undergoing surgery at the time, were killed along with doctors and members of nursing staff.[125] The following day about 200 male staff members and patients who had been assembled and bound the previous day,[125] many of them walking wounded, were ordered to walk about 400 m (440 yd) to an industrial area. Anyone who fell on the way was bayoneted. The men were forced into a series of small, badly ventilated rooms where they were held overnight without water. Some died during the night as a result of their treatment.[125] The remainder were bayoneted the following morning.[126][127] Several survivors were identified after the war, with some having survived by pretending to be dead. One survivor, Private Arthur Haines from the Wiltshire Regiment, later wrote a four-page account of the massacre that was sold by his daughter by private auction in 2008.[128]
Fall of Singapore
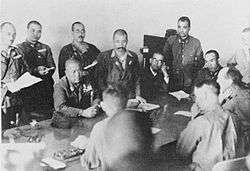
By the morning of 15 February, the Japanese had broken through the last line of defence; the Allies were running out of food and ammunition. The anti-aircraft guns had also run out of ammunition and were unable to disrupt Japanese air attacks, which were causing heavy casualties in the city centre.[129] Little work had been done to build air raid shelters and looting and desertion by Allied troops further added to the chaos in this area.[130][Note 7] At 09:30, Percival held a conference at Fort Canning with his senior commanders. He proposed two options: either launch an immediate counter-attack to regain the reservoirs and the military food depots in the Bukit Timah region, or surrender. After heated argument and recrimination, all present agreed that no counterattack was possible. Percival opted for surrender.[133][129] Post war analyses has shown, though, that had Percival opted for a counterattack at that time, it might have been successful. The Japanese were at the limit of their supply line, and their artillery had just a few hours of ammunition left.[134]
A deputation was selected to go to the Japanese headquarters. It consisted of a senior staff officer, the colonial secretary and an interpreter. They set off in a motor car bearing a Union Jack and a white flag of truce toward the enemy lines to discuss a cessation of hostilities.[135] They returned with orders that Percival himself proceed with staff officers to the Ford Motor Factory, where Yamashita would lay down the terms of surrender. A further requirement was that the Japanese Rising Sun Flag be hoisted over the tallest building in Singapore, the Cathay Building.[136] Percival formally surrendered shortly after 17:15.[114] Earlier that day Percival had issued orders to destroy all secret and technical equipment, ciphers, codes, secret documents and heavy guns.[137]

Under the terms of the surrender hostilities were to cease at 20:30 that evening, all military forces in Singapore were to surrender unconditionally, all Allied forces would remain in position and disarm themselves within an hour, and the British were allowed to maintain a force of 1,000 armed men to prevent looting until relieved by the Japanese. In addition, Yamashita also accepted full responsibility for the lives of the civilians in the city.[138]
In the days following the surrender, Bennett caused controversy when he decided to escape. After receiving news of the surrender, Bennett handed command of the 8th Division to the divisional artillery commander, Brigadier Cecil Callaghan, and—along with some of his staff officers—commandeered a small boat.[139] They eventually made their way back to Australia,[140] meanwhile between 15,000 and 20,000 Australian soldiers are reported to have been captured.[141][142] Bennett blamed Percival and the Indian troops for the defeat, but Callaghan reluctantly stated that Australian units had been affected by the desertion of many men towards the end of the battle.[Note 8][Note 9] Indeed, the Kappe Report compiled by Colonels J.H. Thyer and C.H. Kappe, concedes that only two-thirds at most, of the available Australian troops manned the final perimeter.[143] Regardless, many British units were reported to have been similarly affected.[132]
In analysing the campaign, Clifford Kinvig, a senior lecturer at Royal Military Academy Sandhurst and others, point the finger of blame at the commander of the 27th Brigade, Brigadier Duncan Maxwell, for his defeatist attitude[145] and not properly defending the sector between the Causeway and the Kranji River.[131] Elphick also claims that Australians made up the majority of stragglers.[146] Meanwhile, according to one source Taylor cracked under the pressure.[Note 10] Thompson argues, however, that the 22nd Brigade was "so heavily outnumbered that defeat was inevitable",[147] while Costello states that Percival's insistence on concentrating the 22nd Brigade's strength at the water's edge had been a serious mistake.[130] Yamashita, the Japanese commander, laid the blame on the British "...underestimating Japanese military capabilities", and Percival's hesitancy in reinforcing the Australians on the western side of the island.[148]
A classified wartime report by Wavell released in 1992 blamed the Australians for the loss of Singapore.[26] Yet according to John Coates the report "lacked substance", as whilst there had undoubtedly been ill-discipline in the final stages of the campaign—particularly among the poorly trained British, Indian and Australian reinforcements that were hurriedly dispatched as the crisis worsened—the Australian 8th Division had fought well and had gained the respect of the Japanese.[149] Indeed, at Gemas, Bakri and Jemaluang "they achieved the few outstanding tactical successes" of the campaign in Malaya,[150] and although the Australians made up just 13 percent of the British Empire's ground forces, they sustained 73 percent of its battle deaths.[142] Coates argues that the real reason for the fall of Singapore was the failure of the British strategy, to which Australian policy-makers had contributed in their acquiescence, and the overall lack of military resources allocated to the fighting in Malaya.[149]
Aftermath
British losses during the fighting for Singapore were heavy, with a total of nearly 85,000 personnel captured, in addition to losses during the earlier fighting in Malaya.[151] About 5,000 were killed or wounded,[152] of which Australians made up the majority.[153] Japanese casualties during the fighting in Singapore amounted to 1,714 killed and 3,378 wounded. Throughout the entire 70-day campaign in Malaya and Singapore total British casualties amounted to 8,708 killed or wounded and 130,000 captured; while Japanese losses during this period amounted to 9,824 battle casualties. During this time the Japanese had advanced a total of 650 miles (1,050 km) from Singora, Thailand to the southern-coast of Singapore at a rate of 9 miles (14 km) a day.[151][Note 11]
The Japanese occupation of Singapore started after the British surrender. Japanese newspapers triumphantly declared the victory as deciding the general situation of the war.[154] The city was renamed Syonan-to (Japanese: 昭南島 Shōnan-tō; literally: Southern Island gained in the age of Shōwa, or "Light of the South").[155][156] The Japanese sought vengeance against the Chinese and to eliminate anyone who held any anti-Japanese sentiments. The Japanese authorities were suspicious of the Chinese because of the Second Sino-Japanese War, and killed thousands in the Sook Ching massacre.[157] The other ethnic groups of Singapore—such as the Malays and Indians—were not spared either. The residents would suffer great hardships under Japanese rule over the following three and a half years.[158]
Numerous British and Australian soldiers taken prisoner remained in Singapore's Changi Prison. Many died in captivity. Thousands of others were shipped out on prisoner transports known as "hell ships" to other parts of Asia, including Japan, to be used as forced labour on projects such as the Siam–Burma Death Railway and Sandakan airfield in North Borneo. Many of those aboard the ships perished.[159][160]
An Indian revolutionary, Rash Behari Bose, formed the pro-independence Indian National Army (INA), with the help of the Japanese, who were highly successful in recruiting Indian soldiers taken prisoner. In February 1942, from a total of about 40,000 Indian personnel in Singapore, about 30,000 joined the INA, of which about 7,000 fought Allied forces in the Burma Campaign as well as in the northeast Indian regions of Kohima and Imphal.[161][162] Others became POW camp guards at Changi.[163] An unknown number were taken to Japanese-occupied areas in the South Pacific as forced labour. Many of them suffered severe hardships and brutality similar to that experienced by other prisoners of Japan during the war. About 6,000 survived until they were liberated by Australian and US forces in 1943–45 as the war in the Pacific turned in favour of the Allies.[162]

British forces had planned to liberate Singapore in 1945; however, the war ended before these operations could be carried out. It was subsequently re-occupied by British, Indian and Australian forces following the Japanese surrender in September.[164] Meanwhile, Yamashita was tried by a US military commission for war crimes, but not for crimes committed by his troops in Malaya or Singapore. He was convicted and hanged in the Philippines on 23 February 1946.[165]
See also
- Singapore strategy
- Malaya Command
- British Far East Command
- Japanese order of battle during the Malayan Campaign
- British Military Hospital, Singapore
Notes
- Footnotes
- ↑ On Singapore, the Japanese captured 300 field guns, 180 mortars, 100 anti-aircraft guns, 54 fortress guns, and 108 1-pounder guns, as well as 200 armoured vehicles (Universal Carriers and armoured cars) and 1,800 trucks.[1]
- ↑ Blackburn and Hack give a total of 226 for British artillery pieces captured during the siege of Singapore itself, including fortress guns (172 without them),[2] but this appears to exclude 3.7 to 4.5 inch howitzers and 75mm field guns.[3]
- ↑ Two brigades from the Australian 8th Division had been dispatched to Singapore and then Malaya in February 1941, while its third brigade had been dispersed to garrison Rabaul, Timor and Ambon.[24]
- ↑ The number of Japanese killed and wounded is disputed.[26]
- ↑ 64 Sentai lost three Ki-43s and claimed five Hurricanes.[71]
- ↑ See the article on D. J. Murnane for a discussion of his role as the Singapore Municipal Water Engineer in assessing the condition of the water supply.
- ↑ During this time a number of witnesses claim that Australian deserters were involved in widespread looting, while others were alleged to have pushed women off the gangways to get aboard the departing ships evacuating the civilians.[131] Thompson argues that the identity of these troops is disputed, recounting that around this time some British troops had broken into some of the Australian equipment stores and stolen Australian slouch hats and that further investigations had found that the offending soldiers had worn the black boots worn by British troops, rather than the brown boots worn by Australians.[132]
- ↑ "Bennett singled out Indian troops but did not confine his remarks to them. He admitted that towards the end it was all but impossible to return men to their units ... Callaghan recommended that on any clash Percival's report be accepted as more reliable ... Regarding the many reports of Australians hiding in town or trying to escape, Callaghan bluntly admitted "there is a certain amount of truth in both these statements ... This temporary lapse of the Australian on the island and the criticism it has invoked has caused me a lot of uneasiness"."[143]
- ↑ According to Kirby the majority of deserters were from administrative units or were men who had only recently arrived in Malaya and were inadequately trained.[144]
- ↑ In the 2002 documentary No Prisoners, Major John Wyett, an 8th Division staff officer, claimed the commander of the Australian 22nd Brigade cracked under the pressure stating, "Taylor was wandering around rather like a man in a sleep walk. He was utterly, utterly, you know, shell-shocked and not able to do very much."[131]
- ↑ The break down of British Empire losses included 38,496 United Kingdom, 18,490 Australian, 67,340 Indian and 14,382 local volunteer troops. Total Australian casualties included 1,789 killed and 1,306 wounded.[151]
- Citations
- ↑ Allen 2013, pp. 300–301.
- ↑ Blackburn & Hack 2004, p. 74.
- ↑ Blackburn & Hack 2004, p. 193.
- 1 2 Allen 2013, p. 169.
- ↑ Toland 2003, p. 272.
- ↑ Corrigan 2010, p. 280.
- ↑ Churchill 2002, p. 518.
- ↑ Keogh 1965, p. 68.
- ↑ Costello 2009, p. 71.
- 1 2 Keogh 1965, pp. 72–73.
- ↑ Costello 2009, p. 98.
- ↑ Brayley 2002, pp. 14–15.
- ↑ Farrell & Pratten 2011, pp. 91–92.
- ↑ Keogh 1962, pp. 62–65.
- ↑ Moreman 2005, p. 13.
- ↑ Brayley 2002, p. 15.
- ↑ Mant 1995, p. 23.
- ↑ Coulthard-Clark 2001, p. 198.
- ↑ Gillison 1962, pp. 204–205.
- 1 2 Dennis et al 2008, p. 115.
- ↑ Farrell & Pratten 2011, pp. 30, 98 & 101.
- ↑ Hall 1983, pp. 62–63.
- ↑ Hall 1983, p. 67.
- ↑ Powell 2003, p. 7.
- ↑ Coulthard-Clark 2001, p. 197.
- 1 2 Murdoch 2012.
- ↑ Coulthard-Clark 2001, pp. 198–199.
- ↑ Wigmore 1986, pp. 137–139.
- ↑ Wigmore 1957, p. 262.
- ↑ Wigmore 1957, p. 267.
- ↑ Moreman 2005, p. 34.
- ↑ "2/18th Australian Infantry Battalion". Australian War Memorial. Retrieved 3 May 2015.
- ↑ Thompson 2005, pp. 250–251.
- ↑ Keogh 1962, p. 154.
- ↑ Thompson 2005, pp. 103–130.
- ↑ Thompson 2005, pp. 60–61.
- ↑ Coello, Terry. "The Malayan Campaign 1941". Orbat.com. Archived from the original on 19 November 2005. Retrieved 7 December 2005.
- 1 2 3 Legg 1965, p. 230.
- ↑ Thompson 2005, pp. 270–271.
- ↑ Thompson 2005, p. 261.
- ↑ Thompson 2005, p. 262.
- ↑ Wigmore 1957, p. 308.
- ↑ Lee 2008, p. 37.
- ↑ Reid, Richard. "War for the Empire: Malaya and Singapore, Dec 1941 to Feb 1942". Australia-Japan Research Project. Australian War Memorial. Archived from the original on 2 July 2015. Retrieved 8 May 2015.
- ↑ Thompson 2008, p. 239.
- ↑ Smith 2006, pp. 442–443 & 527.
- ↑ Kirby 1954, p. 361.
- ↑ Chung 2011, pp. 24–26.
- 1 2 Coulthard-Clark 2001, p. 202.
- ↑ Thompson 2005, p. 285.
- 1 2 3 4 5 Thompson 2008, p. 240.
- ↑ Felton 2008, p. 33.
- ↑ Murfett et al 2011, p. 177.
- ↑ Keogh 1962, p. 157.
- ↑ Hall 1983, p. 163.
- ↑ Thompson 2005, p. 286.
- ↑ Thompson 2005, p. 287.
- ↑ Hall 1983, pp. 162–163.
- ↑ Wigmore 1957, pp. 308–310.
- 1 2 Costello 2009, p. 199.
- ↑ Thompson 2005, p. 288.
- ↑ Thompson 2005, p. 291.
- ↑ Thompson 2005, p. 297.
- ↑ Thompson 2005, p. 292.
- ↑ Thompson 2005, pp. 293–295.
- ↑ Thompson 2005, pp. 296–300.
- ↑ Legg 1965, p. 235.
- ↑ Regan 1992, p. 189.
- ↑ Shores et al 1992, pp. 276–288.
- ↑ Perry 2012, p. 105.
- 1 2 Cull & Sortehaug 2004, pp. 27–29.
- ↑ Shores et al 1992, p. 350.
- ↑ Grehan & Mace 2015, p. 442.
- ↑ Gillison 1962, pp. 387–388.
- ↑ Boyne 2002, p. 391.
- ↑ Thompson 2005, p. 273.
- 1 2 3 Owen 2001.
- ↑ Richards & Saunders 1954, p. 40.
- ↑ Thompson 2005, pp. 302–303.
- 1 2 3 Legg 1965, p. 237.
- ↑ Percival's despatches published in The London Gazette: (Supplement) no. 38215. pp. 1245–1346. 20 February 1948. Retrieved 16 August 2012.
- ↑ Wigmore 1957, p. 325.
- 1 2 Wigmore 1957, p. 324.
- 1 2 Legg 1965, p. 236.
- ↑ Thompson 2005, p. 305.
- ↑ Wigmore 1957, p. 331.
- ↑ Wigmore 1957, p. 333.
- ↑ Thompson 2005, pp. 307–309.
- 1 2 Wigmore 1957, p. 329.
- ↑ Thompson 2005, pp. 308–309.
- ↑ Thompson 2005, p. 309.
- ↑ Thompson 2005, p. 310.
- ↑ Thompson 2005, pp. 310–311.
- ↑ Leasor 2001, p. 246.
- ↑ Thompson 2005, p. 312.
- ↑ Thompson 2005, pp. 312–313.
- ↑ Thompson 2005, p. 314.
- ↑ Wigmore 1957, pp. 348–350.
- ↑ Hall 1983, p. 179.
- ↑ Lloyd 2012, p. 66.
- ↑ Perry 2012, p. 104.
- ↑ Smith 2006, p. 509.
- ↑ Thompson 2005, p. 316.
- ↑ Kirby 1954, p. 410.
- ↑ Wigmore 1957, p. 354.
- ↑ Hall 1983, p. 180.
- ↑ Shores et al 1992, p. 383.
- ↑ Thompson 2005, pp. 322–323.
- ↑ Hall 1983, p. 183.
- ↑ Thompson 2005, p. 323.
- 1 2 Hall 1983, p. 184.
- ↑ Thompson 2005, pp. 329–330.
- ↑ Keogh 1962, p. 170.
- 1 2 Keogh 1962, p. 171.
- ↑ Elphick, Peter (2002). "Viewpoint: Cover-ups and the Singapore Traitor Affair". Four Corners Special: No Prisoners. Australian Broadcasting Commission. Retrieved 5 March 2007.
- ↑ Smith 2006, pp. 161–163.
- ↑ Elphick 1995, p. 353.
- 1 2 3 Wigmore 1957, p. 369.
- ↑ Thompson 2005, p. 331–333.
- ↑ Thompson 2005, p. 332.
- ↑ Perry 2012, p. 95.
- ↑ Wigmore 1957, p. 375.
- ↑ Thompson 2005, p. 333.
- ↑ Thompson 2005, pp. 333–334.
- 1 2 3 Thompson 2005, p. 334.
- ↑ Partridge, Jeff. "Alexandra Massacre". National Ex-Services Association United Kingdom. Archived from the original on 18 October 2005. Retrieved 7 December 2005.
- ↑ Perry 2012, p. 107.
- ↑ "Soldier's account of Japanese World War Two massacre to be auctioned". The Telegraph. 11 August 2008. Retrieved 6 May 2015.
- 1 2 Wigmore 1957, p. 377.
- 1 2 Costello 2009, p. 198.
- 1 2 3 "Transcript". Four Corners Special: No Prisoners. Australian Broadcasting Commission. 2002. Retrieved 4 May 2015.
- 1 2 Thompson 2008, p. 241.
- ↑ Thompson 2005, pp. 339–340.
- ↑ Thompson 2005, p. 356.
- ↑ Smith 2006.
- ↑ Hall 1983, pp. 190–191.
- ↑ Wigmore 1957, p. 378.
- ↑ Hall 1983, p. 193.
- ↑ "Lieutenant General Henry Gordon Bennett, CB, CMG, DSO". Australian War Memorial. Retrieved 6 May 2015.
- ↑ Legg 1965, pp. 255–263.
- ↑ Hopkins 2008, p. 96.
- 1 2 Morgan 2013, p. 13.
- 1 2 Murfett et al 2011, p. 360.
- ↑ Kirby 1954, p. 401.
- ↑ Murfett et al 2011, p. 350.
- ↑ Elphick 1995, p. 352.
- ↑ Thompson 2005, pp. 297–298.
- ↑ Thompson 2005, p. 355.
- 1 2 Dennis et al 2008, pp. 344–345.
- ↑ Coulthard-Clark 2001, p. 204.
- 1 2 3 Wigmore 1957, p. 382.
- ↑ "Battle Of Singapore". World History Group. Retrieved 8 May 2015.
- ↑ Legg 1965, p. 248.
- ↑ Toland 1970, p. 277.
- ↑ Abshire 2011, p. 104.
- ↑ Blackburn & Hack 2004, p. 132.
- ↑ Hall 1983, pp. 211–212.
- ↑ Church 2012, Chapter 9: Singapore.
- ↑ Dennis et al 2008, pp. 126 & 431–434.
- ↑ Kinvig 2005, p. 39.
- ↑ Brayley 2002, p. 13.
- 1 2 Stanley, Peter. "'Great in adversity': Indian prisoners of war in New Guinea". Australian War Memorial. Archived from the original on 14 January 2008. Retrieved 15 February 2008.
- ↑ Warren 2007, p. 276.
- ↑ Bose 2010, pp. 18–20.
- ↑ Smith 2006, p. 556–557.
References
- Abshire, Jean (2011). The History of Singapore. Santa Barbara, California: ABC-CLIO. ISBN 031337743X.
- Allen, Louis (2013). Singapore 1941–1942 (Revised ed.). London: Routledge. ISBN 9781135194253.
- Blackburn, Kevin; Hack, Karl (2004). Did Singapore Have to Fall? Churchill and the Impregnable Fortress. London: Routledge. ISBN 0203404408.
- Bose, Romen (2010). The End of the War: Singapore's Liberation and the Aftermath of the Second World War. Singapore: Marshall Cavendish. ISBN 9789814435475.
- Boyne, Walter (2002). Air Warfare: An International Encyclopedia. Santa Barbara, California: ABC-CLIO. ISBN 9781576077290.
- Brayley, Martin (2002). The British Army 1939–45: The Far East. Men at Arms. Botley, Oxford: Osprey Publishing. ISBN 1-84176-238-5.
- Cull, Brian; Sortehaug, Paul (2004). Hurricanes Over Singapore: RAF, RNZAF and NEI Fighters in Action Against the Japanese Over the Island and the Netherlands East Indies, 1942. London: Grub Street Publishing. ISBN 978-1-904010-80-7.
- Church, Peter (ed.) (2012). A Short History of South-East Asia (5th ed.). Singapore: John Wiley & Sons. ISBN 9781118350447.
- Chung, Ong Chit (2011). Operation Matador: World War II—Britain's Attempt to Foil the Japanese Invasion of Malaya and Singapore. Singapore: Marshall Cavendish. ISBN 9789814435444.
- Churchill, Winston (2002) [1959]. The Second World War (Abridged ed.). London: Pimlico. ISBN 9780712667029.
- Corrigan, Gordon (2010). The Second World War: A Military History. New York: Atlantic Books. ISBN 9780857891358.
- Costello, John (2009) [1982]. The Pacific War 1941–1945. New York: Harper Perennial. ISBN 978-0-68-801620-3.
- Coulthard-Clark, Chris (2001). The Encyclopaedia of Australia's Battles (Second ed.). Crows Nest, New South Wales: Allen and Unwin. ISBN 1865086347.
- Dennis, Peter; Grey, Jeffrey; Morris, Ewan; Prior, Robin; Bou, Jean (2008). The Oxford Companion to Australian Military History (Second ed.). Melbourne: Oxford University Press. ISBN 0195517849.
- Elphick, Peter (1995). Singapore: The Pregnable Fortress. London: Hodder & Stoughton. ISBN 0-340-64990-9.
- Farrell, Brian; Pratten, Garth (2011) [2009]. Malaya 1942. Australian Army Campaigns Series – 5. Canberra, Australian Capital Territory: Army History Unit. ISBN 978-0-9805674-4-1.
- Felton, Mark (2008). The Coolie Generals. Barnsley: Pen & Sword Military. ISBN 9781844157679.
- Hall, Timothy (1983). The Fall of Singapore 1942. North Ryde, New South Wales: Methuen. ISBN 0-454-00433-8.
- Gillison, Douglas (1962). Royal Australian Air Force 1939–1942. Australia in the War of 1939–1945. Series 3 – Air. Volume 1. Canberra: Australian War Memorial. OCLC 2000369.
- Grehan, John; Mace, Martin (2015). Disaster in the Far East 1940–1942. Havertown: Pen & Sword. ISBN 9781473853058.
- Hopkins, William B. (2008). The Pacific War: The Strategy, Politics, and Players that Won the War. Minneapolis: Zenith Press. ISBN 9780760334355.
- Keogh, Eustace (1962). Malaya 1941–42. Melbourne: Printmaster. OCLC 6213748.
- Keogh, Eustace (1965). South West Pacific 1941–45. Melbourne: Grayflower Publications. OCLC 7185705.
- Kinvig, Clifford (2005). River Kwai Railway: The Story of the Burma-Siam Railroad. London: Conway. ISBN 9781844860210.
- Kirby, Stanley Woodburn (1954). War Against Japan: The Loss of Singapore. History of the Second World War. Volume I. HMSO. OCLC 58958687.
- Leasor, James (2001) [1968]. Singapore: The Battle That Changed The World. London: House of Stratus. ISBN 9780755100392.
- Lee, Edwin (2008). Singapore: The Unexpected Nation. Singapore: Institute of Southeast Asian Studies. OCLC 474265624.
- Legg, Frank (1965). The Gordon Bennett Story: From Gallipoli to Singapore. Sydney, New South Wales: Angus & Robertson. OCLC 3193299.
- Lloyd, Stu (2012). The Missing Years: A POW's Story from Changi to Hellfire Pass. Dural, New South Wales: Rosenberg Publishing. ISBN 1921719206.
- Mant, Gilbert (1995). Massacre at Parit Sulong. Kenthurst, New South Wales: Kangaroo Press. ISBN 9780864177322.
- Morgan, Joseph (2013). "A Burning Legacy: The Broken 8th Division". Sabretache. Military Historical Society of Australia. LIV (3, September): 4–14. ISSN 0048-8933.
- Moreman, Tim (2005). The Jungle, The Japanese and the British Commonwealth Armies at War, 1941–45: Fighting Methods, Doctrine and Training for Jungle Warfare. London: Frank Cass. ISBN 9780714649702.
- Murdoch, Lindsay (15 February 2012). "The Day The Empire Died in Shame". The Sydney Morning Herald. ISSN 0312-6315.
- Murfett, Malcolm H.; Miksic, John; Farell, Brian; Shun, Chiang Ming (2011). Between Two Oceans: A Military History of Singapore from 1275 to 1971 (2nd ed.). Singapore: Marshall Cavendish International Asia. OCLC 847617007.
- Owen, Frank (2001). The Fall of Singapore. London: Penguin Books. ISBN 0-14-139133-2.
- Perry, Roland (2012). Pacific 360: Australia's Battle for Survival in World War II. Sydney, New South Wales: Hachette Australia. ISBN 978-0-7336-2704-0.
- Powell, Alan (2003). The Third Force: ANGAU's New Guinea War, 1942–46. South Melbourne, Victoria: Oxford University Press. ISBN 0-19-551639-7.
- Regan, Geoffrey (1992). The Guinness Book of Military Anecdotes. Enfield: Guinness. ISBN 9780851125190.
- Richards, Dennis; Saunders, Hilary St. George (1954). The Fight Avails. Royal Air Force 1939–1945, Volume 2. London: Her Majesty's Stationery Office. OCLC 64981538.
- Shores, Christopher F.; Cull, Brian; Izawa, Yasuho (1992). Bloody Shambles: The First Comprehensive Account of the Air Operations over South-East Asia December 1941 – April 1942. Volume One: Drift to War to the Fall of Singapore. London: Grub Street Press. ISBN 0-948817-50-X.
- Smith, Colin (2006). Singapore Burning: Heroism and Surrender in World War II. London: Penguin Books. ISBN 978-0-14-101036-6.
- Thompson, Peter (2005). The Battle for Singapore: The True Story of the Greatest Catastrophe of World War II. London: Portrait Books. ISBN 0-7499-5099-4.
- Thompson, Peter (2008). Pacific Fury: How Australia and Her Allies Defeated the Japanese Scourge. North Sydney: William Heinemann. ISBN 9781741667080.
- Tsuji, Masanobu (1960). Japan's Greatest Victory, Britain's Worst Defeat: The Capture of Singapore, 1942. Singapore: The Japanese Version. New York: St. Martin's Press.
- Toland, John (1970). The Rising Sun: The Decline and Fall of the Japanese Empire 1936–1945. New York: Random House. ISBN 9780394443119.
- Toland, John (2003). The Rising Sun. New York: The Modern Library. ISBN 9780812968583.
- Warren, Alan (2007) [2002]. Britain's Greatest Defeat: Singapore 1942. London: Hambeldon Continuum. ISBN 9781852855970.
- Wigmore, Lionel, ed. (1986). They Dared Mightily (2nd ed.). Canberra: Australian War Memorial. ISBN 0642994714.
- Wigmore, Lionel (1957). The Japanese Thrust. Australia in the War of 1939–1945. Series 1 – Army. Volume 4. Canberra, Australian Capital Territory: Australian War Memorial. OCLC 3134219.
Further reading
- Afflerbach, Holger; Strachan, Hew (2012). How Fighting Ends: A History of Surrender. Oxford, New York: Oxford University Press. ISBN 9780199693627.
- Bose, Romen (2005). Secrets of the Battlebox: The History and Role of Britain's Command HQ during the Malayan Campaign. Singapore: Marshall Cavendish. ISBN 9789812610645.
- Bose, Romen (2006). Kranji: The Commonwealth War Cemetery and the Politics of the Dead. Singapore: Marshall Cavendish. ISBN 9789812612755.
- Cawood, Ian (2013). Britain in the Twentieth Century. London: Routledge. ISBN 9781136406812.
- Cull, Brian (2008). Buffaloes over Singapore: RAF, RAAF, RNZAF and Dutch Brewster Fighters in Action Over Malaya and the East Indies 1941–1942. Grub Street Publishing. ISBN 978-1-904010-32-6.
- Dixon, Norman (1976). On the Psychology of Military Incompetence. New York: Basic Books. ISBN 9780465052530.
- Farrell, Brian (2005). The Defence and Fall of Singapore 1940–1942. Stroud, Gloucestershire: Tempus. ISBN 9780752434780.
- Kelly, Terence (2008). Hurricanes Versus Zeros: Air Battles over Singapore, Sumatra and Java. South Yorkshire: Pen and Sword. ISBN 978-1-84415-622-1.
- Kinvig, Clifford (1996). Scapegoat: General Percival of Singapore. London: Brassey's. ISBN 9781857531718.
- Percival, Lieutenant-General A.E. (1948). Operations of Malaya Command from 8th December 1941 to 15th February 1942. London: UK Secretary of State for War. OCLC 64932352.
- Seki, Eiji (2006). Mrs. Ferguson's Tea-Set, Japan and the Second World War: The Global Consequences Following Germany's Sinking of the SS Automedon in 1940. London: Global Oriental. ISBN 1-905246-28-5.
- Smyth, John George (1971). Percival and the Tragedy of Singapore. London: MacDonald and Company. OCLC 213438.
- Uhr, Janet (1998). Against the Sun: The AIF in Malaya, 1941–42. St Leonards: Allen & Unwin. ISBN 9781864485400.
External links
| Library resources about Battle of Singapore |
| Wikimedia Commons has media related to Battle of Singapore. |
- Bicycle Blitzkrieg – The Japanese Conquest of Malaya and Singapore 1941–1942
- Royal Engineers Museum Royal Engineers and the Second World War – the Far East
- The diary of one British POW, Frederick George Pye of the Royal Engineers
- Animated History of the Fall of Malaya and Singapore