Battle of Stamford Bridge
Coordinates: 53°59′20″N 0°54′11″W / 53.989°N 0.903°W
| Battle of Stamford Bridge | |||||||
|---|---|---|---|---|---|---|---|
| Part of the Viking invasions of England | |||||||
 | |||||||
| Belligerents | |||||||
| Kingdom of England | English rebels | ||||||
| Commanders and leaders | |||||||
| Harold Godwinson |
Harald Hardrada † Tostig Godwinson † | ||||||
| Strength | |||||||
| ~15,000 |
9,000 (of which 3,000 engaged late in battle) 300 transport ships | ||||||
| Casualties and losses | |||||||
| ~5,000 dead | ~6,000 dead | ||||||
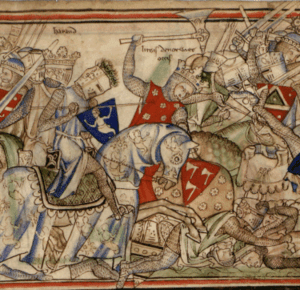
The Battle of Stamford Bridge took place at the village of Stamford Bridge, East Riding of Yorkshire, in England on 25 September 1066, between an English army under King Harold Godwinson and an invading Norwegian force led by King Harald Hardrada and the English king's brother Tostig Godwinson. After a bloody battle, both Hardrada and Tostig along with most of the Norwegians were killed. Although Harold Godwinson repelled the Norwegian invaders, his army was defeated by the Normans at Hastings less than three weeks later. The battle has traditionally been presented as symbolising the end of the Viking Age, although major Scandinavian campaigns in Britain and Ireland occurred in the following decades, such as those of King Sweyn Estrithson of Denmark in 1069–1070 and King Magnus Barefoot of Norway in 1098 and 1102–1103.
Background
The death of King Edward the Confessor of England in January 1066 had triggered a succession struggle in which a variety of contenders from across north-western Europe fought for the English throne. These claimants included the King of Norway, Harald Hardrada. According to the Anglo-Saxon Chronicle Manuscript D (p. 197),[1] the Norwegians assembled a fleet of 300 ships to invade England. The authors, however, did not seem to differentiate between warships and supply ships. In King Harald's Saga, Snorri Sturluson states, "... it is said that King Harald had over two hundred ships, apart from supply ships and smaller craft."[2] Combined with reinforcements picked up in Orkney, the Norwegian army most likely numbered between 7,000 and 9,000 men. Arriving off the English coast in September Hardrada was joined by further forces recruited in Flanders and Scotland by Tostig Godwinson.[3] Tostig was at odds with his elder brother Harold (who had been elected king by the Witan on the death of Edward). Having been ousted from his position as Earl of Northumbria and exiled in 1065, Tostig had mounted a series of abortive attacks on England in the spring of 1066.[4]
In the late summer of 1066, the invaders sailed up the Ouse before advancing on York. On 20 September they defeated a northern English army led by Edwin, Earl of Mercia, and his brother Morcar, Earl of Northumbria, at the Battle of Fulford, outside York. Following this victory they received the surrender of York. Having briefly occupied the city and taken hostages and supplies from the city they returned towards their ships at Riccall. They offered peace to the Northumbrians in exchange for their support for Hardrada's bid for the throne, and demanded further hostages from the whole of Yorkshire.[5]
At this time King Harold was in Southern England, anticipating an invasion from France by William, Duke of Normandy, another contender for the English throne. Learning of the Norwegian invasion he headed north at great speed with his houscarls and as many thegns as he could gather, travelling day and night. He made the journey from London to Yorkshire, a distance of about 185 miles, in only four days, enabling him to take the Norwegians completely by surprise. Having learned that the Northumbrians had been ordered to send the additional hostages and supplies to the Norwegians at Stamford Bridge, Harold hurried on through York to attack them at this rendezvous on 25 September.[6] Until the English army came into view the invaders remained unaware of the presence of a hostile army anywhere in the vicinity.
Location
There is some controversy as to whether or not a village and bridge existed at the time of the battle. One theory holds that there was no village at Stamford Bridge in 1066 and not even in 1086 when the Domesday Book was compiled. According to this theory, the name is locative and descriptive of crossing points over the River Derwent being derived from a combination of the words stone, ford and bridge i.e. stoneford and bridge. At the location of the present village, within the river bed, there is an outcrop of stone over which the river once flowed as a mini-waterfall. At low water levels one could easily cross over the river at this point, either on foot or horseback.
An alternative explanation is given by Darby and Maxwell [7] who state, "Stamford Bridge does, in fact, exemplify that small number of places which, though not mentioned in the Domesday Book, must have existed, or at any rate been named, in Domesday times because they appear in both pre-Domesday and post-Domesday documents." Most likely the Stamford Bridge lands were included with Low Catton and therefore were not mentioned in the Domesday Book. As for the presence of a bridge, manuscripts C, D and E of the Anglo-Saxon Chronicle all mention Stamford Bridge by name. Manuscript C contains a passage which states "... came upon them beyond the bridge ....".[8] Henry of Huntington[9] mentions Stamford Bridge and describes part of the battle being fought across the bridge. Therefore, a bridge over the Derwent most likely did exist at this time.
One mile to the south along the River Derwent at Scoreby lies the site of a 1st to 4th century Roman settlement known as Derventio. The town runs for two and a half miles east/west alongside a Roman road. Occupying both east and west banks of the river, the town was connected by the construction of a bridge which carried the road. There is no archaeological evidence for a Roman bridge construction at or near the present site of Stamford Bridge.
It is possible that there may have been a two-pronged attack by Godwinson on Hardrada's army, making use of both the ford and perhaps the remnants of the earlier Roman bridge one mile to the south, information of which, and of the two road routes to the location from York, could have been gathered from Godwinson's earlier occupation of the city of York. However, no documentation exists to support this possibility.
Topographically, on the east bank of the river from the bridge crossing point, the land rises sharply up to 100 feet at High Catton. This is the only high ground around and a good defensive position for Hardrada's army caught out by Godwinson's sudden appearance on the skyline, as he rounded the ridge at Gate Helmsley to drop downhill swiftly onto Hardrada's unsuspecting army.
The Battle
The exact location of the Stamford Bridge battlefield is not known. Local tradition places the battlefield east of the River Derwent and just southeast of the town in an area known as Battle Flats. The location of the Norwegian army at the start of the battle is not known for certain. Accounts of their location differ, depending on sources and interpretations. A common view is that the Norwegian army was divided in two; with some of their troops on the west side of the River Derwent and the bulk of their army on the east side. Another interpretation is that they were just leaving Stamford Bridge and moving along the old Roman road toward York (west side of the River Derwent).[10]
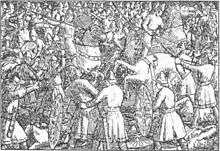
The sudden appearance of the English army caught the Norwegians by surprise.[11] Their response was to deploy rapidly in a defensive circle.[12] If the Norwegians were located at Battle Flats, there is no good explanation as to why they deployed into this formation. However, if they were located on the east side of the Derwent, the deployment made perfect sense. By the time the bulk of the English army had arrived, the Vikings on the west side were either slain or fleeing across the bridge. The English advance was then delayed by the need to pass through the choke-point presented by the bridge itself. The Anglo-Saxon Chronicle has it that a giant Norse axeman (possibly armed with a Dane Axe) blocked the narrow crossing, and single-handedly held up the entire English army. The story is that this axeman cut down up to 40 Englishmen and was only defeated when an English soldier floated under the bridge in a half-barrel and thrust his spear through the planks in the bridge, mortally wounding the axeman.[13]
This delay had allowed the bulk of the Norse army to form a shieldwall to face the English attack. Harold's army poured across the bridge, forming a line just short of the Norse army, locked shields and charged. The battle went far beyond the bridge itself, and although it raged for hours the Norse army's decision to leave their armour behind left them at a distinct disadvantage. Eventually, the Norse army began to fragment and fracture, allowing the English troops to force their way in and break up the Scandinavians' shield wall. Completely outflanked, and with Hardrada killed with an arrow to his wind pipe and Tostig slain, the Norwegian army disintegrated and was virtually annihilated.[14]
In the later stages of the battle, the Norwegians were reinforced by troops who had been guarding the ships at Riccall, led by Eystein Orre, Hardrada's prospective son-in-law. Some of his men were said to have collapsed and died of exhaustion upon reaching the battlefield. The remainder were fully armed for battle. Their counter-attack, described in the Norwegian tradition as "Orre's Storm", briefly checked the English advance, but was soon overwhelmed and Orre was slain. The Norwegian army were routed. Pursued by the English army, some of the fleeing Norsemen drowned whilst crossing rivers.[15]
So many died in an area so small that the field was said to have been still whitened with bleached bones 50 years after the battle.[16]
Aftermath
King Harold accepted a truce with the surviving Norwegians, including Harald's son Olaf and Paul Thorfinnsson, Earl of Orkney. They were allowed to leave after giving pledges not to attack England again. The losses the Norwegians had suffered were so severe that only 24 ships from the fleet of over 300 were needed to carry the survivors away.[15] They withdrew to Orkney, where they spent the winter, and in the spring Olaf returned to Norway. The kingdom was then divided and shared between him and his brother Magnus, whom Harald had left behind to govern in his absence.[17]
Three days after the battle, on 28 September 1066 a second invasion army led by William, Duke of Normandy landed in Pevensey Bay, Sussex, on the south coast of England. King Harold had to immediately turn his troops around and force-march them southwards to intercept the Norman army. Less than three weeks after Stamford Bridge, on 14 October 1066, the English army was heavily defeated and King Harold II fell in action at the Battle of Hastings, beginning the Norman Conquest of England, a process facilitated by the heavy losses amongst the English military commanders.
Monuments

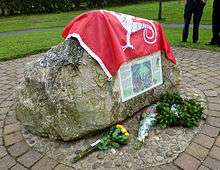
Two monuments to the battle have been erected in and around the village of Stamford Bridge.
Village monument
The first memorial is located in the village on Main Street (A116).[18] The monument's inscription reads (in both English and Norwegian):
THE BATTLE OF STAMFORD BRIDGE
WAS FOUGHT IN THIS NEIGHBOURHOOD
ON SEPTEMBER 25TH, 1066
The inscription on the accompanying marble tablet reads:
THE BATTLE OF STAMFORD BRIDGE
KING HAROLD OF ENGLAND DEFEATED
HIS BROTHER TOSTIG AND KING
HARDRAADA [sic] OF NORWAY HERE ON
25 SEPTEMBER 1066
Battlefield monument
A second monument is located at the battlefield site at the end of Whiterose Drive. This monument consists of a memorial stone and plaque detailing the events and outcome of the battle. The plaque points out that:
This viewpoint overlooks the site of the Battle of Stamford Bridge, fought by King Harold of England against the invading Norse army of Hardrada.
References
- ↑ Michael Swanton, ed. (1998). The Anglo-Saxon Chronicle. New York: Routledge.
- ↑ Snorri Sturluson (1966). Trans. by M. Magnusson and H. Palsson, ed. King Harald's Saga. Penguin Group. p. 139.
- ↑ The Anglo-Saxon Chronicles, ed. and tr. Michael Swanton, 2nd ed. (London 2000), pp. 196–7.
- ↑ Anglo-Saxon Chronicles, pp. 190–7.
- ↑ Anglo-Saxon Chronicles, pp. 196–7.
- ↑ Anglo-Saxon Chronicles, pp. 196–8.
- ↑ H. C. Darby; Maxwell, I. S. (1977). The Domesday Geography of Northern England. Cambridge, UK: Cambridge University Press. p. 176.
- ↑ Michael Swanton, ed. (1998). The Anglo-Saxon Chronicle. New York: Routledge. p. 198.
- ↑ Henry of Huntingdon (1853). Thomas Forester, ed. The Chronicle of Henry of Huntington, The History of England, From the Invasion of Julius Caesar to the Accession of Henry II. London: Henry G. Bohn. p. 209.
- ↑ Michael C. Blundell (2012). "The Battle of Stamford Bridge 1066 A.D.: An Alternative Interpretation.". pp. 3–7.
- ↑ The Anglo-Saxon Chronicles. pp. 197–198.
- ↑ 2.
- ↑ Anglo-Saxon Chronicles, p. 198.
- ↑ Larsen, Karen A History of Norway (New York: Princeton University Press, 1948).
- 1 2 Anglo-Saxon Chronicles, p. 199.
- ↑ Wade, John (1843). British history, chronologically arranged; comprehending a classified analysis of events and occurrences in church and state (2 ed.). Bohn. p. 19.
- ↑ Snorri Sturluson: Heimskringla (J. M. Stenersen & Co, 1899).
- ↑ BATTLE OF STAMFORD BRIDGE, UK National Inventory of War Memorials (www.ukniwm.org.uk), retrieved 4 March 2012
External links
- The Battle of Stamford Bridge by Michael C. Blundell
- Description of battle by Geoff Boxell
- The Battle of Stamford Bridge
- Saga of Harald Hardrade
- The Battle of Stamford Bridge, BBC "In Our Time" 2 June 2011
- Old Norse description of the battle, with translation