Battle of Hastings
Coordinates: 50°54′43″N 0°29′15″E / 50.91194°N 0.48750°E
| ||||||||||||||||||||||||||
 Battle Hastings Eastbourne Rye Newhaven Lewes Crowborough Hailsham Bexhill-on-Sea Heathfield Uckfield Seaford Peacehaven Site of Battle of Hastings in East Sussex | ||||||||||||||||||||||||||
The Battle of Hastings was fought on 14 October 1066 between the Norman-French army of William, the Duke of Normandy, and an English army under the Anglo-Saxon King Harold Godwinson, beginning the Norman conquest of England. It took place approximately 7 miles (11 kilometres) northwest of Hastings, close to the present-day town of Battle, East Sussex, and was a decisive Norman victory.
The background to the battle was the death of the childless King Edward the Confessor in January 1066, which set up a succession struggle between several claimants to his throne. Harold was crowned king shortly after Edward's death, but faced invasions by William, his own brother Tostig and the Norwegian King Harald Hardrada (Harold III of Norway). Hardrada and Tostig defeated a hastily gathered army of Englishmen at the Battle of Fulford on 20 September 1066, and were in turn defeated by Harold at the Battle of Stamford Bridge five days later. The deaths of Tostig and Hardrada at Stamford Bridge left William as Harold's only serious opponent. While Harold and his forces were recovering, William landed his invasion forces in the south of England at Pevensey on 28 September 1066 and established a beachhead for his conquest of the kingdom. Harold was forced to march south swiftly, gathering forces as he went.
The exact numbers present at the battle are unknown; modern estimates are around 10,000 for William and about 7,000 for Harold. The composition of the forces is clearer; the English army was composed almost entirely of infantry and had few archers, whereas only about half of the invading force was infantry, the rest split equally between cavalry and archers. Harold appears to have tried to surprise William, but scouts found his army and reported its arrival to William, who marched from Hastings to the battlefield to confront Harold. The battle lasted from about 9 am to dusk. Early efforts of the invaders to break the English battle lines had little effect; therefore, the Normans adopted the tactic of pretending to flee in panic and then turning on their pursuers. Harold's death, probably near the end of the battle, led to the retreat and defeat of most of his army. After further marching and some skirmishes, William was crowned as king on Christmas Day 1066.
There continued to be rebellions and resistance to William's rule, but Hastings effectively marked the culmination of William's conquest of England. Casualty figures are hard to come by, but some historians estimate that 2,000 invaders died along with about twice that number of Englishmen. William founded a monastery at the site of the battle, the high altar of the abbey church supposedly placed at the spot where Harold died.
Background
In 911, French Carolingian ruler Charles the Simple allowed a group of Vikings to settle in Normandy under their leader Rollo.[1] Their settlement proved successful,[2][lower-alpha 1] and they quickly adapted to the indigenous culture, renouncing paganism, converting to Christianity,[3] and intermarrying with the local population.[4] Over time, the frontiers of the duchy expanded to the west.[5] In 1002, King Æthelred II of England married Emma, the sister of Richard II, Duke of Normandy.[6] Their son Edward the Confessor spent many years in exile in Normandy, and succeeded to the English throne in 1042.[7] This led to the establishment of a powerful Norman interest in English politics, as Edward drew heavily on his former hosts for support, bringing in Norman courtiers, soldiers, and clerics and appointing them to positions of power, particularly in the Church. Edward was childless and embroiled in conflict with the formidable Godwin, Earl of Wessex and his sons, and he may also have encouraged Duke William of Normandy's ambitions for the English throne.[8]
Succession crisis in England
Following King Edward's death on 5 January 1066,[9][lower-alpha 2] the lack of a clear heir led to a disputed succession in which several contenders laid claim to the throne of England.[11] Edward's immediate successor was the Earl of Wessex, Harold Godwinson, the richest and most powerful of the English aristocrats and son of Godwin, Edward's earlier opponent. Harold was elected king by the Witenagemot of England and crowned by Archbishop of York Ealdred, although Norman propaganda claimed that the ceremony was performed by Stigand, the uncanonically elected Archbishop of Canterbury.[11][12] Harold was at once challenged by two powerful neighbouring rulers. Duke William claimed that he had been promised the throne by King Edward and that Harold had sworn agreement to this.[13] Harald III of Norway, commonly known as Harald Hardrada, also contested the succession. His claim to the throne was based on an agreement between his predecessor Magnus I of Norway and the earlier King of England Harthacanute, whereby, if either died without heir, the other would inherit both England and Norway.[14] William and Harald Hardrada immediately set about assembling troops and ships for separate invasions.[15][lower-alpha 3]
Tostig and Hardrada's invasions
In early 1066, Harold's exiled brother Tostig Godwinson raided south-eastern England with a fleet he had recruited in Flanders, later joined by other ships from Orkney. Threatened by Harold's fleet, Tostig moved north and raided in East Anglia and Lincolnshire. He was driven back to his ships by the brothers Edwin, Earl of Mercia, and Morcar, Earl of Northumbria. Deserted by most of his followers, he withdrew to Scotland, where he spent the middle of the year recruiting fresh forces.[21] Hardrada invaded northern England in early September, leading a fleet of more than 300 ships carrying perhaps 15,000 men. Hardrada's army was further augmented by the forces of Tostig, who supported the Norwegian king's bid for the throne. Advancing on York, the Norwegians occupied the city after defeating a northern English army under Edwin and Morcar on 20 September at the Battle of Fulford.[22]
English army and Harold's preparations
The English army was organised along regional lines, with the fyrd, or local levy, serving under a local magnate – whether an earl, bishop, or sheriff.[23] The fyrd was composed of men who owned their own land, and were equipped by their community to fulfil the king's demands for military forces. For every five hides,[24] or units of land nominally capable of supporting one household,[25] one man was supposed to serve.[24] It appears that the hundred was the main organising unit for the fyrd.[26] As a whole, England could furnish about 14,000 men for the fyrd, when it was called out. The fyrd usually served for two months, except in emergencies. It was rare for the whole national fyrd to be called out; between 1046 and 1065 it was only done three times, in 1051, 1052, and 1065.[24] The king also had a group of personal armsmen, known as housecarls, who formed the backbone of the royal forces. Some earls also had their own forces of housecarls. Thegns, the local landowning elites, either fought with the royal housecarls or attached themselves to the forces of an earl or other magnate.[23] The fyrd and the housecarls both fought on foot, with the major difference between them being the housecarl's superior armour. The English army does not appear to have had a significant number of archers.[26]
Harold had spent mid-1066 on the south coast with a large army and fleet waiting for William to invade. The bulk of his forces were militia who needed to harvest their crops, so on 8 September Harold dismissed the militia and the fleet.[27] Learning of the Norwegian invasion he rushed north, gathering forces as he went, and took the Norwegians by surprise, defeating them at the Battle of Stamford Bridge on 25 September. Harald Hardrada and Tostig were killed, and the Norwegians suffered such great losses that only 24 of the original 300 ships were required to carry away the survivors. The English victory came at great cost, as Harold's army was left in a battered and weakened state.[28]
William's preparations and landing
William assembled a large invasion fleet and an army gathered from Normandy and the rest of France, including large contingents from Brittany and Flanders.[30] He spent almost nine months on his preparations, as he had to construct a fleet from nothing.[lower-alpha 4] According to some Norman chronicles, he also secured diplomatic support, although the accuracy of the reports has been a matter of historical debate. The most famous claim is that Pope Alexander II gave a papal banner as a token of support, which only appears in William of Poitiers's account, and not in more contemporary narratives.[33] In April 1066 Halley's Comet appeared in the sky, and was widely reported throughout Europe. Contemporary accounts connected the comet's appearance with the succession crisis in England.[34][lower-alpha 5]
William mustered his forces at Saint-Valery-sur-Somme, and was ready to cross the English Channel by about 12 August.[36] But the crossing was delayed, either because of unfavourable weather or to avoid being intercepted by the powerful English fleet. The Normans crossed to England a few days after Harold's victory over the Norwegians, following the dispersal of Harold's naval force, and landed at Pevensey in Sussex on 28 September.[30][lower-alpha 6][lower-alpha 7] A few ships were blown off course and landed at Romney, where the Normans fought the local fyrd.[32] After landing, William's forces built a wooden castle at Hastings, from which they raided the surrounding area.[30] More fortifications were erected at Pevensey.[51]
Norman forces at Hastings
The exact numbers and composition of William's force are unknown.[31] A contemporary document claims that William had 776 ships, but this may be an inflated figure.[52] Figures given by contemporary writers are highly exaggerated, varying from 14,000 to 150,000.[53] Modern historians have offered a range of estimates for the size of William's forces: 7,000–8,000 men, 1,000–2,000 of them cavalry;[54] 10,000–12,000 men;[53] 10,000 men, 3,000 of them cavalry;[55] or 7500 men.[31] The army consisted of cavalry, infantry, and archers or crossbowmen, with about equal numbers of cavalry and archers and the foot soldiers equal in number to the other two types combined.[56] Later lists of companions of William the Conqueror are extant, but most are padded with extra names; only about 35 named individuals can be reliably identified as having been with William at Hastings.[31][57][lower-alpha 8]
The main armour used was chainmail hauberks, usually knee-length, with slits to allow riding, some with sleeves to the elbows. Some hauberks may have been made of scales attached to a tunic, with the scales made of metal, horn or hardened leather. Headgear was usually a conical metal helmet with a band of metal extending down to protect the nose.[59] Horsemen and infantry carried shields. The infantryman's shield was usually round and made of wood, with reinforcement of metal. Horsemen had changed to a kite-shaped shield and were usually armed with a lance. The couched lance, carried tucked against the body under the right arm, was a relatively new refinement and was probably not used at Hastings; the terrain was unfavourable for long cavalry charges. Both the infantry and cavalry usually fought with a straight sword, long and double-edged. The infantry could also use javelins and long spears.[60] Some of the cavalry may have used a mace instead of a sword. Archers would have used a self bow or a crossbow, and most would not have had armour.[61]
Harold moves south
After defeating his brother Tostig and Harald Hardrada in the north, Harold left much of his forces in the north, including Morcar and Edwin, and marched the rest of his army south to deal with the threatened Norman invasion.[62] It is unclear when Harold learned of William's landing, but it was probably while he was travelling south. Harold stopped in London, and was there for about a week before Hastings, so it is likely that he spent about a week on his march south, averaging about 27 miles (43 kilometres) per day,[63] for the approximately 200 miles (320 kilometres).[64] Harold camped at Caldbec Hill on the night of 13 October, near what was described as a "hoar-apple tree". This location was about 8 miles (13 kilometres) from William's castle at Hastings.[65][lower-alpha 9] Some of the early contemporary French accounts mention an emissary or emissaries sent by Harold to William, which is likely. Nothing came of these efforts.[66]
Although Harold attempted to surprise the Normans, William's scouts reported the English arrival to the duke. The exact events preceding the battle are obscure, with contradictory accounts in the sources, but all agree that William led his army from his castle and advanced towards the enemy.[66] Harold had taken a defensive position at the top of Senlac Hill (present-day Battle, East Sussex), about 6 miles (9.7 kilometres) from William's castle at Hastings.[67]
English forces at Hastings
The exact number of soldiers in Harold's army is unknown. The contemporary records do not give reliable figures; some Norman sources give 400,000 to 1,200,000 men on Harold's side.[lower-alpha 10] The English sources generally give very low figures for Harold's army, perhaps to make the English defeat seem less devastating.[69] Recent historians have suggested figures of between 5,000 and 13,000 for Harold's army at Hastings,[70] and most modern historians argue for a figure of 7,000–8,000 English troops.[26][71] These men would have been a mix of the fyrd and housecarls. Few individual Englishmen are known to have been at Hastings;[31] about 20 named individuals can reasonably be assumed to have fought with Harold at Hastings, including Harold's brothers Gyrth and Leofwine and two other relatives.[58][lower-alpha 11]
The English army consisted entirely of infantry. It is possible that some of the higher class members of the army rode to battle, but when battle was joined they dismounted to fight on foot.[lower-alpha 12] The core of the army was made up of housecarls, full-time professional soldiers. Their armour consisted of a conical helmet, a mail hauberk, and a shield, which might be either kite-shaped or round.[72] Most housecarls fought with the two-handed Danish battleaxe, but they could also carry a sword.[73] The rest of the army was made up of levies from the fyrd, also infantry but more lightly armoured and not professionals. Most of the infantry would have formed part of the shield wall, in which all the men in the front ranks locked their shields together. Behind them would have been axemen and men with javelins as well as archers.[74]
Battle
Background and location
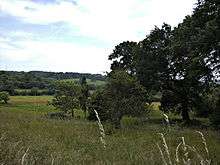
Because many of the primary accounts contradict each other at times, it is impossible to provide a description of the battle that is beyond dispute.[75] The only undisputed facts are that the fighting began at 9 am on Saturday 14 October 1066 and that the battle lasted until dusk.[76] Sunset on the day of the battle was at 4:54 pm, with the battlefield mostly dark by 5:54 pm and in full darkness by 6:24 pm. Moonrise that night was not until 11:12 pm, so once the sun set, there was little light on the battlefield.[77] William of Jumieges reports that Duke William kept his army armed and ready against a surprise night attack for the entire night before.[75] The battle took place 7 miles (11 km) north of Hastings at the present-day town of Battle,[78] between two hills – Caldbec Hill to the north and Telham Hill to the south. The area was heavily wooded, with a marsh nearby.[79] The name traditionally given to the battle is unusual – there were several settlements much closer to the battlefield than Hastings. The Anglo-Saxon Chronicle called it the battle "at the hoary apple tree". Within 40 years, the battle was described by the Anglo-Norman chronicler Orderic Vitalis as "Senlac",[lower-alpha 13] a Norman-French adaptation of the Old English word "Sandlacu", which means "sandy water".[lower-alpha 14] This may have been the name of the stream that crosses the battlefield.[lower-alpha 15] The battle was already being referred to as "bellum Hasestingas" or "Battle of Hastings" by 1087, in the Domesday Book.[83]
Sunrise was at 6:48 am that morning, and reports of the day record that it was unusually bright.[84] The weather conditions are not recorded.[85] The route that the English army took to the battlefield is not known precisely. Several roads are possible: one, an old Roman road that ran from Rochester to Hastings has long been favoured because of a large coin hoard found nearby in 1876. Another possibility is a Roman road between London and Lewes and then over local tracks to the battlefield.[75] Some accounts of the battle indicate that the Normans advanced from Hastings to the battlefield, but the contemporary account of William of Jumieges places the Normans at the site of the battle the night before.[86] Most historians incline towards the former view,[67][84][87][88] but M. K. Lawson argues that William of Jumieges's account is correct.[86]
Dispositions of forces and tactics
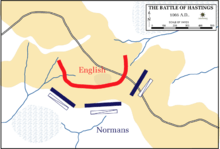
Harold's forces deployed in a small, dense formation at the top of steep slope,[84] with their flanks protected by woods and marshy ground in front of them.[88] The line may have extended far enough to be anchored on a nearby stream.[89] The English formed a shield wall, with the front ranks holding their shields close together or even overlapping to provide protection from attack.[90] Sources differ on the exact site that the English fought on: some sources state the site of the abbey,[91][92][93] but some newer sources suggest it was Caldbec Hill.[89][84]
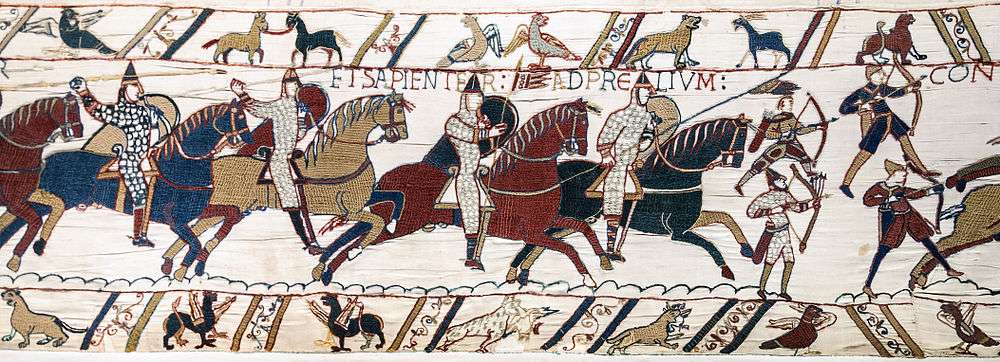
More is known about the Norman deployment.[94] Duke William appears to have arranged his forces in three groups, or "battles", which roughly corresponded to their origins. The left units were the Bretons,[95] along with those from Anjou, Poitou and Maine. This division was led by Alan the Red, a relative of the Breton count.[90] The centre was held by the Normans,[95] under the direct command of the duke and with many of his relatives and kinsmen grouped around the ducal party.[90] The final division on the right consisted of the Frenchmen,[95] along with some men from Picardy, Boulogne, and Flanders. The right was commanded by William fitzOsbern and Count Eustace II of Boulogne.[90] The front lines were archers with a line of foot soldiers armed with spears behind.[95] There were probably a few crossbowmen and slingers in with the archers.[90] The cavalry was held in reserve,[95] and a small group of clergymen and servants situated at the base of Telham Hill was not expected to take part in the fighting.[90]
William's disposition of his forces implies that he planned to open the battle with archers in the front rank weakening the enemy with arrows, followed by infantry who would engage in close combat. The infantry would create openings in the English lines that could be exploited by a cavalry charge to break through the English forces and pursue the fleeing soldiers.[90]
Beginning of the battle
The battle opened with the Norman archers shooting uphill at the English shield wall, to little effect. The uphill angle meant that the arrows either bounced off the shields of the English or overshot their targets and flew over the top of the hill.[95][lower-alpha 16] The lack of English archers hampered the Norman archers, as there were few English arrows to be gathered up and reused.[96] After the attack from the archers, William sent the spearmen forward to attack the English. They were met with a barrage of missiles, not arrows but spears, axes and stones.[95] The infantry was unable to force openings in the shield wall, and the cavalry advanced in support.[96] The cavalry also failed to make headway, and a general retreat began, blamed on the Breton division on William's left.[97] A rumour started that the duke had been killed, which added to the confusion. The English forces began to pursue the fleeing invaders, but William rode through his forces, showing his face and yelling that he was still alive.[98] The duke then led a counter-attack against the pursuing English forces; some of the English rallied on a hillock before being overwhelmed.[97]
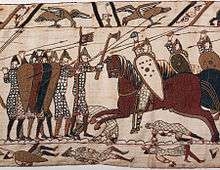
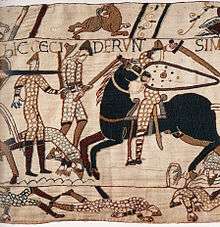
It is not known whether the English pursuit was ordered by Harold or if it was spontaneous. Wace relates that Harold ordered his men to stay in their formations but no other account gives this detail. The Bayeux Tapestry depicts the death of Harold's brothers Gyrth and Leofwine occurring just before the fight around the hillock. This may mean that the two brothers led the pursuit.[99] The Carmen de Hastingae Proelio relates a different story for the death of Gyrth, stating that the duke slew Harold's brother in combat, perhaps thinking that Gyrth was Harold. William of Poitiers states that the bodies of Gyrth and Leofwine were found near Harold's, implying that they died late in the battle. It is possible that if the two brothers died early in the fighting their bodies were taken to Harold, thus accounting for their being found near his body after the battle. The military historian Peter Marren speculates that if Gyrth and Leofwine died early in the battle, that may have influenced Harold to stand and fight to the end.[100]
Feigned flights
A lull probably occurred early in the afternoon, and a break for rest and food would probably have been needed.[99] William may have also needed time to implement a new strategy, which may have been inspired by the English pursuit and subsequent rout by the Normans. If the Normans could send their cavalry against the shield wall and then draw the English into more pursuits, breaks in the English line might form.[101] William of Poitiers says the tactic was used twice. Although arguments have been made that the chroniclers' accounts of this tactic were meant to excuse the flight of the Norman troops from battle, this is unlikely as the earlier flight was not glossed over. It was a tactic used by other Norman armies during the period.[99][lower-alpha 17] Some historians have argued that the story of the use of feigned flight as a deliberate tactic was invented after the battle; most historians agree that it was used by the Normans at Hastings.[102]
Although the feigned flights did not break the lines, they probably thinned out the housecarls in the English shield wall. The housecarls were replaced with members of the fyrd, and the shield wall held.[99] Archers appear to have been used again before and during an assault by the cavalry and infantry led by the duke. Although 12th-century sources state that the archers were ordered to shoot at a high angle to shoot over the front of the shield wall, there is no trace of such an action in the more contemporary accounts.[103] It is not known how many assaults were launched against the English lines, but some sources record various actions by both Normans and Englishmen that took place during the afternoon's fighting.[104] The Carmen claims that Duke William had two horses killed under him during the fighting, but William of Poitiers's account states that it was three.[105]
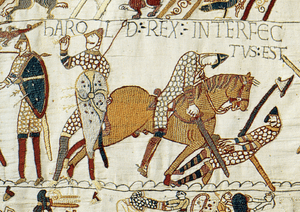
Death of Harold
Harold appears to have died late in the battle, although accounts in the various sources are contradictory. William of Poitiers only mentions his death, without giving any details on how it occurred. The Tapestry is not helpful, as it shows a figure holding an arrow sticking out of his eye next to a falling fighter being hit with a sword. Over both figures is a statement "Here King Harold has been killed".[103] It is not clear which figure is meant to be Harold, or if both are meant.[107][lower-alpha 18] The earliest written mention of the traditional account of Harold dying from an arrow to the eye dates to the 1080s from a history of the Normans written by an Italian monk, Amatus of Montecassino.[108][lower-alpha 19] William of Malmesbury stated that Harold died from an arrow to the eye that went into the brain, and that a knight wounded Harold at the same time. Wace repeats the arrow-to-the-eye account. The Carmen states that Duke William killed Harold, but this is unlikely, as such a feat would have been recorded elsewhere.[103] The account of William of Jumièges is even more unlikely, as it has Harold dying in the morning, during the first fighting. The Chronicle of Battle Abbey states that no one knew who killed Harold, as it happened in the press of battle.[110] A modern biographer of Harold, Ian Walker, states that Harold probably died from an arrow in the eye, although he also says it is possible that Harold was struck down by a Norman knight while mortally wounded in the eye.[111] Another biographer of Harold, Peter Rex, after discussing the various accounts, concludes that it is not possible to declare how Harold died.[109]
Harold's death left the English forces leaderless, and they began to collapse.[101] Many of them fled, but the soldiers of the royal household gathered around Harold's body and fought to the end.[103] The Normans began to pursue the fleeing troops, and except for a rearguard action at a site known as the "Malfosse", the battle was over.[101] Exactly what happened at the Malfosse, or "Evil Ditch", and where it took place, is unclear. It occurred at a small fortification or set of trenches where some Englishmen rallied and seriously wounded Eustace of Boulogne before being defeated by the Normans.[112]
Reasons for the outcome
Harold's defeat was probably due to several circumstances. One was the need to defend against two almost simultaneous invasions. The fact that Harold had dismissed his forces in southern England on 8 September also contributed to the defeat. Many historians fault Harold for hurrying south and not gathering more forces before confronting William at Hastings, although it is not clear that the English forces were insufficient to deal with William's forces.[113] Against these arguments for an exhausted English army, the length of the battle, which lasted an entire day, show that the English forces were not tired by their long march.[114] Tied in with the speed of Harold's advance to Hastings is the possibility Harold may not have trusted Earls Edwin of Mercia and Morcar of Northumbria once their enemy Tostig had been defeated, and declined to bring them and their forces south.[113] Modern historians have pointed out that one reason for Harold's rush to battle was to contain William's depredations and keep him from breaking free of his beachhead.[115]
Most of the blame for the defeat probably lies in the events of the battle.[113] William was the more experienced military leader,[116] and in addition the lack of cavalry on the English side allowed Harold fewer tactical options.[114] Some writers have criticised Harold for not exploiting the opportunity offered by the rumoured death of William early in the battle.[117] The English appear to have erred in not staying strictly on the defensive, for when they pursued the retreating Normans they exposed their flanks to attack. Whether this was due to the inexperience of the English commanders or the indiscipline of the English soldiers is unclear.[116][lower-alpha 20] In the end, Harold's death appears to have been decisive, as it signalled the break-up of the English forces in disarray.[114] The historian David Nicolle said of the battle that William's army "demonstrated – not without difficulty – the superiority of Norman-French mixed cavalry and infantry tactics over the Germanic-Scandinavian infantry traditions of the Anglo-Saxons."[119]
Aftermath
The day after the battle, Harold's body was identified, either by his armour or marks on his body.[lower-alpha 21] His personal standard was presented to William,[120] and later sent to the papacy.[103] The bodies of the English dead, including some of Harold's brothers and housecarls, were left on the battlefield,[121] although some were removed by relatives later.[122] The Norman dead were buried in a large communal grave, which has not been found.[123][lower-alpha 22] Exact casualty figures are unknown. Of the Englishmen known to be at the battle, the number of dead implies that the death rate was about 50 per cent of those engaged, although this may be too high. Of the named Normans who fought at Hastings, one in seven is stated to have died, but these were all noblemen, and it is probable that the death rate among the common soldiers was higher. Although Orderic Vitalis's figures are highly exaggerated,[lower-alpha 23] his ratio of one in four casualties may be accurate. Marren speculates that perhaps 2,000 Normans and 4,000 Englishmen were killed at Hastings.[124] The Normans buried their dead in mass graves. Reports stated that some of the English dead were still being found on the hillside years later. Although scholars thought for a long time that remains would not be recoverable, due to the acidic soil, recent finds have changed this view.[125] One skeleton that was found in a medieval cemetery, and originally was thought to be associated with the 13th century Battle of Lewes now is thought to be associated with Hastings instead.[126][lower-alpha 24]
One story relates that Gytha, Harold's mother, offered the victorious duke the weight of her son's body in gold for its custody, but was refused. William ordered that Harold's body be thrown into the sea, but whether that took place is unclear.[121] Another story relates that Harold was buried at the top of a cliff.[123] Waltham Abbey, which had been founded by Harold, later claimed that his body had been secretly buried there.[121] Other legends claimed that Harold did not die at Hastings, but escaped and became a hermit at Chester.[122]
William expected to receive the submission of the surviving English leaders after his victory, but instead Edgar the Ætheling[lower-alpha 25] was proclaimed king by the Witenagemot, with the support of Earls Edwin and Morcar, Stigand, the Archbishop of Canterbury, and Ealdred, the Archbishop of York.[128] William therefore advanced on London, marching around the coast of Kent. He defeated an English force that attacked him at Southwark but was unable to storm London Bridge, forcing him to reach the capital by a more circuitous route.[129]
William moved up the Thames valley to cross the river at Wallingford, where he received the submission of Stigand. He then travelled north-east along the Chilterns, before advancing towards London from the north-west,[lower-alpha 26] fighting further engagements against forces from the city. The English leaders surrendered to William at Berkhamsted, Hertfordshire. William was acclaimed King of England and crowned by Ealdred on 25 December 1066, in Westminster Abbey.[129]
Despite the submission of the English nobles, resistance continued to erupt for several years.[131] There were rebellions in Exeter in late 1067, an invasion by Harold's sons in mid-1068, and an uprising in Northumbria in 1068.[132] In 1069 William faced more troubles from Northumbrian rebels, an invading Danish fleet, and rebellions in the south and west of England. He ruthlessly put down the various risings, culminating in the Harrying of the North in late 1069 and early 1070 that devastated parts of northern England.[133] A further rebellion in 1070 by Hereward the Wake was also defeated by the king, at Ely.[134]
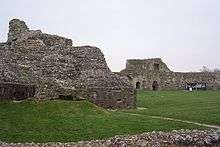
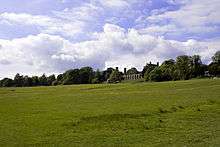
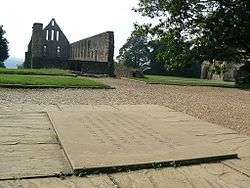
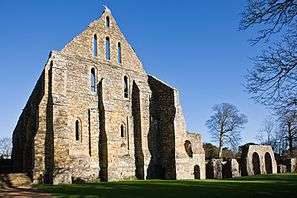
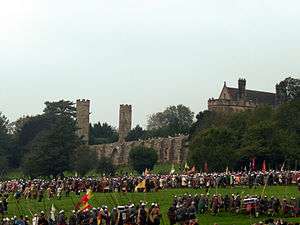
Battle Abbey was founded by William at the site of the battle. According to 12th-century sources, William made a vow to found the abbey, and the high altar of the church was placed at the site where Harold had died.[101] More likely, the foundation was imposed on William by papal legates in 1070.[135] The topography of the battlefield has been altered by subsequent construction work for the abbey, and the slope defended by the English is now much less steep than it was at the time of the battle; the top of the ridge has also been built up and levelled.[78] After the Dissolution of the Monasteries, the abbey's lands passed to secular landowners, who used it as a residence or country house.[136] In 1976 the estate was put up for sale and purchased by the government with the aid of some American donors who wished to honour the 200th anniversary of American independence.[137] The battlefield and abbey grounds are currently owned and administered by English Heritage and are open to the public.[138] The Bayeux Tapestry is an embroidered narrative of the events leading up to Hastings probably commissioned by Odo of Bayeux soon after the battle, perhaps to hang at the bishop's palace at Bayeux.[139][lower-alpha 27] In modern times annual reenactments of the Battle of Hastings have drawn thousands of participants and spectators to the site of the original battle.[141][142]
Notes
- ↑ The Vikings in the region became known as the "Northmen," from which "Normandy" and "Normans" are derived.[2]
- ↑ There is some slight confusion in the original sources about the exact date; it was most likely 5 January, but a few contemporaneous sources give 4 January.[10]
- ↑ Other contenders later came to the fore. The first was Edgar Ætheling, Edward the Confessor's great nephew who was a patrilineal descendant of King Edmund Ironside. He was the son of Edward the Exile, son of Edmund Ironside, and was born in Hungary where his father had fled after the conquest of England by Cnut. After his family's eventual return to England and his father's death in 1057,[16] Edgar had by far the strongest hereditary claim to the throne, but he was only about thirteen or fourteen at the time of Edward the Confessor's death, and with little family to support him, his claim was passed over by the Witan.[17] Another contender was Sweyn II of Denmark, who had a claim to the throne as the grandson of Sweyn Forkbeard and nephew of Cnut,[18] but he did not make his bid for the throne until 1069.[19] Tostig Godwinson's attacks in early 1066 may have been the beginning of a bid for the throne, but threw in his lot with Harald Hardrada after defeat at the hands of Edwin and Morcar and the desertion of most of his followers he.[20]
- ↑ The surviving ship list gives 776 ships, contributed by 14 different Norman nobles.[31] This list does not include William's flagship, the Mora, given to him by his wife, Matilda of Flanders. The Mora is depicted on the Bayeux Tapestry with a lion figurehead.[32]
- ↑ The comet's appearance was depicted on the Bayeux Tapestry, where it is connected with Harold's coronation, although the appearance of the comet was later, from 24 April to 1 May 1066. The image on the tapestry is the earliest pictorial depiction of Halley's Comet to survive.[35]
- ↑ Most modern historians agree on this date,[37][38][39][40][41][42] although a few contemporary sources have William landing on 29 September.[43]
- ↑ Most contemporary accounts have William landing at Pevensey, with only the E version of the Anglo-Saxon Chronicle giving the landing as taking place at Hastings.[43] Most modern accounts also state that William's forces landed at Pevensey.[32][38][39][40][41][44][45][46][47][48][49][50]
- ↑ Of those 35, 5 are known to have died in the battle: Robert of Vitot, Engenulf of Laigle, Robert fitzErneis, Roger son of Turold, and Taillefer.[58]
- ↑ "Hoar" means grey, and probably refers to a crab-apple tree covered with lichen that was likely a local landmark.[65]
- ↑ The 400,000 figure is given in Wace's Romance de Rou and the 1,200,000 figure coming from the Carmen de Hastingae Proelio.[68]
- ↑ Of these named persons, eight died in the battle – Harold, Gyrth, Leofwine, Godric the sheriff, Thurkill of Berkshire, Breme, and someone known only as "son of Helloc".[58]
- ↑ Some historians have argued, based on comments by Snorri Sturlson made in the 13th century, that the English army did occasionally fight as cavalry. Contemporary accounts, such as in the Anglo-Saxon Chronicle record that when English soldiers were forced to fight on horseback, they were usually routed, as in 1055 near Hereford.[72]
- ↑ This was the name popularised by Edward Freeman,[80] a Victorian historian who wrote one of the definitive accounts of the battle.[81]
- ↑ "Sandlacu" can be rendered into Modern English as "sandlake".[80]
- ↑ Freeman suggested that "Senlac" meant "sand lake" in Old English with the Norman conquerors calling it (in French) "sanguelac". Freeman regarded this use as a pun because the English translation of "sanguelac" is "blood lake".[82]
- ↑ There is a story that the first fighting at Hastings was between a jongleur named Taillefer and some of the English fighters which comes from three sources: the Carmen de Hastingae Proelio, Wace's Romance de Rou, and the 12th-century account of Henry of Huntingdon.[90] The story has two versions, in one of which Taillefer entertained the Norman army prior to the battle by juggling a sword but then killed an English soldier sent to kill him. Another version has the jongleur charging the English and killing two before dying himself.[85]
- ↑ Examples of the use of feigned flight include the Battle of Arques around 1052, the Battle of Messina in 1060, and the Battle of Cassel in 1071.[99]
- ↑ The issue is furthered confused by the fact that there is evidence that the 19th century restoration of the Tapestry changed the scene by inserting or changing the placement of the arrow through the eye.[107]
- ↑ Amatus' account is less than trustworthy because it also states that Duke William commanded 100,000 soldiers at Hastings.[109]
- ↑ Modern wargaming has demonstrated the correctness of not pursuing the fleeing Normans,[115] with the historian Christopher Gravett stating that if in a wargame he allowed Harold to pursue the Normans, his opponent "promptly, and rightly, punished such rashness with a brisk counter-attack with proved to be the turning point of the battle — just as in 1066".[118]
- ↑ A 12th-century tradition stated that Harold's face could not be recognised and Edith the Fair, Harold's common-law wife, was brought to the battlefield to identify his body from marks that only she knew.[112]
- ↑ It is possible the grave site was located where the abbey now stands.[123]
- ↑ He states that there were 15,000 casualties out of 60,000 who fought on William's side at the battle.[124]
- ↑ This skeleton, numbered 180, sustained six fatal sword cuts to the back of the skull and was one of five skeletons that had suffered violent trauma. Analysis continues on the other remains to try and build up a more accurate picture of who the individuals are.[125]
- ↑ Ætheling is the Anglo-Saxon term for a royal prince with some claim to the throne.[127]
- ↑ William appears to have taken this route to meet up with reinforcements that had landed by Portsmouth and met him between London and Winchester. By swinging around to the north, William cut off London from reinforcements.[130]
- ↑ The first recorded mention of the tapestry is from 1476, but it is similar in style to late Anglo-Saxon manuscript illustrations and may have been composed and executed in England.[139] The Tapestry now is displayed at the former Bishop's Palace at Bayeux in France.[140]
Citations
- ↑ Bates Normandy Before 1066 pp. 8–10
- 1 2 Crouch Normans pp. 15–16
- ↑ Bates Normandy Before 1066 p. 12
- ↑ Bates Normandy Before 1066 pp. 20–21
- ↑ Hallam and Everard Capetian France p. 53
- ↑ Williams Æthelred the Unready p. 54
- ↑ Huscroft Ruling England p. 3
- ↑ Stafford Unification and Conquest pp. 86–99
- ↑ Fryde, et al. Handbook of British Chronology p. 29
- ↑ Barlow Edward the Confessor p. 250 and footnote 1
- 1 2 Higham Death of Anglo-Saxon England pp. 167–181
- ↑ Walker Harold pp. 136–138
- ↑ Bates William the Conqueror pp. 73–77
- ↑ Higham Death of Anglo-Saxon England pp. 188–190
- ↑ Huscroft Ruling England pp. 12–14
- ↑ Huscroft Norman Conquest pp. 96–97
- ↑ Huscroft Norman Conquest pp. 132–133
- ↑ Stafford Unification and Conquest pp. 86–87
- ↑ Bates William the Conqueror pp. 103–104
- ↑ Thomas Norman Conquest pp. 33–34
- ↑ Walker Harold pp. 144–145
- ↑ Walker Harold pp. 154–158
- 1 2 Nicolle Medieval Warfare Sourcebook pp. 69–71
- 1 2 3 Marren 1066 pp. 55–57
- ↑ Coredon Dictionary of Medieval Terms and Phrases p. 154
- 1 2 3 Gravett Hastings pp. 28–34
- ↑ Walker Harold pp. 144–150
- ↑ Walker Harold pp. 158–165
- ↑ Pettifer English Castles pp. 252–253
- 1 2 3 Bates William the Conqueror pp. 79–89
- 1 2 3 4 5 Gravett Hastings pp. 20–21
- 1 2 3 Marren 1066 pp. 91–92
- ↑ Huscroft Norman Conquest pp. 120–122
- ↑ Douglas William the Conqueror p. 181 and footnote 1
- ↑ Musset Bayeux Tapestry p. 176
- ↑ Douglas William the Conqueror p. 192
- ↑ Gravett Hastings p. 50
- 1 2 Huscroft Norman Conquest p. 123
- 1 2 Barlow Feudal Kingdom p. 81
- 1 2 Stenton Anglo-Saxon England p. 591
- 1 2 Thomas Norman Conquest p. 35
- ↑ Douglas William the Conqueror p. 195
- 1 2 Lawson Battle of Hastings p. 176
- ↑ Bennett Campaigns of the Norman Conquest p. 37
- ↑ Gravett Hastings pp. 47–49
- ↑ Huscroft Ruling England p. 15
- ↑ Stafford Unification and Conquest p. 100
- ↑ Bates William the Conqueror p. 86
- ↑ Walker Harold p. 166
- ↑ Rex Harold II p. 221
- ↑ Lawson Battle of Hastings p. 179
- ↑ Bennett Campaigns of the Norman Conquest p. 25
- 1 2 Lawson Hastings pp. 163–164
- ↑ Bennett Campaigns of the Norman Conquest p. 26
- ↑ Marren 1066 pp. 89–90
- ↑ Gravett Hastings p. 27
- ↑ Marren 1066 pp. 108–109
- 1 2 3 Marren 1066 pp. 107–108
- ↑ Gravett Hastings pp. 15–19
- ↑ Gravett Hastings p. 22
- ↑ Gravett Hastings pp. 24–25
- ↑ Carpenter Struggle for Mastery p. 72
- ↑ Marren 1066 p. 93
- ↑ Huscroft Norman Conquest p. 124
- 1 2 Marren 1066 pp. 94–95
- 1 2 Lawson Battle of Hastings pp. 180–182
- 1 2 Marren 1066 pp. 99–100
- ↑ Lawson Battle of Hastings p. 128 footnote 32
- ↑ Lawson Battle of Hastings p. 128 and footnote 32
- ↑ Lawson Battle of Hastings pp. 130–133
- ↑ Marren 1066 p. 105
- 1 2 Gravett Hastings pp. 29–31
- ↑ Marren 1066 p. 52
- ↑ Bennett, et al. Fighting Techniques pp. 21–22
- 1 2 3 Lawson Battle of Hastings pp. 183–184
- ↑ Marren 1066 p. 114
- ↑ Lawson Battle of Hastings pp. 212–213
- 1 2 Gravett Hastings p. 91
- ↑ Marren 1066 p. 101
- 1 2 Lawson Battle of Hastings p. 57
- ↑ Lawson Battle of Hastings p. 129
- ↑ Freeman History of the Norman Conquest pp. 743-751
- ↑ Marren 1066 p. 157
- 1 2 3 4 Gravett Hastings p. 59
- 1 2 Marren 1066 p. 116
- 1 2 Lawson Battle of Hastings pp. 186–187
- ↑ Huscroft Norman Conquest pp. 125–126
- 1 2 Bennett Campaigns of the Norman Conquest p. 40
- 1 2 Lawson Battle of Hastings pp. 190–191
- 1 2 3 4 5 6 7 8 Gravett Hastings p. 64
- ↑ Hare Battle Abbey p.11
- ↑ English Heritage Research on Battle Abbey and Battlefield
- ↑ Battlefields Trust Battle of Hastings
- ↑ Lawson Battle of Hastings p. 192
- 1 2 3 4 5 6 7 Bennett Campaigns of the Norman Conquest p. 41
- 1 2 Gravett Hastings pp. 65–67
- 1 2 Bennett Campaigns of the Norman Conquest p. 42
- ↑ Gravett Hastings p. 68
- 1 2 3 4 5 Gravett Hastings pp. 72–73
- ↑ Marren 1066 pp. 127–128
- 1 2 3 4 Bennett Campaigns of the Norman Conquest p. 43
- ↑ Marren 1066 p. 130
- 1 2 3 4 5 Gravett Hastings pp. 76–78
- ↑ Marren 1066 pp. 131–133
- ↑ Marren 1066 p. 135
- ↑ Gravett Hastings p. 79
- 1 2 Lawson Battle of Hastings pp. 207–210
- ↑ Marren 1066 p. 138
- 1 2 Rex Harold II pp. 256–263
- ↑ Marren 1066 p. 137
- ↑ Walker Harold pp. 179–180
- 1 2 Gravett Hastings p. 80
- 1 2 3 Lawson Battle of Hastings pp. 217–218
- 1 2 3 Huscroft Norman Conquest p. 130
- 1 2 Marren 1066 p. 152
- 1 2 Lawson Battle of Hastings pp. 219–220
- ↑ Walker Harold pp. 180–181
- ↑ Quoted in Marren 1066 p. 152
- ↑ Nicolle Normans p. 20
- ↑ Rex Harold II p. 253
- 1 2 3 Huscroft Norman Conquest p. 131
- 1 2 Gravett Hastings p. 81
- 1 2 3 Marren 1066 p. 146
- 1 2 Marren 1066 pp. 147–149
- 1 2 Livesay "Skeleton 180 Shock Dating Result" Sussex Past and Present p. 6
- ↑ Barber "Medieval Hospital of St Nicholas" Sussex Archaeological Collections pp. 79-109
- ↑ Bennett Campaigns of the Norman Conquest p. 91
- ↑ Douglas William the Conqueror pp. 204–205
- 1 2 Douglas William the Conqueror pp. 205–206
- ↑ Bennett Campaigns of the Norman Conquest p. 45
- ↑ Douglas William the Conqueror p. 212
- ↑ Bennett Campaigns of the Norman Conquest pp. 49–50
- ↑ Bennett Campaigns of the Norman Conquest pp. 51–53
- ↑ Bennett Campaigns of the Norman Conquest pp. 57–60
- ↑ Coad Battle Abbey and Battlefield p. 32
- ↑ Coad Battle Abbey and Battlefield pp. 42–46
- ↑ Coad Battle Abbey and Battlefield p. 48
- ↑ Marren 1066 p. 165
- 1 2 Coad Battle Abbey and Battlefield p. 31
- ↑ Gravett Hastings p. 99
- ↑ "Normans fight Saxons... and the rain". BBC News. Retrieved 22 August 2013.
- ↑ "King Harold and William square up". BBC News. Retrieved 22 August 2013.
References
- Barber, Luke, ed. (2010). "The Medieval Hospital of St Nicholas, East Sussex: Excavations 1994". Sussex Archaeological Collections. 148: 79–110.
- Barlow, Frank (1970). Edward the Confessor. Berkeley, CA: University of California Press. ISBN 0-520-01671-8.
- Barlow, Frank (1988). The Feudal Kingdom of England 1042–1216 (Fourth ed.). New York: Longman. ISBN 0-582-49504-0.
- Bates, David (1982). Normandy Before 1066. London: Longman. ISBN 0-582-48492-8.
- Bates, David (2001). William the Conqueror. Stroud, UK: Tempus. ISBN 0-7524-1980-3.
- Battlefields Trust. "Battle of Hastings: 14 October 1066". UK Battlefields Resource Centre. Retrieved 5 October 2016.
- Bennett, Matthew (2001). Campaigns of the Norman Conquest. Essential Histories. Oxford, UK: Osprey. ISBN 978-1-84176-228-9.
- Bennett, Matthew; Bradbury, Jim; DeVries, Kelly; Dickie, Iain; Jestice, Phyllis (2006). Fighting Techniques of the Medieval World AD 500–AD 1500: Equipment, Combat Skills and Tactics. New York: St Martin's Press. ISBN 978-0-312-34820-5.
- Carpenter, David (2004). The Struggle for Mastery: The Penguin History of Britain 1066–1284. New York: Penguin. ISBN 0-14-014824-8.
- Coad, Jonathan (2007). Battle Abbey and Battlefield. English Heritage Guidebooks. London: English Heritage. ISBN 978-1-905624-20-1.
- Coredon, Christopher (2007). A Dictionary of Medieval Terms & Phrases (Reprint ed.). Woodbridge, UK: D. S. Brewer. ISBN 978-1-84384-138-8.
- Crouch, David (2007). The Normans: The History of a Dynasty. London: Hambledon & London. ISBN 1-85285-595-9.
- Douglas, David C. (1964). William the Conqueror: The Norman Impact Upon England. Berkeley, CA: University of California Press. OCLC 399137.
- English Heritage. "Research on Battle Abbey and Battlefield". Retrieved 5 October 2016.
- Freeman, Edward A. (1869). The History of the Norman Conquest of England: Its Causes and Results. III. Oxford, UK: Clarendon Press. OCLC 186846557.
- Fryde, E. B.; Greenway, D. E.; Porter, S.; Roy, I. (1996). Handbook of British Chronology (Third revised ed.). Cambridge, UK: Cambridge University Press. ISBN 0-521-56350-X.
- Gravett, Christopher (1992). Hastings 1066: The Fall of Saxon England. Campaign. 13. Oxford, UK: Osprey. ISBN 1-84176-133-8.
- Hallam, Elizabeth M.; Everard, Judith (2001). Capetian France 987–1328 (Second ed.). New York: Longman. ISBN 0-582-40428-2.
- Hare, J. N. (1984). Battle Abbey: The Eastern Range and the Excavations of 1978-80. London: English Heritage. p. 11. ISBN 9781848021341. Retrieved 1 October 2016 – via Archaeology Data Service.
- Higham, Nick (2000). The Death of Anglo-Saxon England. Stroud, UK: Sutton. ISBN 0-7509-2469-1.
- Huscroft, Richard (2009). The Norman Conquest: A New Introduction. New York: Longman. ISBN 1-4058-1155-2.
- Huscroft, Richard (2005). Ruling England 1042–1217. London: Pearson/Longman. ISBN 0-582-84882-2.
- Lawson, M. K. (2002). The Battle of Hastings: 1066. Stroud, UK: Tempus. ISBN 0-7524-1998-6.
- Marren, Peter (2004). 1066: The Battles of York, Stamford Bridge & Hastings. Battleground Britain. Barnsley, UK: Leo Cooper. ISBN 0-85052-953-0.
- Livesay, Edwina (2014). "Skeleton 180 Shock Dating Result". Sussex Past and Present. 133: 6.
- Musset, Lucien; Rex, Richard (translator) (2005). The Bayeux Tapestry (New ed.). Woodbridge, UK: Boydell Press. ISBN 1-84383-163-5.
- Nicolle, David (1999). Medieval Warfare Source Book: Warfare in Western Christendom. Dubai: Brockhampton Press. ISBN 1-86019-889-9.
- Nicolle, David (1987). The Normans. Oxford, UK: Osprey. ISBN 1-85532-944-1.
- Rex, Peter (2005). Harold II: The Doomed Saxon King. Stroud, UK: Tempus. ISBN 978-0-7394-7185-2.
- Stafford, Pauline (1989). Unification and Conquest: A Political and Social History of England in the Tenth and Eleventh Centuries. London: Edward Arnold. ISBN 0-7131-6532-4.
- Stenton, F. M. (1971). Anglo-Saxon England (Third ed.). Oxford, UK: Oxford University Press. ISBN 978-0-19-280139-5.
- Thomas, Hugh (2007). The Norman Conquest: England after William the Conqueror. Critical Issues in History. Lanham, MD: Rowman & Littlefield Publishers, Inc. ISBN 0-7425-3840-0.
- Walker, Ian (2000). Harold the Last Anglo-Saxon King. Gloucestershire, UK: Wrens Park. ISBN 0-905778-46-4.
- Williams, Ann (2003). Æthelred the Unready: The Ill-Counselled King. London: Hambledon & London. ISBN 1-85285-382-4.
External links
- Official English Heritage site
- Origins of the conflict, the battle itself and its aftermath BBC History website